Friday, June 22, 2012

Garden Party - Worm Composting

We have new pets!


This was the hands-on activity at the end of my composting class.  Inside are dozens of red wrigglers, happily munching on a couple of banana peels and some leftover tea bags.

Worm composting is not only great for the environment by helping to limit the amount of trash we send to the dump, but the castings (aka worm poop) are PHENOMENAL fertilizer for your garden.  And, BONUS - keeping a worm bin is also a great educational activity for your kids!

So how do you make a bin?  My bin is a plastic storage container, 15" long by 12" wide by 9" deep.  You can see the holes in the lid - three rows, roughly equally spaced 1/4" holes that were drilled.  There's also one row around the top edge of the container itself.  About 5 holes per long side and 3 on the short sides.  No holes on the bottom.

There are loads of other worm bin designs online, along with other information about how to start them, etc.

Mine was started with about 1/3 of the container filled with moist shredded newspaper.  Moist like a damp, wrung out sponge.  If you squeeze it, only a drop or two of water should come out.  On top of the moist paper, my worms were added with some of their "native" soil.  More shredded moistened newspaper on top of that, then a solid layer of moistened newspaper.

We are on week 2 of this grand experiment.  I brought them home on a Saturday, and last Saturday, I added a couple of peels from bananas that had gone bad.  I've also added a few tea bags throughout this week.

If you'd like to try this experiment at home along with us, here are some really great links:

Hope you'll join us!

Thursday, June 21, 2012

Garden Party - Organic Weed Control

Yes, there were a few weeds in yesterday's photos, but here's how you can zap'em without harsh chemicals.

Let's take a quick moment to discuss the scientific method.  First, you see a problem or ask a question. Next, you want a solution or an answer.  Then, you figure out a way to test out an idea you have that will solve/answer the problem/question.  And then, you test it.

I have a perfect example of this scenario for you today.  Recently, in a composting class I was taking, one of the members of the class mentioned using vinegar as a weed killer.  Now, despite my best efforts and cultural practices, weeds still find their way into my garden.  It happens.  Usually, I can pull them when they are small, but if I've been lazy or they are the mean-nasty-thorny weeds, it's a bit more complicated.  The vinegar idea really appealed to me.

I did some online looking, and found several articles about using vinegar.  Some used plain household vinegar, some used horticultural vinegar.  This article with Grandma's Recipe for Weed Killer really was the best.  The author did his own testing with various variations on the formulas that may have been handed down through the generations.

Based on this information, I prepared my own experiment in my own garden, and here are the results:

These grasses grow in between our garden beds.  In spite of weed blocking fabric and mulching.  They need to go!  The test group was sprayed with undiluted regular white distilled table vinegar.  You know the stuff you buy at the grocery store.  I used Great Value brand from WalMart.  It costs about $2/gallon.  I applied it with one of those little spray bottles you can get in the beauty section - the ones that cost about a buck.  I sprayed on a day that I knew it would be scorching hot and that we wouldn't see any chance of rain.  That morning, I filled my little bottle with vinegar and sprayed the holy heck out of the test patch.  The photo shows results after 24 hours.  I'd say they're pretty well dead.  Now, they'll be easy to hand pull and throw in the compost pile.

So what about those meany-nasty-thorny weeds, the ones with the deep tap root?
This is one instance where our drought has worked in our favor - even the weeds are really thirsty!

Using information from the chart in the article mentioned above, I made a larger quantity of weed killer (we have some other big nasties hanging around in other areas of our landscape).  I used about 1/2 of a 1 gallon jug of the vinegar, and added 1 cup of kosher salt.  It's what I had on hand.  You can try other table salt if that's what you have.  I gave the jug a good shake, keeping my thumb on the lid.  Then, I filled my little spray bottle again.  For each weed, I sprayed about half the bottle on the leaves and poured the remainder straight onto the spot where the stem meets the soil.  Again, hot scorching day with no rain.

And this is what the weed looks like now:
You're not so big and tough now, are ya' pal?! Gardener-1 Weed-0.

Just a little FYI here:  I did test some of the other formulas in the chart, but these two worked the best for me.  Feel free to try the other formulas in your yard.  Find what works best for you.


Also, be sure to only spray the weeds.  The vinegar will do the same thing to plants you want to keep.  That's the benefit of using the smaller spray bottle - it will make it easier to apply the solution only where you want it to go.


So get your mad scientist hat on, laugh your best wicked laugh, and go kill your weeds!


Bwa-ha-ha-ha-ha!

Garden Party - Companion Planting

Remember WAAAAAY back when, in the post about planning your garden?

I'm sure you'll remember the diagrams with the fun colored dots.  Well, this is what they look like in my garden...


And here's another one:

You'll notice I don't have any photos from the tomato/marigold/basil/pepper diagram. We have had such record heat here, coupled with amazing drought conditions that none of the seeds I planted for these plants grew. Not one. Not even the marigolds! I have even resorted to watering our beds with a lawn sprinkler. It's a set-it-and-forget-it kind of thing. The sprinkler can water for a half-hour while I do something else semi-productive in the air conditioning or take 4LPA for a walk. But still no plants...

The good news is that we have no Japanese beetles in the garden gnoshing on my potatoes or anything else. None. The geraniums are doing their job. Also, we have minimal cabbage leaf looper damage on the kale. Way to go, zinnias!

So, yes, companion planting really does work. It's a cheaper, prettier alternative to nasty chemical bug sprays.

Now if we could just get some rain...

Tuesday, June 19, 2012

What's Shakin' Bacon?

Just a quickie update about what's shakin' here at the Suburban Prairie Home...


It's Fair Season!  Yay!  That exciting time of year when you convince yourself that you can crochet, knit, and sew simultaneously for 47 hours every day and turn out blue-ribbon worthy projects by the truckload!

Well, maybe not quite that extreme, but things do tend to kick into high gear around here from a crafting perspective.  Princess and I are both entering quite a few projects, and while she had the foresight to get started last fall, I still had a lot on my plate that I was wrapping up before I started my class.

Now that class is done, and the garden is in, and growing, and weeded...

I've had time to start sitting down with my crochet hook.  I made sure to buy my yarn on sale with my teacher's discount, and now it's time to get stuff used up and moved out.  The first project I've got is an afghan.  It's a patriotic afghan, and so far I've got one square done (out of 24), the second one almost done and ready to join.  I'm learning a new technique with this one - join as you go.  I'll be sure to take photos and share how to do this with you.

I'll also be posting how my other projects are coming along.  Because you know that you can't just stop with one.

Also, keep an eye on the Chicago weather.  If you see that we're above 90 degrees, we use a certain set of rules to save energy.  The main rule is no electronic media between 6 am and 6 pm, especially those items with video monitors, like the TV and the computer.  We've found that the temperature in a room where these two particular items are running can be as much as 10-15 degrees warmer.  I don't want to pay for the extra electricity to keep us cooler when we are adding the heat.  Another rule:  no baking or cooking, unless we use the toaster oven or crock pot outside on the front porch.  Maybe the grill if Hubby's in the mood.

Today is one of those days - 97 degrees in the city, which means we could easily top the century mark out here.

So what does that mean?  Well, if you don't see me post for a few days, don't be surprised or alarmed.  Just know that it's uber hot here.  Like today and the next few days.  Also, new recipes will be few and far between for a while.  I'll try to be here when I can, with photos, updates, etc.

I'm off to finish up some cleaning before it gets too hot, then I'll be grabbing my hook and my camera.  Until next time!

Wednesday, June 13, 2012

Gluten Free Glazed Lemon Bread Recipe

A light and luscious treat for breakfast or anytime!


This is a great recipe for a loaf.  Or muffins.  Or mini-muffins or mini-loaves.

SPH Glazed Lemon Bread
Inspired by a recipe by Marjorie Rose
as seen in Taste of Home magazine

1/2 cup butter, softened
1 cup sugar
2 eggs
1 tablespoon lemon extract
1 tablespoon grated lemon zest, optional
1 1/2 cups Gluten Free Bisquick (brand)
1/2 cup sour cream
4 tablespoons Betty Crocker Rich & Creamy vanilla frosting
2 tablespoons milk, water, or lemon juice (more if needed to make it thin enough)
1 tablespoon lemon extract (use if not using lemon juice)

Preheat oven to 350, and grease a 9" x 5" loaf pan.  In a large mixing bowl, cream together butter and sugar.  Beat in eggs, one at a time, then add lemon extract.  This would also be a good time to add the lemon zest if you are using it.  Alternately add Bisquick and sour cream, ending with Bisquick, stirring until well combined each time.  Pour into loaf pan, and bake for about an hour.  Check with a bamboo skewer or knife inserted in center, and if your tester comes out clean, your loaf is done.

Allow to cool for about 15 minutes.  Meanwhile, whisk together frosting, liquid of choice and lemon extract (if using).  While loaf is still warm, drizzle top with glaze.  Spread with a knife if necessary.  Allow loaf to cool completely, and slice and serve.

Some other options?  Use orange extract instead of lemon.  Instead of a thinned glaze, eliminate the liquid from the glaze altogether, and let the heat of the loaf melt the flavored frosting.  Want your loaf yellower (or oranger)?  Add a few drops of food color.  Make a strawberry lemonade loaf by glazing with melted strawberry jelly.

This would be lovely to bring to a summer brunch, to small group/Bible study, or to a new neighbor.  Or take a loaf to someone who is new to the whole gluten free world as a little encouragement.

Enjoy!

One Yard Wednesday - Patriotic Hoop Art

Some scraps, a hoop and a little paint - let's rock!


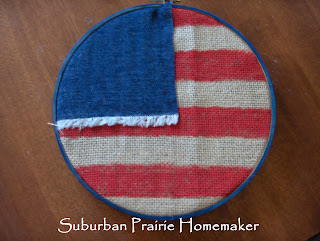
Made entirely from scraps in my stash, some acrylic paint, and a spare hoop.  I love the folk art vibe, and especially that it was super simple and basically FREE!

What you'll need:

  • Red, white and blue acrylic paints - use the bottles that are on sale for less than $1, or what you have on hand.
  • Wooden embroidery hoop - I used one I had on hand that fit the scrap of burlap I had in my stash.  Use whatever size works best for you.
  • Burlap
  • Scrap piece of denim
  • Craft glue
  • Sponge brush - I use the little 1" ones you can get 20/$1 because they come with a wonderful chisel edge and they are CHEAP!
  • Newspaper and wax paper to protect your work surface


Start by painting the outside ring of the hoop navy blue.  Be sure to get the front edge as well as the side.  That chisel tip really comes in handy here.  Some hoops have a light finish on them.  Feel free to sand this off if you want more of a painted look.  I wanted mine to look like blue stain, so I only did one light coat of the navy blue paint right over the top of the finish.  I think it looks more vintage.  Rinse your brush THOROUGHLY for the next step.

While the hoop is drying, cut a circle of burlap to go into the hoop.  This circle should be a couple inches larger than the size of your hoop to allow for being pulled tight in the hoop when you frame it.  Make red stripes by using your brush as a guide.  Start by making one red horizontal stripe at the top, roughly the width of your brush.  To make the "white" stripe, use the width of your brush as a guide, and mark the top line of the next stripe.  It looks something like this:

Then, go across, following this line, making a stripe that is one brush-width wide.  Clean up your edges as needed.  They don't have to be perfect, but you don't want your stripes to be too wonky.

Repeat these two steps all the way down the circle.  Again, rinse that brush THOROUGHLY.  Now it's time to add the blue to Old Glory.

Use a scrap of denim and cut a quarter circle the same size as 1/4 of your burlap circle.  Apply some craft glue on the back of the denim, and place it in the upper left corner of your circle.  Be sure to attach the edges firmly.  If your denim has some fringe action like mine, don't let the fringe get caught in the glue.  Allow the glue to dry.


So our flag tribute wouldn't be complete without a star.  I drew a rough outline with a disappearing ink fabric marker, but if you feel really brave and artistic, you can just freehand it.  Make one star or a bunch - up to you.  The chisel point of the sponge brush really helps make crisp edges and sharp points.  Allow your paint to dry, and trim all the fabric from around the back edge of the frame.  Try to get as close to the hoop as possible, and display proudly!

Make a big one.  Make a bunch of small ones.  String them together to make a banner.  Tie some patriotic ribbon around the top to make a bow.  Don't have denim or burlap?  Use scraps you have on hand.  For example, you could use muslin, or old cream/white sheets to make the back ground.  Maybe a blue with tiny dots for the blue field instead of blue with a white star.

Have fun!


Monday, June 11, 2012

Everyday Science and Bird Watching


As a homeschooler, I love what I call “Everyday Science”.  It’s the science that’s all around us, all the time...
**THIS IS A COMPENSATED POST***
***ALL IDEAS EXPRESSED ARE COMPLETELY MY OWN**

One of my favorite “Everyday Sciences” is bird study.  We live in an area that is semi-wooded, with mature trees, so we see lots of different birds all year round.  Our first foray into this wonderful world of winged creatures was simply learning to identify the birds that we would see in our trees, or on our walks around our town.  We have since graduated on to looking at migration and habitat maps, and also keeping track of who’s here when.

Speaking of keeping track, a cherished activity that is under this umbrella is participating in the Great Backyard Bird Count through the Audubon Society and The Cornell Lab of Ornithology.  Simply set up a bird feeder in your backyard, or on your deck or balcony, then identify who visits and how many friends they bring with them.  What a great math activity, too!

What’s that?  You don’t have a bird feeder?!

Backyard Chirper is an excellent resource for you.  They have a huge selection of bird feeding products, and also bird baths, bird houses, and other fun gardening accessories.

One of the greatest parts of the website is their learning center.  Maybe you’ve never bird watched a day in your life.  I didn’t before we lived in this house.  Now you’d like to share in the joy of learning with your children.  The resources here are just so helpful!  You can learn how to attract many different bird species, the importance of bird baths, and also about butterfly gardens.  Backyard Chirper also carries DVD’s and CD’s as well as birding guidebooks.

Whether you need help with a purchase, have questions about an order, or just need information about their products, their friendly staff is knowledgeable about their product line and can help you pick the perfect product for your home.  In fact, they offer a 30-day money back guarantee (some exclusions apply – see website for details).


Use the warm summer days to explore the feathered friends in your neighborhood.  Visit Backyard Chirper today, and get started on a new adventure – bird watching!


Saturday, June 9, 2012

Gluten Free Easy Sloppy Joes Recipe

Sloppy Joes are always a huge favorite for large gatherings.  They are easy to make, and you can whip up a bunch in no time flat!  Here's a recipe that's just as easy, just as fast, AND it's gluten free!


Yes, that is actually a bun!  So you can have your Sloppy Joe and a bun, too!  I buy Udi's brand because it is not only tasty, but the buns themselves hold up well to a wet sandwich, like a Sloppy Joe, or a cheeseburger fresh from the grill, or tuna salad - you get the picture.  They come in 4 packs, which is also very convenient for our family of 4.

So on to the recipe!

SPH Easy Gluten Free Sloppy Joes
2 pounds lean ground beef
salt and pepper to taste
1 tablespoon minced garlic
1 tablespoon dried minced onion
2 medium bell peppers, diced very fine
1 12-oz. bottle Annie's Naturals Sweet & Spicy Barbecue Sauce
1/2 cup Organicville ketchup
1/2 cup Pacific Organic Beef Broth
1 tablespoon dijon mustard

Heat a large skillet over medium-high heat.  Drizzle in a tablespoon or two of olive oil.  Add ground beef, and break it up with a spoon.  Season with salt and pepper.  Continue to brown and stir.  When beef is almost completely browned, drain all but a tablespoon or two of the grease/oil from the pan, and add garlic, onion, and bell pepper.  Stir for a few minutes, til the peppers become a brilliant green color.  Add the barbecue sauce and ketchup.  Pour the beef broth into the barbecue sauce bottle (use a funnel), swirl around to get all the savory goodness loosened from the inside of the bottle, then pour into the pan.  Add the mustard and stir.  Reduce heat to low, and simmer for about 30 minutes.  Or, pour the contents into a crock pot and let them cook on low for a few hours.  Serve hot.

No minced garlic or dried minced onion?  No problem!  You can use either fresh or dried for both of these ingredients.  I made this recipe with what I had on hand.  Want more kick?  Add some diced fresh jalapeno pepper.

So another great thing about Sloppy Joes is that the recipe is easily doubled or tripled or then-some.  If you are hosting a graduation party or other large family gathering, you can upsize as needed.  Again, the crock pot will be a big help here, keeping everything cooking and hot while you tie up all those last minute loose ends.

Have a great weekend, and enjoy!


Friday, June 8, 2012

Bloggy Olympics

Something new and fun this summer!

Watch for me - I'll be competing in "Kitchen".  Will I win a gold medal?  We'll have to wait and see!

Come join the fun!

HatingMartha


Gluten Free S'More Semifredo Recipe

Who doesn't love s'mores?!  A fun and exciting twist on two classics today...


Semifredo means half-frozen in Italian.  It is a soft, wonderful icy treat - perfect for the hot weather that's due in our neighborhood over the next several days.  This simplified version is quick and simple, easy and delicious, gluten free, and you can make it the night before to enjoy on a hot afternoon the next day.

SPH S'More Semifredo
1 1.75-quart container chocolate ice cream, defrosted and melted (yes, you read that correctly)
1 8-oz. container frozen whipped topping, defrosted
1/2 of a 10-oz. package mini marshmallows - more or less to your taste
1/2 of a 12-oz. package Nestle's Chunks chocolate pieces (baking aisle in the grocery store) - more or less
12 gluten free graham crackers (I use S'Moreables brand), crumbled into large chunks

In a large mixing bowl, gently stir together melted ice cream and whipped topping just until mostly combined.  Fold in marshmallows, chocolate chunks, and graham cracker pieces.  This will work in the rest of the whipped topping.  Prepare two 9" x 5" loaf pans by lining them with large sheets of aluminum foil.  Work the foil into the bottom and up the sides of each pan.  Be sure to leave longer pieces hanging off the short ends of the pan.  These will be your handles when you are ready to plate this yumminess.  You can crimp them in to make your pans easier to manage.  You may also wish, depending on space in your freezer, to place both empty pans onto a cookie sheet for easier transport into and out of the freezer.  Just a thought.  I didn't, because I could fit the pans in by themselves easier.  You can also just freeze this in the same large mixing bowl if you'd prefer.  Do what works best for you.

Pour your chocolate concoction into the two pans.  Try to be sure that you have everything in pretty even amounts for each loaf pan.  I used a ladle to help me divide everything up.  Place the pans into your freezer and leave them for several hours.  Like at least 5 or 6.  The overnight thing for the next afternoon is a really good suggestion.

When you are ready to serve, allow your pans to sit at room temperature for about 10 minutes to start to soften.  Remember, it's half-frozen, not solid as a brick.  You can try to slice it.  I just used a large spoon to scoop portions because it seemed that no matter where I put my sharp knife, I was hitting frozen graham crackers.  This has been scientifically proven in my kitchen to be harder than diamonds.  No kidding!

You can also drizzle with hot fudge and top with more whipped topping/cream if you so desire.

The taste and texture of the final product is like eating frozen chocolate mousse, with fun bites every so often.  It is very rich, but because of the whipped topping being mixed in, it also has a very delicate quality.

So let's play Spin the Recipe - one of my favorite games!

Make plain chocolate semifredo and freeze it in individual small jars.  Top with rasperries and whipped cream and a drizzle of fudge syrup.  OR...

Mix in other types of chips and doodads, like mint chocolate, or nuts, or whatever you have on hand that sounds good to you.  OR...

Make semifredo with any of your favorite flavors of ice cream (check for gluten content if needed!)!

This is such a simple dessert with such stunning results.  It can easily be served to children of all ages, and will surely be enjoyed by one and all.

Try to stay cool this weekend, everyone, and enjoy!


This recipe linked to Very Good Recipes.

Wednesday, June 6, 2012

Good News Bad News


So after years of sleeping in the most awful bed ever created by man, I finally had a little spare time over this past weekend to go bed shopping.  Yay, I found the most amazing bed, and between the sale price and some additional negotiation (like we would remove our old bed instead of taking advantage of their "free" service), we bought it.  It will be delivered tomorrow afternoon sometime between noon and 4 pm.

That's the good news...

The bad news:
I had to choose between taking care of my family and my home or my blog for a few days, and sorry, but the fam won out. So no One Yard Wednesday today.  I hope you'll understand, and know that as soon as I can get some time on my machine, you'll have a great project to play along with!

So for now, adieu!


Monday, June 4, 2012

Gluten Free Applesauce Spice Coffee Cake Recipe

Some cake to go with our tea today...


Yesterday was Applesauce Cake Day, so I thought it would be a nice treat for Tea for Tuesday to have some applesauce coffee cake.  Quick and simple, easy and delicious.  So wonderfully soft and moist!

SPH Gluten Free Applesauce Spice Coffee Cake
1 box Betty Crocker Gluten Free Yellow Cake Mix (reserve 1/2 cup on the side)
3 eggs
1/2 cup butter + another 1/4 cup, both melted
1 tablespoon homemade vanilla
1 cup applesauce (use whatever you have in the house - sweetened, unsweetened, mixed with other fruits, etc.)
1 teaspoon apple or pumpkin pie spice (I used pumpkin)
1/2 teaspoon ground ginger

Preheat oven to 350 degrees.  Add cake mix to mixing bowl.  Beat in eggs, butter, vanilla and applesauce until batter is smooth.  In a separate bowl, combine reserved cake mix, 1/4 cup melted butter, and spices.  Mixture will be somewhat thin.  Pour cake batter into a greased 9" square baking pan.  Drizzle on the spice mixture and swirl into cake batter with a knife.  Bake for about 40 minutes, or til tester comes out clean.  Allow to cool, then cut into squares and serve.

This is delicious as is, or would be wonderful with a little whipped cream on top.  Make and take for a Sunday brunch, surprise your kids some cool morning, or have it for dessert one evening with the neighbors. It's sure to be a favorite in your house!

Enjoy!

ROASTe Review Today!

A new sponsor and product review today - STAY TUNED!

***THIS IS A COMPENSATED POST***

***ALL OPINIONS EXPRESSED ARE MY OWN***

When I was very small, we lived in a 2-flat above my grandparents.  Wednesday night was card night, and of course, I always went downstairs to hang out with the Grands and whoever the older folks were who were over that night.

When I was three, Grandma let me have my own cup of coffee.  Now, you know (as an adult) that cup was probably all of a tablespoon of coffee and the other 99% milk and sugar.  BUT - I've been a coffee drinker ever since, and that's why it's my privilege to introduce you to Suburban Prairie Homemaker's newest sponsor today!

ROASTe is the one-stop shop for people who want the at-home gourmet coffee experience.  With nearly 1000 coffees in stock, they are THE LARGEST coffee store online!

I visited ROASTe myself, and was incredibly impressed by the intuitive search function.  It is so easy to use!  Simply click the type of coffee you are looking for, and then be ready to be amazed at the variety you are offered.  Every type of coffee, from whole bean to ground, organic, flavored, espresso, and even decaf are all literally at your fingertips.  Change up the box (es) you’ve chosen to see more choices, all from award-winning micro-roasters.

Not sure which of these amazing brews to choose?  ROASTe has user-generated reviews and a vibrant coffee community to help you in your search.  They also have excellent customer service for those more challenging questions.

Want convenience?  Sign up for ROASTe’s subscription services.

Want serious coffee gadgetry?  ROASTe has a huge selection of coffee makers.  Everything from high-end espresso machines, to French presses and percolators.  They also have an enormous assortment of accessories, such as milk frothers, flavoring syrups, and coffee filters.

And the best part is:  price!  Some gourmet coffees will blow your mind and your wallet with how much they cost.  You can even search for your morning cuppa Joe by price.  There are plenty of coffees on the site that are not only delicious but also reasonably priced.  For example, my favorite organic coffee comes from Peru.  For a 12-ounce bag, I pay $9.99 when it’s on clearance at my local supermarket.  Now, consider the cost of gas…  For $12.99, I can get Rao's Coffee Roasting Company's Organically Grown Peruvian delivered right to my door from ROASTe.  That's the same price as the coffee when it's NOT on sale, with no driving in traffic.  No waiting for it to be on sale.  No muss, no fuss.  And, it's certified organic by the Rainforest Alliance, an environmental group who works to conserve the forests while promoting sustainable livelihoods through land-use and business practices.

Online ordering is secure and easy, too.  Pay with your favorite credit card, or with PayPal.  ROASTe has free shipping on orders over $39 – even better!  And, ROASTe offers a $5 coupon off your first order – just use coupon code BLOGME5 when ordering before December 31st.

So visit ROASTe today, and be ready to enjoy that coffee shop experience in your own home!  Enjoy!


***UPDATE***Just got word:  All the flavored coffees are also GLUTEN FREE!  BONUS!


Friday, June 1, 2012

Easy Gluten Free Chorizo Quesadillas Recipe

This is what's for dinner tonight!


I love quesadillas for 2 reasons:  they are always delicious, no matter what you fill them with, and they are so easy to make.  Like a Mexican grilled cheese sandwich.  So when I came across this recipe, I knew I had to try it.

As I've said before, a lot of authentic Mexican food items are naturally gluten free.  Tortillas, however, can be a bit tricky.  Yes, there are plenty of corn tortillas out there, and you'd think they were safe because they were made with corn.  And yet...

Just because they are made with corn doesn't necessarily mean they aren't also made with wheat flour.  Or made in a factory where they'd be cross-contaminated.  This is where it pays to know which brands are safe, and which are not.  One way to be sure is to purchase the Essential Gluten-Free Grocery Guide from Triumph Dining.  This book will give you a list of products that you can count on to be safe.  It has been a real blessing to me and my family, and it will be for yours as well!

Also, we live in an area that has a high Latino population.  Because of that, we have tortilla factories within 100 miles of us, and they make the authentic tortillas that are 100% corn flour, water and salt.  All they make are these tortillas, so there's no risk of cross-contamination.  And boy, are they good!  If you can get this kind of tortilla where you live, be thankful, and buy them!

Let's make dinner, and then we can chit chat a bit more...

SPH Gluten Free Chorizo Quesadillas
inspired by a recipe in Sandra Lee Semi-Homemade magazine
January/February 2011 issue
8 corn tortillas (mine were in the 6-8" range)
1 9-oz. package Sausages by Amylu Chicken Chorizo, diced (which is gluten free)
1/2 cup long grain white rice
1 cup chicken stock (I use Pacific brand Organic Free Range Chicken Broth)
1 tablespoon dried minced onion
1 tablespoon minced garlic (I use the kind from a jar)
1 tablespoon dried parsley OR fresh cilantro (I used parsley because I don't like cilantro)
1 teaspoon salt (or to taste)
1/2 cup frozen corn, thawed, OR canned sweet corn (I used canned)
Shredded Mexican cheese blend
Lime wedges


Optional Extras:
diced chilies
fresh jalapeno slices
jarred roasted red bell peppers
sliced olives
salsa
sour cream

Put rice, stock, onion, garlic, parsley and salt into a small pot.  Cover, and bring to a boil.  Reduce heat to a simmer, and allow to bubble for 15 minutes.  Turn off heat, and let sit for about 5 more minutes.

While rice is cooking, warm a large (preferably non-stick) skillet over medium-high heat, then drizzle in some olive oil.  Add diced sausage, and brown, stirring occasionally.  Drain on paper towels.  Drain excess oil from skillet and wipe clean.  If you don't have non-stick (and I don't), you may want to have another skillet handy in case the chorizo sticks at all.  My apologies to the dishwasher.

When rice is cooked, stir in sausage, sweet corn, and any extras you may desire.  Warm the skillet over medium heat.  Butter one side of one tortilla.  Set it butter side down in the skillet, just like you'd do for a grilled cheese.  Place 1/4 of the rice mixture on top of the tortilla, and sprinkle with some cheese.  Top with another buttered tortilla (this one has butter side up facing you).  Press with a spatula while it is heating through for a few minutes, then turn.  They really only take a few minutes per side, so keep an eye on them.  Burnt is not delicious.  Repeat with all the remaining tortillas.  Cut into wedges with a pizza cutter, and serve warm with lime wedges (the squeeze of lime really puts these over the top!).  You can also serve with additonal salsa and sour cream if desired.

Ok, so now the chit chat.  The original recipe used much larger flour tortillas, so switching to gluten free corn  tortillas was Tweak #1.  Also, because I used smaller tortillas, the original made way too much rice mixture, with too little sausage for our tastes.  It is much better with the onion, garlic, and salt, which were not in the original, either.  Because we had extra rice, we ate it reheated for lunch the next day, and it is FANTASTIC by itself!  If you don't have chorizo in the house, use some leftover cooked chicken that has been diced.

And as for the corn, you can use some from a bag of frozen, like the original did, or part of a can, like I did.  This is what I had on hand. If you use canned, drain the leftovers, and make corn muffins or corn bread with it.  Add it to a soup or a stew.  Just use it within a few days so it doesn't get spoiled.

Start your weekend off right with some delicious quesadillas, and enjoy!