Thursday, April 12, 2012

*V*A*C*A*T*I*O*N*

Taking a short break
4/11-4/21
Will be back soon!

Check out some recipes
or how-to's
while you're here...


Also
coming up
we have some
***Special Guest Stars***
next week
while I'm away


Be sure to stop back
again soon
so you don't miss
a
thing
!!!!!!

Photobucket

Tuesday, April 10, 2012

Quick Update !

Please double check today's jelly recipe for an important safety update!
Photobucket

Tea for Tuesday - Spring Flower Jelly Recipes

Organic weed control you can eat - you have to see it to believe it...


This jelly is actually made from an herbal tea.  You make an infusion of the blossoms using hot water - just like regular tea.  It's one of my favorites - Dandelion Jelly.  If you've never canned before, this is a great recipe to start with.  It is pretty simple - if you can boil water, you can make jelly and properly preserve it.

Let me put on my food safety hat here for a few minutes.  If you intend to give these IMMEDIATELY (like within 24 hours), you can reuse clean old food jars and lids.  Think salsa for pints, old jam/jelly jars for half-pints or smaller, and also reusing jars, rings and old canning lids.  Yes you can reuse the lids, but only when you don't ABSOLUTELY NEED them to seal.  These jars will not be processed, and MUST go in the fridge as soon as they are cool enough to handle.  They are good for a week.

If you intend to process your jelly (i.e., can it), you can reuse jars and rings, but you will need NEW lids.  NEVER REUSE OLD LIDS FOR THIS PURPOSE!!!!!  Absolutely, with no exceptions.  You want the tightest seal possible to protect your food from microscopic critters.

**IMPORTANT UPDATE**  Speaking of food safety, be sure to use plants that have not been sprayed with any kind of chemicals - whether that's an herbicide, a pesticide or a fertilizer!

You will also need a canning kettle.  You can find them at some hardware stores and at WalMart.  These are those big black speckled pots.  Do not confuse them with pressure canners - that's a horse of a completely different color.  Like zebra stripes.

While purchasing your kettle, get a pair of canning tongs.  These are grippy things with a plastic/rubber type coating on the bottom.  They might be called jar lifters.  When you are moving hot jars of hot jelly into boiling water, they are ESSENTIAL.

So is a canning funnel.  These have a wide opening at the bottom which is perfect for food to slide neatly into jars.  Neatness counts here to ensure a perfect seal.

Also nice by not necessary:  a rack for your jars for inside the kettle - I've never had good luck with these, but it may be easier for you; a lid rack (a handled base with slots for your rings) or a magnetic lid lifter.  I use ice tongs to carefully pull my lids from their pot.  Whatever works for you.  Just remember everything you will be working with is approximately 200-ish degrees, and if you are not careful, you will get burned.  I can promise.  Because I've done it.  Ouch.

Clean and sterilize your lids, jars and rings, and keep them hot.  I run my jars and rings through the dishwasher and keep them inside until ready to use.  If my timing is off (based on water boiling in canner), I have also put them on a cookie sheet in a 250 F oven.  This keeps them hot and sterile.  As for the lids, I handwash them in hot soapy water, rinsing well.  Then, they go into a small pan of simmering water.


So let's start with our recipe:

SPH Dandelion Jelly
2 cups dandelion blossoms, yellow part only (remove from green part with scissors)
1 quart boiling water
1/2 cup fresh, strained lemon juice (no pulp or seeds - and use the stuff that actually comes from the fruit, not the bottle)
2 packages powdered fruit pectin (Sure-Jell)
9 cups sugar
2 tablespoons orange extract

Start by filling your canner about half to two-thirds full.  Mine has a big groove about 2/3 way up, so I just call it the fill line. For me, that's about 3 gallons.  Use either distilled water, or tap water with a tablespoon or two of white vinegar in it.  This will keep your pretty glass jars from getting mineral deposits on the outside.

My canner also takes up 2 burners on my stove.  I set both of them at about medium high heat.  It takes about 40 minutes for room temperature water to come to a boil.  Read the rest of the recipe below and PLAN ACCORDINGLY!  Canning is like a dance, where timing is everthing.  You need to keep your product (in this case jelly) hot, your jars, lids and rings hot, and then get them into the boiling water ASAP after you fill the jars and put on the lids and rings.  I usually start my water when I start my dishwasher with the jars and rings.

My recipe above made 6 half-pints and two pints.  That's 10 half-pint jars if you want all half-pints, or 5 pints if you want all pints.  This is the number of jars you will need, so have that many jars, lids and rings available.  I reused a salsa jar for one of my pints because it is going to a friend's house, and I know the friend and his family will eat it within a week.

Put blossoms into a large bowl.  Cover with boiling water and allow to steep.  I put mine in my Pyrex measuring cup and fill the cup with boiling water.  Then, I put on the lid to one of my pots that's a similar size.  I let mine sit for about 2 hours.  You can do as little as 30 minutes or up to 24 hours.  Strain through a fine meshed sieve, keeping 4 cups of dandelion tea.  If you will not be using this right away, refrigerate for up to another 24 hours.

Pour tea into a large soup pot.  You'll see why you need a large pot in a bit.  Add lemon juice, and bring to a full boil.  That's the boil with the really big, loud bubbles.  Boil for 5 minutes, then add pectin.  Return to a full boil, stirring constantly, and gradually add sugar.  I add mine into the pot in about 4 or 5 portions, stirring each time until the sugar is dissolved and the mixture starts to bubble again.  I also use a whisk for this, then switch to a large spoon when all the sugar is in.  When all the sugar is dissolved, allow to boil for 5 more minutes.  Add orange extract.  It will bubble like mad and sputter and fuss, so be warned!  That's because the alcohol in the extract boils at a lower temperature, so it will boil and evaporate quickly.  Boil for 1 minute.  Turn off heat. Skim jelly if desired. I don't because I like how the bubbles look like glitter, and skimming the foam takes product away, so I will have less jelly.  If you plan to show your jelly at a county fair, skim it.  If not, who cares.  It tastes the same regardless.  If I'm guilty of jelly blasphemy, so be it!

Also, as your jelly is boiling, you'll see why I said large soup pot.  It will easily double in volume.  It will also bubble back up when you put in the extract.

Ladle the jelly into the jars CAREFULLY, and wipe all the tops with a clean, damp cloth to remove any drips.  Then, top with a lid and a ring.  Hand tighten the ring just until you feel the ring grab the jar.  You'll know when.  It should be firm and secure, but not death-grip tight.  Make sense?

If you are not processing your jelly, you can stop here.  Place jars onto a cookie sheet, set the sheet on a hot mat of some kind, and allow to cool enough to handle.  Then, place jars in fridge.

If you ARE processing, read on!

So using your tongs/lifter, place the jars into the boiling water of the canner.  You should have enough water to cover the tops of the jars by at least 1".  Put the lid on your canner.  When the water comes back to a full rolling boil, set the timer for 10 minutes.  Then, after the 10 minutes, let the jars boil in the canner for another 5 minutes with the lid off.

Remove jars from canner.  I place mine on a cookie sheet, and set the sheet on a hot mat on my dining room table.  Allow them to cool, and listen for the characteristic POP.  You'll know it when you hear it.  Try to count the pops (there should be the same number of pops as you have jars).  Jars that didn't seal properly need to be kept in the refrigerator.  Sealed jars are good for 6 months.

This jelly has a soft set, meaning it won't be as solid as Jell-o, like a grape or apple jelly typically would be.  And that's ok.  It still looks gorgeous in a jar, and tastes almost exactly like honey.  Put some on hot fresh biscuits.

Cooled jars need to be labeled with product name (Dandelion Jelly), and the date you processed it (4-9-2012).  Then feel free to embellish your jars any way you wish:  crochet, sew or knit a topper; use scrap fabric and bakers' twine; decorate with scrapbooking paper and embellishments.  You can also buy fancy lids and rings, but they are really expensive.  Whatever you'd like to do.  With the dandelion jelly, I don't usually add to my jars.  The color is such a lovely pale yellow, it speaks for itself.

By the way, if you need MORE - there are two ways to approach this, and you'll have to decide how each will best fit your personal situation.  You can double the recipe - be sure to have appropriate number of jars, rings, lids available and also use a really big pan.  Or, if you have the time over a few days, make individual batches.  Whichever works for you.

Want less?  Divide the recipe accordingly, but ALWAYS use at least one full package of fruit pectin.  This will ensure that your jelly sets.

Now that you've gotten your feet wet with this, here are some other jellies you might like to try:
Violet Jelly
Red Clover Jelly
Lilac Jelly
Rose Petal Jelly

Give them a go, then give them as gifts.  Tuck jars into pretty thrifted baskets with other homemade goodies, a lace doily that you crocheted (and yes you can make a doily by now if you've played along at home with all of our crochet tutorials - aren't you so clever and talented!).  Maybe add some herbal teas and a tea cozy or mug mat.  What a nice gift for a teacher, a scout leader, a new neighbor.

Enjoy!

Photobucket

Monday, April 9, 2012

How to Follow a Crochet Chart

Learning a new way to read a crochet pattern today!


One of the hottest trends in crochet today is Japanese crochet.  Japanese crochet is the same as "regular" crochet, except it is all done from a chart.  The written pattern is almost always excluded.

Now if you are new to crochet and pattern reading (we've been learning to read a pattern while learning to crochet here on the blog if you'd like to learn too - just do a search for crochet in the sidebar), don't panic.  It will look really scary, but actually it is EASY.

Yep, easy.  Really.

Here is the chart of crochet symbols from the Craft Yarn Council of America.  When you pull up the chart, you'll see x's and T's and hooky looking things.  These symbols each represent a specific stitch.  The cool part about the chart is that these symbols actually LOOK like the stitches.

And this is what makes working from a chart easier, especially if you struggle with reading a pattern.  The chart basically shows you what your end product will look like.  If you know what it's supposed to look like, it's easier to follow along and to catch mistakes.

So let's give it a try!


Here's a simple flower I found on a blog hop.  It's from an adorable site, LeMonde de Sucrette.  She has all kinds of fun crochet stuff, so be sure to go back to her blog and check all the goodness out!

Click the link above, and print the chart.  Grab a hook and yarn - whatever size you like to work with.  Here we go!

You'll notice that the chart doesn't have a beginning chain.  You can start crocheting this way, and I'll be glad to show you how another time.  Today, we're going to start with chain 4.

We are also going to do double crochets (dc) instead of trebles.  Make 11 dc in the 4th ch from hook.  Join with sl st in top ch of beginning ch 3.  This will make the inside circle, just like we did for the flower mug mat.   On the chart, this round is blue.  It looks like this:

Can you see how the double crochets look kind of like a T with a line through it?

Round 2 is in red.  Ch 3 and dc in same stitch.  2 dc in each stitch around.  Join with sl st in top ch of beginning chain.  Like this:


Round 3 is in green.  It's the shells that make the petals.  Start with a ch 3, and make 4 dc in the same stitch. This is your first shell.

(Skip one stitch, and sc in the next stitch.  Skip one stitch, make 7 dc in the next stitch) 5 times.  You now have 6 shell petals.  Skip one stitch, sc in the next, and join to the top ch of the beginning ch 3.  Fasten off - you're done!

The especially cool part about using a chart really comes into play in that last round.  You can see how Sucrette skipped a stitch, just by looking at where she placed the x that represents a single crochet.

So make a bunch of these in all sorts of colors, with all kinds of yarn or even crochet thread.  This is very similar to the small flowers I used on the Anthro Inspired skirt.  I used a G hook and cotton crochet yarn.  Sew them on skirts and other items for little girls, purses and bags for little girls.  Crochet a bunch out of crochet thread and stitch them together to make a doily for Mother's Day.  Make a long crochet chain, then attach these to the chain for a cute spring banner.  And of course you can play with the flower design itself.  Skip round 2 to make it smaller.  Add a third round of dc's to make it bigger.  Use fewer dc's to make the petals smaller.  Stack your shells to make it ruffly.  Using trebles, like in Sucrette's original design, will also make your circle bigger.  Use sc's to make it smaller.  Change colors after each round - a great way to use up those really tiny oddments of yarn in your stash!

Have fun!


Photobucket

Sunday, April 8, 2012

Happy Easter!!!


The True Story of Easter


He's Alive by Dolly Parton


The gates and doors were barred
And all the windows fastened down
I spent the night in sleeplessness
And rose at every sound
Half in hope of sorrow
And half in fear the day
Would find the soldiers breakin' through
To drag us all away

And just before the sunrise
I heard something at the wall
The gate began to rattle
And a voice began to call
I hurried to the window
Looked down into the street
Expecting swords and torches
And the sound of soldiers' feet

But there was no one there but Mary
So I went down to let her in
John stood there beside me
As she told me where she'd been
She said they've moved Him in the night
And none of us know where
The stone's been rolled away
And now His body isn't there

We both ran towards the garden
Then John ran on ahead
We found the stone and empty tomb
Just the way that Mary said
But the winding sheet they wrapped Him in
Was just an empty shell
And how or where they'd taken Him
Was more than I could tell

Oh something strange had happened there
Just what I did not know
John believed a miracle
But I just turned to go
Circumstance and speculation
Couldn't lift me very high
'Cause I'd seen them crucify Him
Then I saw Him die

Back inside the house again
The guilt and anguish came
Everything I'd promised Him
Just added to my shame
When at last it came to choices
I denied I knew His name
And even if He was alive
It wouldn't be the same

But suddenly the air was filled
With a strange and sweet perfume
Light that came from everywhere
Drove shadows from the room
And Jesus stood before me
With His arms held open wide
And I fell down on my knees
And I just clung to Him and cried

Then He raised me to my feet
And as I looked into His eyes
The love was shining out from Him
Like sunlight from the skies
Guilt in my confusion
Disappeared in sweet release
And every fear I ever had
Just melted into peace

He's alive yes He's alive
Yes He's alive and I'm forgiven
Heaven's gates are open wide
He's alive yes He's alive
Oh He's alive and I'm forgiven
Heaven's gates are open wide
He's alive He's alive
Hallelujah He's alive
He's alive and I'm forgiven
Heaven's gates are open wide
He's alive He's alive He's alive
I believe it He's alive
Sweet Jesus


Rejoice in your salvation today!

Photobucket

Saturday, April 7, 2012

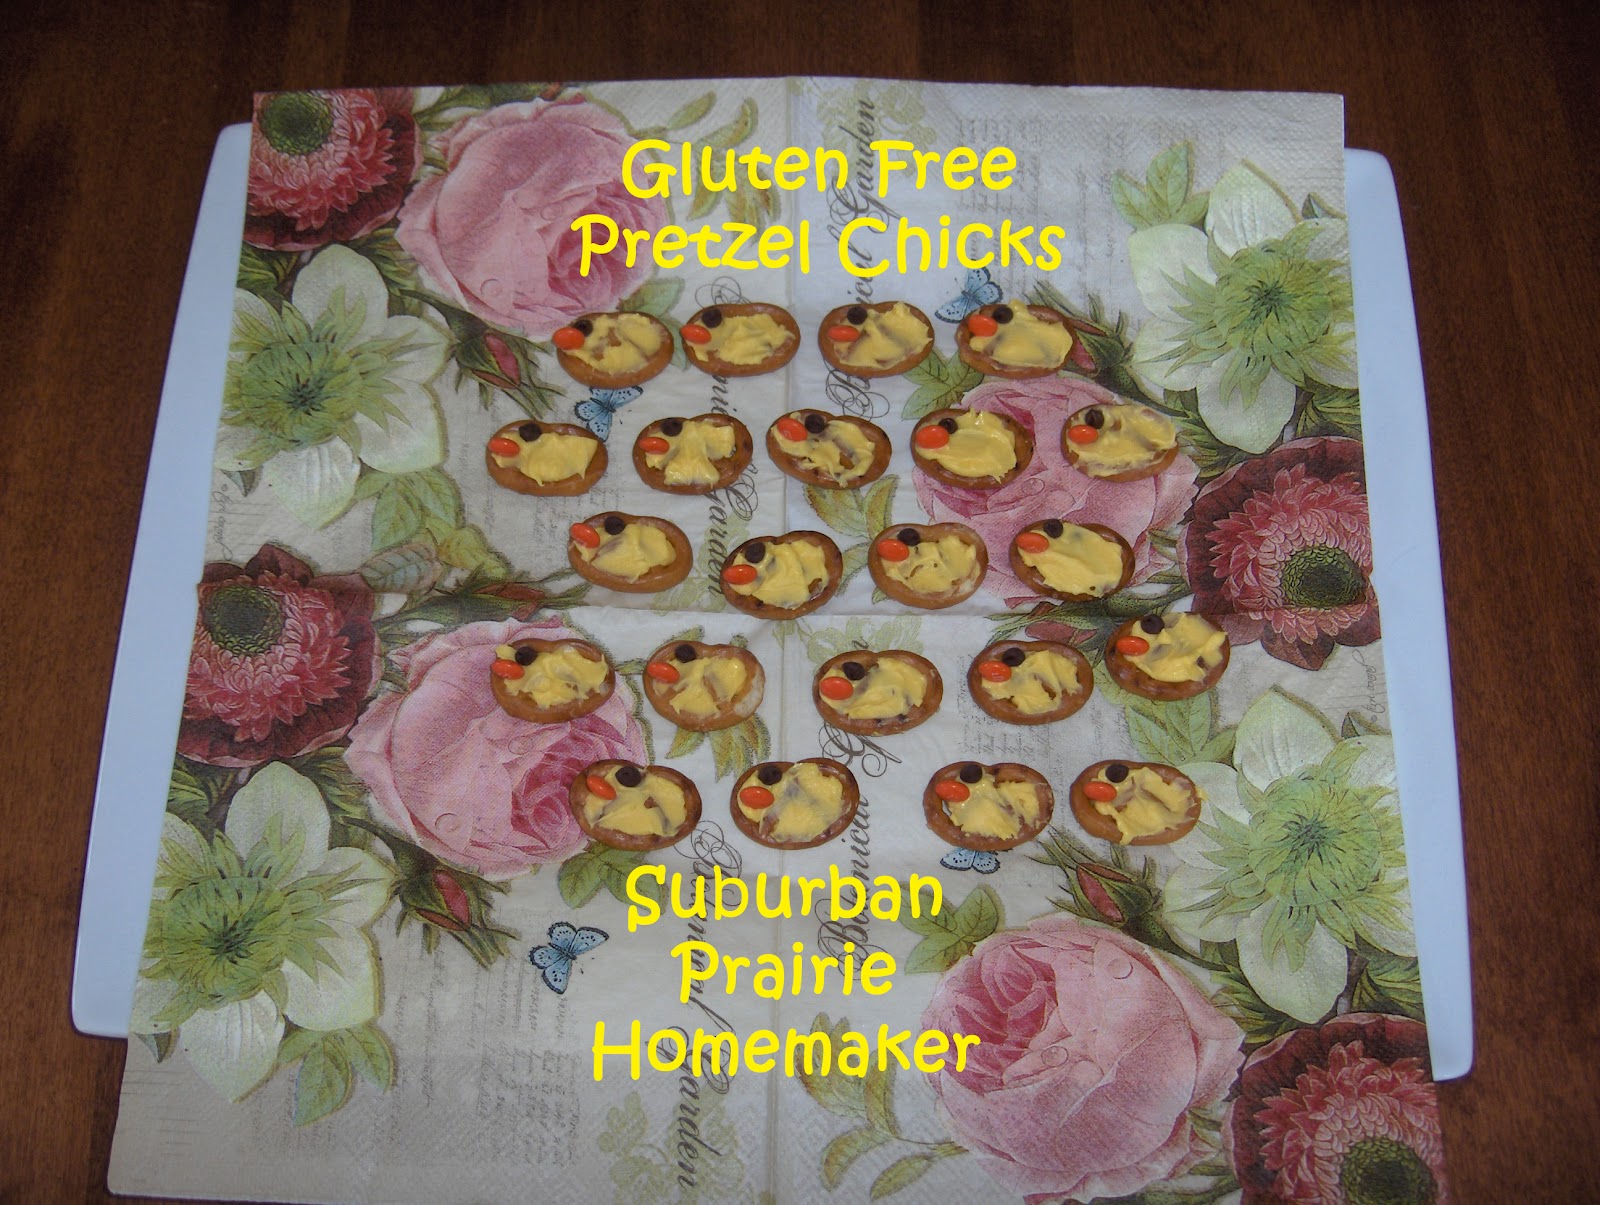
Gluten Free Pretzel Chicks Recipe

Saw these today, when another customer of our local meat CSA brought them to our farmers as an Easter treat.  They are so cute!  Quick and simple, easy and delicious!

Aren't they just so cute!  Here's one, close up.


So, before I tell you how I made them myself, I have to tell you that the other nice customer lady said she used a recipe/how-to.  I don't know the source.  This was not originally my idea, just my take on what I saw today.  They were too cute, and looked too good, not to try!

You will need:
small twist pretzels (I use Glutino brand which are gluten free, but you can use regular ones, too)
Wilton yellow Candy Melt disks for the bodies
Nestle mini chocolate chips for the eyes
Orange mini MnM's for the little beaks

Preheat your oven to 350.  Line a cookie sheet with parchment paper, and lay pretzels on the sheet in a single layer.  Cut candy disks in half, and place them on the pretzels, with the round side matching the round side of the pretzel.  Bake for about 5-ish minutes.  You want the candy to get spreadable, but not completely melted.  Remove from oven and CAREFULLY spread the candy with the tip of a knife or a spoon.  You can also melt the candy separately, then spread it on the pretzels.  While candy is still soft, add one mini chip to make the eye and one MnM (sideways and upright) to make the beak.  Allow to cool, then enjoy!

Just a side note here:  MnM minis come in a bag with many colors.  A GREAT activity for littles is to sort the MnM's by color into separate containers.  This teaches colors, and one-to-one correspondence.  Wow, what's one-to-one correspondence?!  One MnM goes in one container.  It's actually one of the earliest math concepts because if you don't understand what "one" means and is, you won't be able to count.  Also, one candy piece on each pretzel, one chip on each pretzel, and one MnM one each pretzel reinforce this concept as well.

For the not-quite-so-littles, cutting the disks in half is a great way to introduce/practice fractions. The pretzels are also divided roughly in thirds.  Math and science are so much more fun and interesting when you get to eat the results!

Now, I have to warn you - MAKE A BUNCH!  These will disappear probably before they are entirely cooled!

Have a blessed Easter, and I will see you again on Monday!

Photobucket

Thursday, April 5, 2012

MOMMY STUDY TIME


MOMMY STUDY TIME
PLEASE DO NOT DISTURB
UNLESS YOU ARE BRINGING ME CHOCOLATE

While you're here, find out how to dine gluten free for Easter, check out a recipe or two, and take a look at The Butterfly Project.  Maybe you'd like some beginning garden how-to's.

See ya' tomorrow!


Photobucket