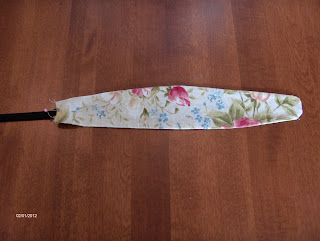
Our project today comes from Able to Sleep. Be sure to visit the link to print out directions and a pattern. While you are there, leave some nice comment love! This is another great beginner project, and you can make it with less than a fat quarter and a drug store elastic headband. Seriously! You only need enough fabric to make an outer layer and inner layer of the pattern. You will also need either fusible interfacing (I used scraps from my stash), or muslin, to help stiffen the fabric part of the headband.
So here are the fabrics I chose from my stash. I wanted a soft, romantic rose-y type fabric for both sides.
I really wish I had bigger pieces of these - they'd make such a wonderful baby girl quilt! Speaking of which, check out the color panel for the large floral:
Yes, there are really 16 dots! This fabric goes with just about anything! But, I digress...
Print out your pattern and the directions.
Trim paper pattern down to a smaller, more manageable size. Fold one edge of your fabrics toward the center (unless you want to "fussy cut" an image from a patterned fabric - more on that in a minute). Repeat for muslin or fusible interfacing. Stack your 2 fabrics and your muslin/interfacing, and pin your pattern on the fold.
The reason you fold and cut this way is so you don't put a large hole in the dead center of a perfectly good piece of fabric. You want to get as much mileage as possible from your fabric - even your stash. Folding and cutting this way will ensure that you are making the most of your resources.
Now, I mentioned fussy cutting. If you are making this headband (or pretty much anything else for that matter), and you want to highlight a certain aspect of the fabric (the large roses for example), you can make a template with the pattern provided with either muslin or paper. Planning on making a bunch for your granddaughters? Definitely make a template! Just be sure to mark the fold line and notches. For the fussy cutting, make the template the full size by printing it, cutting it out, and tracing it right side up then right side down on another piece of paper or on some muslin.
After I cut out both pieces, I taped them together.
Let's say that this section of flowers is what I want to feature for my project.
I will place my template (centered, of course) over the top of the flowers, and pin and cut.
So back to our regularly scheduled program...
Iron fusible interfacing to the wrong side (back) of each of your fabrics, if using, according to manufacturer's directions. Place fabrics right sides together. If using muslin, layer it on top of one side. Stitch long sides, with 1/2" seam allowance, from one notch to the other. Fold fabric up at notches and press.
Turn right side out, using a large crochet hook or some such (I used a small spatula because it was handy - don't worry, it was clean). Press. Cut your elastic headband in half. Insert one end about 1/2" into the fabric and pin.
Insert other end of elastic into the hole on the opposite side and pin. You can try it on CAREFULLY and adjust as needed. Stitch both ends in place securely. Top stitch across long sides. You can use whatever stitch you like - I used a decorative stitch from my machine that looks like this. I even used a thread that is a similar color to the diagram.
So make one for yourself or a bunch. Make them for nieces, grandbabies, DIL's, SIL's. Make them from reclaimed sheets or pillowcases or flannel shirts or blue jeans. Applique some hearts or flowers or a monogram. Add a lace ruffle. This pattern is so flexible and versatile! Enjoy!


Thank you so much for featuring my headband blog. Your headband looks great!
ReplyDeletewhat a great idea and so easy peasy to do... Thanx
ReplyDelete>^..^<
Thanks for this easy tutorial! I would love for you to share with Blog Stalking Thursday Link Party! http://thecraftyblogstalker.blogspot.com/2012/02/blog-stalking-thursday-26.html
ReplyDeletePosted! And thanks for stopping by!
DeleteA pretty, little headband!!! It's easy enough to make one for every outfit.. Thanks for sharing...
ReplyDeleteWhat a beautiful yet simple headband! I love the material you chose and the heart stitching is SO cute. Thanks for linking up this week to DIY Diva Thursdays!
ReplyDeleteKara
www.mineforthemaking.com