Showing posts with label mug mat. Show all posts

Tuesday, April 24, 2012

Tea for Tuesday - Primitive Flower Mug Mat

A great idea for Mother's Day!


This is a really quick and simple way to learn how to do applique.  Our little mug mat is made from some simple squares of muslin and scrap fabric, a square of cotton quilt batting, and some scraps in bright colors.  You can decide how you want to shape your flower (I used an oval), your leaves, etc., and the colors you want.  I loved the combo of that funky pink with just a plain orange.  I also liked how the green made such a wonderful dark contrast to the brights.

You'll also need basic sewing supplies (including pins) and a sewing machine.

So let's all get started.  Cut fabrics and quilt batting to 6" square.  Dig through your scrap stash to find the color(s) you want to use for your flower and for the leaves.

Cut your flower fabric into desired shape(s). I used an oval and a circle.  You can use 2 circles, 2 ovals, a "standard" flower shape.  This is "primitive", meaning it can look like a three-year-old drew it.  Think outside the box!  Then, cut your leaf fabric into desired shape.  My leaves are just pointy ovals.

Pin the larger shape into desired position onto the muslin square.  Stitch it down with straight stitch, zig zag, or blanket stitch.  I used blanket stitch, and I also used an orange thread.  You can use matching, coordinating or contrasting thread - your choice.

Not sure which one is blanket stitch?  It looks kind of like this:


___|___|___|___|___|___|___|___|___|___


Set up your stitch so the flat side follows the outside edge of your item, and the up-and-down line points toward the center.  You may also have to adjust the tension on your machine to avoid puckers.  I should have loosened mine a bit.  If you're not sure, do a few test pieces.

If you'd like to really go vintage on this project, hand stitch the blanket stitches.

Repeat this process with the center for your flower.

Position leaves below flower, and repeat process.

Now, we are going to do the quilting part.  Make your mini quilt sandwich by placing the flower square face up on a table.  Then, place the backing square on top, wrong side (back) up, and place the batting on top of it.

Stitch around 3 sides, using a 1/4" seam.  Trim all 4 corners.  Turn right side out.


Turn edges of open side in towards the inside, about 1/4.  Pin closed.  Stitch around all 4 sides, close to the edge.

To quilt this, just use a straight stitch and go around the edge of the large part of the flower.  You can also stitch around the leaves, or do more quilting around each of the pieces, if you'd like.  I used hot pink to stitch the outside edge and around the flower.  Again, matching, coordinating, contrasting - the choice is all yours.

Make these in a bunch of color combinations.  Try soft, country colors.  Or more bolds and brights.  Or your gift-recipient's favorite colors.

Make these for any holiday or occasion.  Use a simple triangle for a Christmas tree, add rick rack or trims, or decorative stitches from your machine as decorations.  Make an oval from orange and a rectangle from green to make a pumpkin.  Add simple small black shapes to turn your pumpkin into a jack-o-lantern.  Think black half-circle with super thin black rectangle for a graduation cap.  Add a tassel for fun.

Be creative, and have FUN!

Photobucket

Tuesday, April 3, 2012

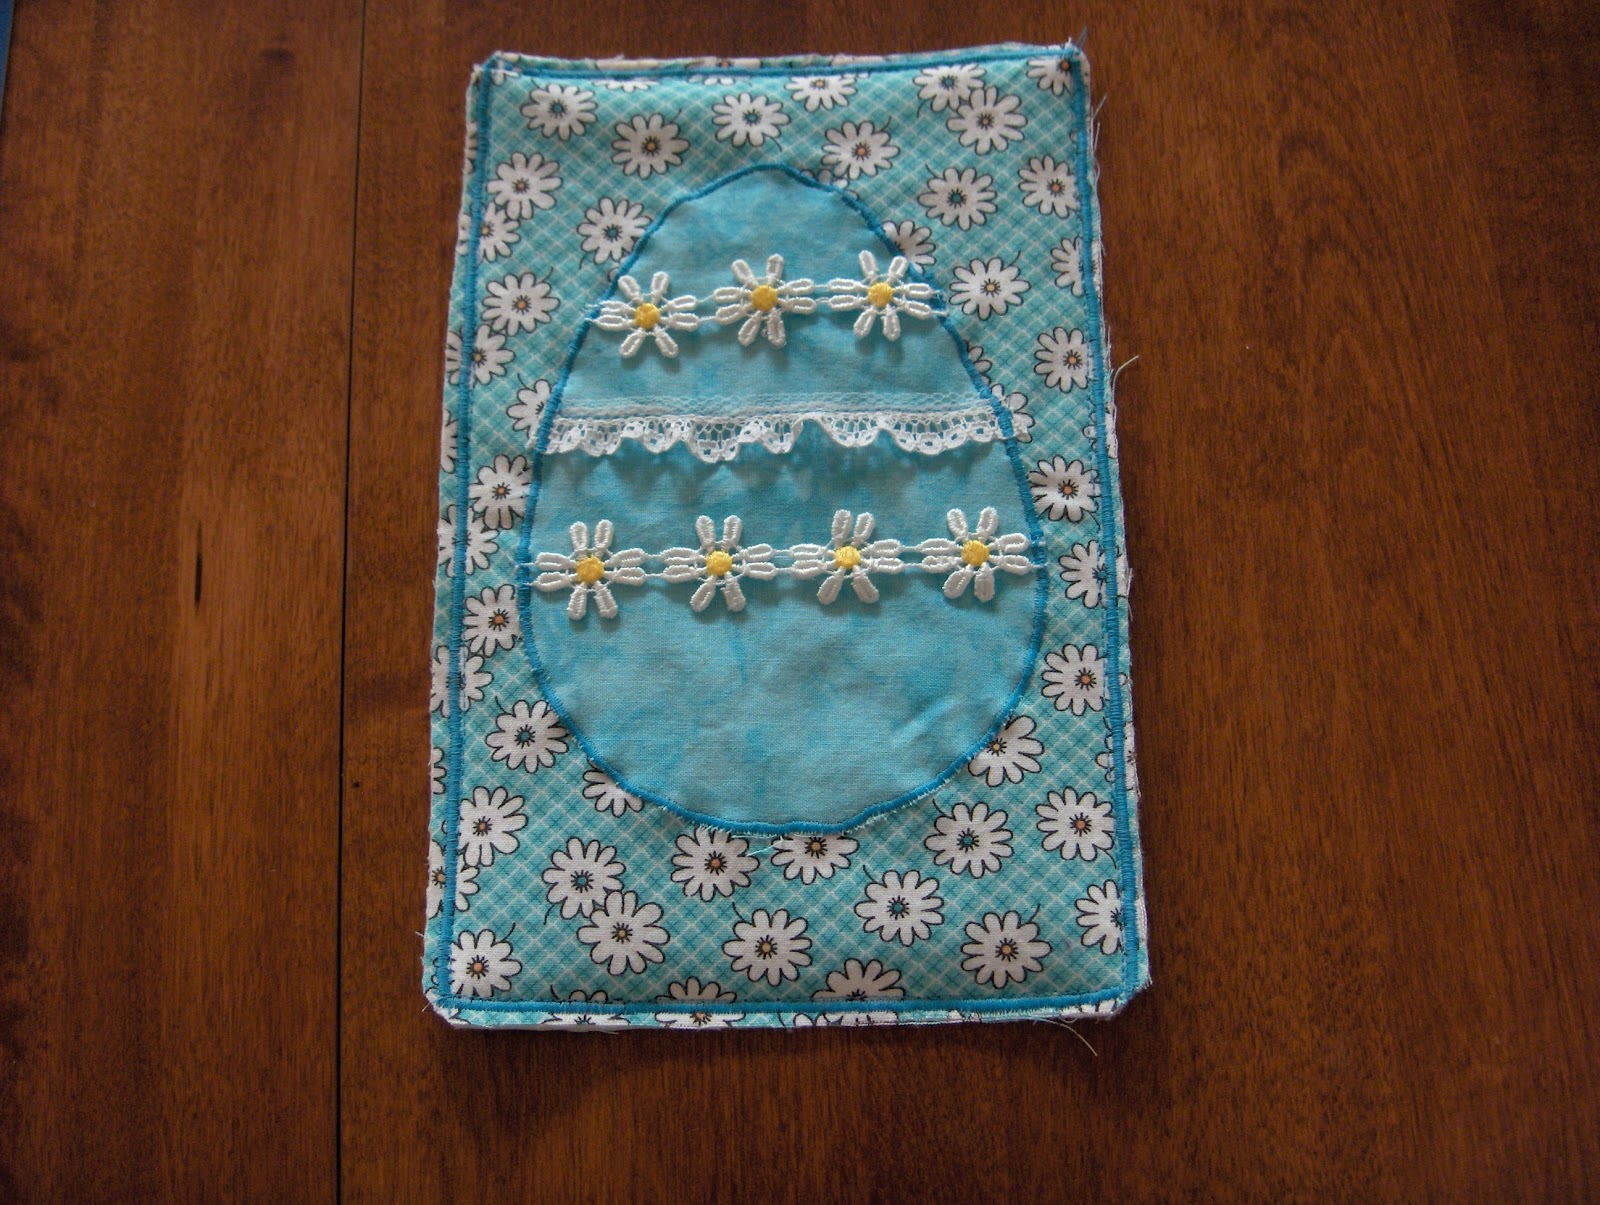
Tea for Tuesday - Easy Egg Mug Mat

All the fun of decorating Easter eggs without the mess...

I found this card online at Shoregirl's Creations, through a blog hop.  I love the simplicity of it.  If you are new to cardmaking, this is a great project for you to try your hand at.  If you are an experienced cardmaker, you will love the little details that make it so special.  She also has some AMAZING cards and crochet projects on her site, so be sure to go check it out when you are done with today's project!

I also thought it would translate to a different medium really well.  Wow - that sounds so technical!  In plain English - I could make it into/out of something else.  And I did.  I give you today's mug mat!


So here's how you take something you see as a card, a pillow, a whatever you see that you really like, and make it into or out of something else.  We'll start with the inspiration card.  This is a print out of the photo.

What drew my eye to this card?  I love the patterned background with the plain egg.  Usually you see a plain background with a jazzed up egg.  The big $10 word for that is juxtaposition.  Isn't that cool to say?!  Use it sometime to amaze and impress your friends!  I love the feminine touch of the lace and bow.  Makes it kind of vintage-looking, too.  I love how the egg is decorated with flowers.  Usually, eggs have stripes or dots - something more geometric.  The flowers also make it so much more Spring-y.  Since today is our Tea for Tuesday, and I'm on this total mug mat addiction trip lately, I thought the shape of the card in general would also make for a good re-do.  Mug mats can be any shape, but commonly they are rectangles.  Most importantly, it is a VERY simple design.  These are the BEST and EASIEST kind of designs to make into something else!

When you want to re-make something into something else, these are the things you should keep in mind, too.  In addition, think about the new version.  Can I make (THIS) out of (THAT)?  This would probably not make a very good woodworking project.  It could, however, work well with fabric.  In fact, in the inspiration piece, there is hand-drawn stitching around both the egg and the main body of the card, so that was a big tip-off.

So here's what you'll need today:
Scraps of a plain-ish fabric and a print.  My "solid" isn't really solid - it has a mottled appearance.  This type of fabric is usually called a texture, because it adds visual texture to a piece.
Scrap of cotton batting
Thread - choose matching, coordinating or contrasting (it's your egg)
Assorted trims - again your choice (use up what's in your scrap basket)
You can see that I'm keeping the floral element I like by using a floral background fabric and a floral trim.  The trim also mimics the lace.  The yellow centers of the flowers are also a great way to bring out the flowers on the background fabric that have yellow centers.

Press your fabrics, then cut:
1     6 1/2" x 9 1/2" rectangle of the patterned fabric
1     6 1/2" x 9 1/2" rectange from the batting
2     6 1/2" x 9 1/2" rectangles from the solid/texture fabric

Also, you will need to print out the egg template (link up here, then click template).  I copied it, brought it into PowerPoint, and made my egg about 4 1/2" wide at the fattest part x 6" long.  You can do the same thing, and make your egg however big or small you'd like.

Print the egg (if you plan to make a bunch of these, I HIGHLY SUGGEST printing it on cardstock  or tracing your original onto the back of a piece of cereal box - it'll be sturdier), cut it out, and trace it onto the back of one of the solid rectangles.  You can use a pencil or fabric marker for this.

Cut the egg from the solid fabric. Place it face up onto the center of your print rectangle.  You can pin this with a safety pin in the center of your egg if you wish.  Stitch around the edge of your egg to secure.  I used a buttonhole stitch.  You can use a zigzag, a straight stitch, a decorative stitch - whatever you'd like.  It just has to hold the egg in place, it's not like a patch on a pair of jeans for a little boy who plays football.

Mine got a little puckery - I should have test-stitched and adjusted my tension on my machine.  If yours is a gift for someone special, you should test-stitch, too.

Now let's decorate our eggs.  I added the flower trim.
There are little spacers between each of the flowers.  I used the same buttonhole stitch to attach the flowers by stitching over the spacers on the outline of the egg.  This made the ends hide in plain sight when they were trimmed, and made them more secure.  I added another row of flowers, and then added a little bit of lace in the middle.  Be sure to audition your trims BEFORE you sew, and remember the rule that less is often more.  With a patterned background, if you add too many embellishments, your egg will get lost in all the visual chaos.

Make a mini-quilt sandwich.  Place the remaining solid rectangle face down, then put the batting on top of it. Put the egg layer on, face up.  Pin through all the layers, and do a straight stitch all the way around.  I used a 1/2" seam.

I then went around one more time with the buttonhole stitch, right up next to the straight stitching.

Trim the edges of the fabric close to BUT NOT THROUGH the buttonhole stitching.  This gives your piece a serged edge finish.  If you have a serger, you can just use that instead.

So let's have some fun with our egg.  Thread paint plain fabric for the background.  Or thread paint the egg. Quilt the background.  Quilt the egg.  Quilt the background one way and the egg another.  Use trims on the background.  Or on the border.  Use highly contrasting colors.  Use different stitches.  Make your mug mat egg-shaped instead of rectangular.  Hand stitch a name or initial on the egg to make it personalized.  Make a second egg from the solid fabric, fold it in half and stitch it onto the egg to make a pocket, and tuck in some goodies like tea bags, or a few stems of small, real flowers.  Use a different shape applique instead of an egg, like a flower.  That would have been awesome on this fabric!  Do the same with the main motif (i.e.,  picture or shape) on your patterned fabric.

This would be a great little gift for a Sunday school teacher, or a mother/sister-in-law.  Or the neighbor who always takes in your mail for you or watches your guinea pig while you are on vacation during spring break.

Play with your scraps today, and enjoy!


Photobucket

Tuesday, March 20, 2012

Tea for Tuesday - Pottery Barn Inspired Mug Mat

A cool bistro stripe on a cute little mug mat.  Very nautical.  And inspired by a rug...


This is the original rug.  Don't these stripes just SCREAM BEACH to you?  This makes me think of someone's summer home out in the Hamptons, probably on their screen porch that overlooks the water.  Where they sit and sip Long Island Iced Tea.  Before they go have dinner at Ina Garten's house.  But I digress...


So the lesson today is this:  you can find inspiration anywhere.  And when you find it, use it.  Let's use this inspiration to make a mug mat.

You will need graph paper, a ruler to make straight sides, a pencil and eraser, colored pencils, cotton worsted weight yarn in your choice of colors (this is a good way to use up some stash), a yarn needle or small crochet hook, and the size needles you prefer.  Mine are size 7's.

If you see something that catches your eye, and you'd like to make if for yourself but just aren't sure where to start, a graph paper sketch will help you immensely! I've used this technique for everything from quilt blocks, to afghans, and now a mug mat.  I even designed our community garden with graph paper!

So I started with my graph paper to sketch out how I want my "rug" to look.  How many stitches wide?  How many rows long?  How wide do I want the stripes.


This original sketch was 20 stitches wide by 32 rows long.  Then I added the stripes.

You can see that I miscounted where I started, so I had an extra row on the end.  This pattern would have been fine, until I started to knit it out.  Twenty stitches was just not wide enough.  Then as I worked my way through the chart, it just didn't look right.  The rows, as they were sketched, were too narrow.  Now, each row on the chart is two rows in height.

So here's what I came up with:
And here's the pattern:
Cast on 28 stitches.
Rows 1-8:  Knit in ivory.  Change color by looping the blue over your needle.  Leave the ivory attached.


Don't worry if your first stitch seems really loose and sloppy - you can tighten it up in just a minute.  Be sure to leave a tail of the blue yarn about 2" long.
Rows 9-16:  Knit in blue.  Once you get in a few stitches of the blue in row 9, pull the tail of the blue and the connected yarn of the ivory to tighten the stitches.  Not too tight - just enough that they are the same as your other stitches.

Our something new today is how to carry the yarn of another color from one section to the next.  After working row 10, loop your ball of blue under the ivory and up behind it.  This will carry your ivory yarn up to the next section, and hide it pretty well, too.  This side edge will still look pretty finished, which is one of those little details that makes the difference between homemade and handcrafted.  Every time you finish an even number row from here on out, loop your working yarn under the yarn you are carrying.


Rows 17-20:  Knit in ivory.  Do the under and up thing again with the ivory.

Now you will add your third color - the brown.  It's ok - don't panic.  You already know what to do.  Just do the same thing you did with the blue, except now, you have to go under both the ivory and the blue when you get to the end of an even row.  As you continue, you'll have to be careful to not get these side threads tangled.  And they will - trust me.  It happens.  Just take your time with it.

Rows 21-24:  Knit in brown.
Rows 25-28:  Knit in ivory.
Rows 29-36:  Knit in blue.
Rows 37- 44:  Knit in ivory.

Let's look at how to bind this off.  Start by cutting the brown and blue.  You've carried them all the way up here, now it's time to set them free.  Be sure to leave tails that are about 2-3" long.

We'll do a typical knit bind off.  Start by knitting the first stitch.  Pull the tails between this stitch and the next, bringing them to the front from the back.  Knit the second stitch.  Flip the tails to the back.  Pull the first knit stitch up and over the second.  Leave the tails in the back.  Just leave them there.  Continue binding off the rest of the way across.  Cut the ivory yarn, pull the tail through the last loop to make a knot, and you are done.  Work all the tails in on the back side, and trim.

Et voila!  You have a new mug mat!

And let's play my favorite game:  What Else Can You Do with It!  Well, let's start with the basic design.  Make it wider, make it longer.  Do both and make a scarf.  Change the colors.  Do two instead of three.  Do every row a different color to use up your stash.  Make the stripes thicker or thinner.  Add fringe.

Let your imagination and your graph paper be your guide!

Have fun!


Photobucket

Wednesday, March 14, 2012

BONUS OYW - Mini Quilt Mug Mat

Our schedule got a little off kilter with the TV appearance, so here's a BONUS One Yard Wednesday - something else to do with those little tiny scraps plus two new techniques...


I found some wonderful fun greens and the orange plaid in the scrap bucket.  Orange, white and green are the colors of the Irish flag, and what better way to add some St. Paddy's flair to your morning cuppa Joe?!

So grab those leftover tidbits of jelly roll strips, or border pieces, or other oddments that you have, some leftover cotton batting.  The batting MUST be cotton (you'll see why in just a bit) - if you don't have any, use a piece of an old towel.  You will also need a piece of plain fabric to put your pieces onto.  You can use muslin or other scrap fabric.  I used a bit of that green sheet I still have left over.  I am beginning to think I will be sewing with that sheet until the end of time, but I digress...


Press your scraps.  Then, cut your backing fabric, your batting and your base fabric into a 6" x 9" rectangle.


Layer these with your backing fabric face down (wrong side up), then batting, then the base fabric.

Now the fun really begins!  On top of your fabric sandwich, place one of your strips right side up.  Place another strip on top of the first, matching the side edges, face down (right sides facing).  This is first of the new techniques - it's called quilt as you go, and it's another real time saver.  Pin through all layers.


Using a 1/4" seam, stitch the two strips together  - yes, through all the layers.  You have now not only started your mug mat, but you are in the process of finishing it, too.  You are quilting as you go.  See how this works?!  Pretty cool, huh?!

And this is why you need cotton batting.  Open the fabric strips and press the seam.  If you used polyester batting, it would melt.  After pressing, add the third strip.
You'll notice this time I didn't line up my edges.  That's ok.  This doesn't have to be super precise.  Again, stitch with a 1/4" seam allowance, and press.

Repeat until you use up all your strips.
Trim everything up, and make sure to square up your edges.  You can stop right now if you want, and add some binding.  Your mug mat is already quilted.  Feel free to play a bit more, though, and have some fun.  This is one of the few occasions that I actually use matching thread in the bobbin (usually I just use white).  I wanted green thread on the back so it would look nice, like the front.  Use a thread that matches or contrasts the backing fabric - whichever you want.

I used a stipple stitch on the multi-color dot fabric section - to me it makes the dots look like confetti.  Then, I just did a simple S pattern on the dark green.  I did "stitch in the ditch" on the green squares (you stitch in the space where the seam is sewn), then went back and added the horizontal lines.  For the green and white dot, I just lined up my presser foot to go between the rows of dots, and went both directions to get the cross-grid pattern.  Here's how that turned out:
Remember, you can add this stitching to the fabric first (thread painting), if you want the pattern but you don't want your quilting to look that way.  If I had it to do again, I would not have quilted the dark green section.  Or I would have used a dark green.  Either way, you can see that you can quilt your mug mat in many different ways.

Here's the quilting on the back.
I could easily have used a yellow or darker green thread, but I think the bright green blended into the fabric better.  Sometimes, you just get lucky that way.

So let's finish this baby off, shall we?

When you make a quilt, you need some way to finish off the raw edges on the sides.  In this case, we'll use binding.  We've made binding before, for another mug mat, back in January.  We're going to do things just a bit different this time, but the principle will be the same.

You will need two strips of fabric.  I cut mine at 1 1/2".  Each piece was also 22" long.  Remember when we measured our fabric scraps yesterday for the table runner?  Also, we're going to do some more geometry to get the perimeter of our mug mat, to be sure we have enough fabric to go all the way around the little thing.  A 6" x 9" mug mat has a perimeter of 30".  I'm safe with my two strips at 22" long.  I just seamed them together (matching the plaid), with a 1/4" seam.  I pressed the seam open.  Then I folded this new long strip in half and pressed it.
Now, normally, on quilt binding, you would fold the raw edges into the middle and press again.  I didn't want to do that in this case.  I liked the casual, folk art element a raw edge added to my mug mat.  Fold or don't fold - you decide.  To apply the binding to your mug mat, on one of the short edges, fold the end under about 1/4".  Slide your little quilt in between the layers of fabric of the binding.  Pin the beginning of the binding to the quilt.
So here's the next new technique today:  a mitered corner.  About 1/4" from the corner, pleat your binding, so it makes a slight angle.  Like the mitered corner on a picture frame.  Pin.
If you are using a plaid, try to get your lines to match up.  That's one of those little details that makes the difference between homemade and handcrafted.  It's hard to see, but the little blue line actually does match up.  Repeat mitering and pinning all the way around.  When you get back to your starting place, leave a bit of a tail to overlap, and cut the loose binding.
Again, I made sure to match my plaid.  Fold the end under about 1/4" and pin to secure.  You can see in the photo that I had already started to stitch my way around.  This was purely to give you a better picture sans pins.  After you get your binding secure all the way around, THEN start stitching.  You know the drill - straight, zigzag, decorative - all your choice.  Thread - matching or contrasting - all your choice.  I used the same bright green and a cute cross-stitch.

Let's play the options game again!  YAY - it's one of my favorites.  It's a chance to show you how far outside the box you can actually go and still have something turn out well.  Let's start with fabrics.  I did greens and the orange/green plaid for St. Pat's Day.  You can use themed fabrics for any holiday.  Or traditional holiday colors.  Use someone's favorite colors for a special occasion (think mother/sister-in-law, neighbor).  How about school colors for a new high school grad heading off to college?  Embellish a corner with a monogram.  Or a cute button.  Just be sure to leave a space for the mug!

What about shape?  How about squares instead of rectangles.  Use them for coasters.

What about size?  Use the quilt-as-you-go technique on placemats.  Or a table runner.  Or a wall hanging.  Or even a baby quilt.  The technique works best with straight-edged geometric shapes and strip piecing.  But there are no rules that say your strips have to be exactly rectangular.  Give your piece a real modern flair by using those "wonky" bits of fabric.  Or use a quilt block that has a circle in the center, then strip piece around that block.  Overlap pieces, but leave raw edges.  Wow, now you're really walking on the wild side!

What about repurposing?  I mentioned using old towels for batting above.  But what about using old blue jeans for the quilt piecing.  Or cotton dress shirts.  Any cotton fabric will work.

Play with your scraps today, and have FUN!

Photobucket

Monday, January 23, 2012

Tea for Tuesday - Knit Heart Mug Mat and Tutorial

A great project to boost your new knitting skills, make as a gift for someone special, or keep for your favorite cup of java.

So how cute is this little mug mat?!
We'll practice the knit stitch (k), learn to purl (p), follow a "real" pattern, and how to weave in your beginning tail.  Before we begin, though, if you are left-handed, READ THIS:


We are going to use this pattern from FaveCrafts.com.  If you need a pattern for a project, FaveCrafts is the place to go to get one free.  They have everything from sewing to knitting to crocheting and more.  Go check them out sometime when you have a chance.

For this project, you will need:
1 ball of cotton worsted weight yarn (like Sugar-n-Cream), your choice of colors (I used a hot pink)
Size 6 needles (I used 7's)
Size D crochet hook
yarn needle
piece of scrap cardboard
ruler
scissors

Following the pattern, cast on 19 stitches.

The first row of the pattern is just a plain knit stitch (k), but here's where you start to weave in that leftover tail of yarn.  Start by knitting 1 stitch.

Flip tail yarn away from you, towards the back of the work.  Knit 1 more stitch.
Flip the tail back toward you.  Continue moving the tail back and forth between stitches until you are about half way across the row.   Finish knitting the row, then knit 2 more rows.

So this is where our next new stitch comes in.  Start by knitting 9 stitches.

The next stitch is a purl (p).  Begin by bringing your working yarn forward to the front of your piece.
Insert the right needle into the loop on the left needle from right to left, on the front side of the needle.
Loop working yarn UNDER the right needle.

Pull through the loop on the needle.  Slide old loop off the left needle.  It's just like a knit stitch, but in reverse.  By working k's and p's, the yarn creates "bumps" on one side and a smooth side (what we typically recognize as a knitted texture) on the other.  Switching back and forth allows the knitter to control where the bumps are, which in this pattern, creates the little heart.

By the way, when I first learned to purl, I CONSTANTLY would lose my stitch off my needle.  If this happens to you, DON'T PANIC!  Just slide your left needle CAREFULLY back into the little loop and try again.  Keep trying until you get it - remember, practice patience and persistence.

Now you will knit the other 9 stitches across the row.  I know just making 1 purl stitch isn't going to teach you how to do it very well, so that's why this pattern is really great.  Continue following the pattern, working k's and p's as directed.  After 6 rows, you'll start to see the bottom of the heart.
After 12 rows, it's starting to really shape up!
Since this pattern does involve some accurate counting, be sure to mark your pattern as needed to keep track of your progress.
Before you know it, you'll be all the way to the top!  Bind off and fasten off.  Use your yarn needle or crochet hook to weave the loose end in on the back side.  If you need to, use the hook to pull the beginning tail to the back side, too.
Now if you want, you can stop here.  The mug mat in the original pattern photo has fringe, and if you'd like to add fringe to yours, here's how to do it.

Cut a rectangle from scrap cardboard (think cereal box - I used a leftover butter box) that's approximately 5" long.  It doesn't have to be exact - it's not like it's a heat shield tile on the space shuttle.

Wrap the yarn around the rectangle LENGTHWISE 19 times, ending when you get back to the top of the rectangle on the back side.
Remove the cardboard.
Snip the top loops with scissors.
Snip the bottom loops.

To add this fringe to your mug mat, insert your crochet hook from BACK TO FRONT in the corner of the base row.
Loop one of the fringies over the hook.

Pull through, then loop the tails over the hook.

Pull those through the loop on your hook.  Pull tight.
It should look like this.
Work across both the base row and the top row.
When you get all the way across, both rows, use a ruler to trim your fringe.
And then you are all done.  Now, you can knit anything - all knitting is knits, purls, and yarn overs/unders - even cables.  Aren't you just so talented and clever!  Make one of these or a dozen.  Make them in all reds, pinks and whites for St. Valentine's Day.  Make them with larger needles, in pastels, and stitch them together to make a cute baby afghan.  Make a bunch in a friend's favorite color, and stitch them together to make her a throw for her birthday or a scarf for Christmas.  Quite a lot of versatility for a little heart!

Enjoy your newest knitting stitch!

Photobucket