Thursday, May 31, 2012

One Yard Wednesday - Easy Wonky House Block Tutorial

A lesson in patience and OCD Management today...


Made these for a SWAP on Mary Jane's Farm Girl Connection.  Sounded like so much fun.  Fabric piecing as folk-type art - how totally cool, right?  Wrong.

I read tutorial after tutorial online.  They all involve using odd-shaped pieces from your stash and some piecing that is just so tiny that these poor over-40 eyes would be crossed indefinitely.  And then, of course, the OCD kicked in.  How wonky is too wonky...

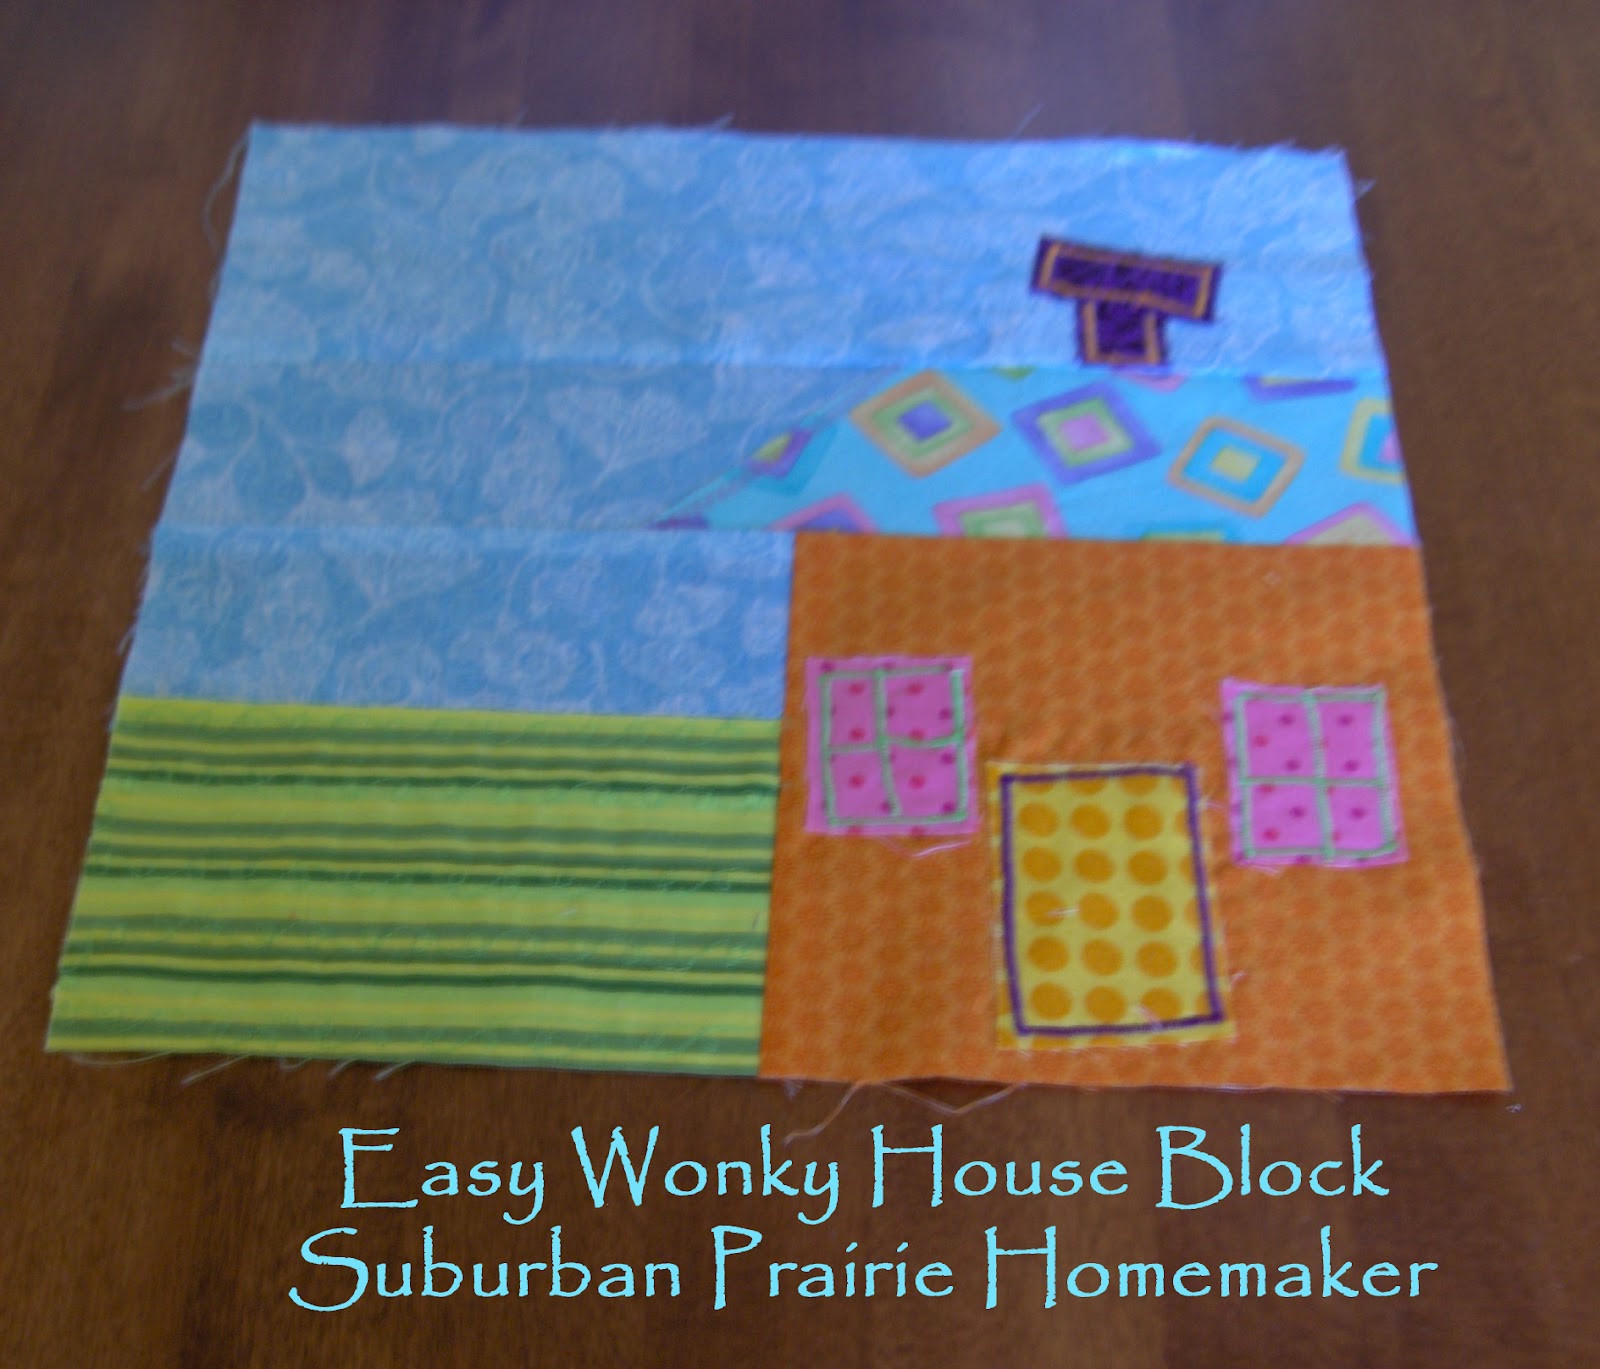
So using a suggestion from my farm girl sisters, and their prayers for patience and persistence, I made the cutie pie you see above.  Well, actually I made 6.  Because these are for a SWAP.

Since you, my dear reader, have practiced patience as well, waiting for this tutorial today, let's get started!

You will need graph paper, a ruler, a pencil and eraser.  For big erase jobs, which this had the potential to be, I always use my Pink Pearl instead of the eraser on my pencil.  Saves that little guy for when he's really needed.   You will also need fabric scraps that are big enough to make sky strips, a roof strip, and a house square.  Anything else can be made from mismatched teeny tiny bits from your stash.

For the six 12" blocks that I made, I used 1 yard of blue print for the sky strips, 1/2 yard of the orange to make the houses, 1 fat quarter of the roof color, and probably about a fat quarter to make the grass strips.  The rest was all little bits from my stash for the doors, windows, and chimneys.  And I mean little bits - like doors that are approximately 2" x 3", and windows that are 1" x 2".  The chimney pieces were 1/2" x 1" and 1/2" square.  Like I said, little bits.  You will also need a cutting mat, quilting ruler and rotary cutter.  Or at least a regular ruler and scissors.  And sewing things like a machine and thread.

The funnest part about the wonky house block is that everything can be random.  Throw everything we've talked about for color matching and coordination out the window.  If you like a certain bright purple next to something else, use it.  Pretend you are a kid, and you are drawing an imaginary house.  And you get to color in that picture with fabric.  If you are a totally free spririt and can just start stitching, go for it!

If you are OCD like I am, read on!

Mark out a square on your graph paper that will be a scale sketch of your finished block.  I have 1/4" graph paper, and used 1 square to equal 1/2".  I made a square on the graph paper that was 6 inches, then added a single row of squares all the way around to accommodate the 1/4" seam allowance.  This represented my 12 1/2" block.

This is when you start adding the features you want in your "drawing".  I started with the house - that's supposed to be the main feature.  For my first sketch (the one that drove me absolutely nutso), I had a house with an odd-shaped roof, and I even tried to do hills and trees.  Then I tried to mark it out to do the piecing, so at least I'd have a road map of how I was going to piece it all together.  It was a mess.  A nightmare!  Imagine cutting pieces 5/8" x 4 1/4".  And really goofy angles that I don't think I could cut.  Let's just say, that this was way more than I bargained for, and certainly not the fun, creative project I had anticipated.

So I got smart.  For my second house, which is the one we're using today, I put my house in the bottom right corner as an anchor.  Then I added two strips that would be the sky and the grass under the roof.  Both straight and simple rectangles, I might add.  The roof, and Sky #2, would be somewhat equal in size, with a simple 45-ish degree angle connecting them.  To top everything off, Sky # 3 would be a simple strip, height needed to make measurement and width of the block.  See?  Much easier!

Here's what I ended up cutting:
Orange (house base) - 7" square
Green stripe (grass) - 6 1/2" x 4 1/4"
Sky #1 (between grass and roof) - 6 1/2" x 3 1/4"
Sky #2 (attaches to roof) - 3" x 8"
Sky #3 (top) - 13" x 4"
Roof - 8 1/2" x 3"


Even after making the blocks, these are still rough measurements.  Feel free to use whatever measurements you want for your block.  The trick is to make certain sections the same height, then cut them to the correct width of the block when you are all done.  When you square up your block at the end, it may end up a different size than you anticipated.  And that's ok, too.

Section 1 is what I called my base.  It's the house, grass, and Sky #1.  Start by stitching together the sky and the grass, then pressing the seam toward the grass.  Line these up with the base of the orange square and stitch, press, and trim if needed.  By the way, use 1/4" seam allowances throughout.  It should look like this:

Next up is attaching the roof to the sky.  Start by cutting the ends of the roof piece to roughly 45 degrees.  I just lined up my ruler with the bottom corner and angled it up and to the right.  It was close enough for me.   (and that's ok), use the lines for these angles on your quilting ruler.If you really need a 45-degree or 60-degree angle, use the lines on your quilting ruler to help you get the angle that you need .

This is what we end up with.


Now, we overlap!  Lay the angled piece over the straight piece, lining the top point of the angled piece up with the top right corner of the straight piece.  Stitch along the angled edge.  Use pins if you need to - I didn't.  I also used a hot pink thread (just for fun) and a zig zag stitch.  You don't have to use hot pink, but I do recommend the zig zag stitch. This is called raw edge applique, and by using the zig zag stitch, you help stabilize the fabric.  Plus it looks cool.  It's a way to add a little fun detail, even if you don't have a big fancy machine.

Fold the roof section back across the sky section, and trim to leave a 1/4" edge behind your sewing.  This eliminates the extra bulk from the center of the block.  Bulk is not a good thing.

Stitch this strip onto the house section, matching the right roof edge with the top right house edge.  Press the seam toward the house.

Trim as necessary.  Then, sew on the last sky strip.  Press the seam toward the top sky strip, and trim if necessary.  Use scraps to make the windows, door, and chimney.  I used a decorative stitch to attach mine, but you could use a plain zig zag.  You will also notice that my front door seems to float.  Remember our 1/4" seam allowance?  When the recipients stitch their blocks together, I didn't want my doors to get caught in the seam.  Again, that bulkiness issue thing.

Here are all 6 of them together.
You can easily make a whole bunch of these over a weekend and do a table runner or small quilt.  How perfect would these be for a child?!  Feel free to add borders around the blocks.  Add outside borders.  Or not.  Make them smaller.  Make them bigger. Make them all different sizes with different borders.

Tap your inner wonkiness, and make some this weekend!  Have fun!


Tuesday, May 29, 2012

Tea for Tuesday - Free Mug Rug Patterns

Just a quick hello this morning!

There are several websites that I subscribe to that have free e-newsletters.  One of my favorites is AllFreeSewing.com.  Today's newsletter was perfect for Tea for Tuesday because it has a link to a list of free mug rug patterns.  So, I thought I'd share that list with you.

A great way to save money crafting is to find websites like this.  By using a free pattern, then using fabric or materials you may already have on hand, your wallet doesn't take such a hard hit when your creative juices are flowing!

Happy Tuesday!

Sunday, May 27, 2012

Happy Memorial Day!


While you are celebrating with family and friends today
please take a moment
to remember those
who have fallen
in service
to our great nation...


Friday, May 25, 2012

Individual Gelatin Salads

A quick and easy blast from the past, with a new country chic twist!


Here's another dish to try to sneak some vegies into a picky eater.  Seriously, does anyone NOT like Jell-o?

So this is an oldie but a goody - a throwback to those picnics and family get-togethers in the 70's.  But with a  fun, modern twist.

Seems no matter where you look these days, everyone is putting individual servings of whatever they happen to be making into canning jars of various sizes.  This is a great way to continue using jars that have chips in the top when they can no longer be used for canning!  So I thought it would be fun to do the gelatin salad in the jars.

Here's how it goes:
Start with a 6-ounce package of orange gelatin.  This is a combination of the hot and quick-set methods you'll see on the back of the package.   Add 2 cups of boiling water and stir to dissolve.  Add 1 cup of cold water and stir again.  Add enough ice cubes to make 4 cups, and stir til the ice cubes are completely dissolved. I mix this up in a 4-cup Pyrex measuring cup so I can be sure.  Place in fridge for about 30 minutes.  While gelatin is taking a chill, shred about 2 cups of carrots.  I run mine through the food processor so they are really really fine.  Also, set out 6 8-ounce jars on a cookie sheet.  When the 30 minutes are up, pour gelatin over carrots and stir to mix well.  Pour gelatin/carrot mixture into individual jars.  Go ahead and fill them up - no need to worry about head space here because you won't be canning with them.

CAREFULLY put the jars in the refrigerator.  Set the timer for 10 minutes.  When the timer rings/buzzes/beeps, stir the mixture in the jars (again CAREFULLY).  Repeat this 3 more times, for a total of 40 minutes.  This keeps your carrots from all settling on the bottom.  Then, allow your gelatin to set.

Serve straight from the jar, or top with a bit of crushed pineapple from a can.

This makes a great presentation as is, but if you want to gussy it up a bit more, put on a lid and ring with a circle of burlap, like I did for the photo.  Add ribbon and a name tag if desired, and use as a placecard.

Feeling brave?  Make it as a ring!  Feeling not so brave, chill the mixture in a serving or mixing bowl.  Spoon and serve from there.

No matter how you make it, JUST DO IT!  And enjoy!


Thursday, May 24, 2012

Gluten Free Triple Chocolate Shortbread Bars Recipe

A little treat for the not-so-sweet tooth in your family...


This is a great recipe when you need a bunch of treats in a hurry!  Perfect for a last minute picnic, or even just to take to Bible study or small group!

SPH Gluten Free Triple Chocolate Shortbread Bars
inspired by a recipe in Sandra Lee Semi-Homemade magazine
(issue and date unknown)
1 1/2 cups butter, softened and at room temperature
1 cup sugar
2 eggs
3 cups Pamela's Baking & Pancake Mix
1/2 cup cocoa powder (I use Hershey's)
1 cup mini chocolate chips (I use Nestle's)
1 package Wilton Candy Melts - white chocolate
2-3 tablespoons Betty Crocker Rich & Creamy Frosting - vanilla
milk (if needed)

Preheat oven to 350.  Butter a large, rimmed cookie sheet.  In mixer bowl, cream butter and sugar together until well combined.  Beat in eggs.  Add first 2 cups of baking mix and mix well.  Add remaining baking mix and cocoa and mix well.  Stir in mini  chips.  Spread mixture evenly on cookie sheet.  Use your hands and fingers if necessary - dough should be pretty stiff.  Bake for about 20 minutes or til tester inserted in center comes out clean.  Allow to cool completely.

While bars are cooling, melt together the candy melts and frosting.  If mixture is too thick and stiff, add milk a little bit at a time.  Only a tablespoon or two at most!  When bars have cooled, spread white chocolate frosting over the top.  Cut into bars, and serve.

You'll notice in the photo above that my bars are thicker and I obviously didn't spread my frosting.  I used my 9x13 pan because that's what I had handy at the moment.  These really need to be thinner to work as cookies.  Also, I piped the frosting to look pretty for the photo.  Because of all the chocolate in the frosting, it sets up fast - and it was certainly faster than I thought it would!  So skip the fancy swirly stuff and just spread it while it's warm.  It will still look nice and taste delicious!

This is another great treat for a family reunion or large picnic.  They'll keep pretty well in the heat (do try to keep them in the shade, though), and one batch makes a large quantity.  Plus, you'll only have your oven running for a very brief time on a hot day.

So get your chocolate on and enjoy!


Recipe linked to Very Good Recipes

Wednesday, May 23, 2012

Gluten Free Secret Ingredient Cookies

The question for the Mommy Panel recently was how to get picky eaters to eat their vegetables.  Here is your new secret weapon in this battle...


This is another recipe that I found in that same stack of hand-me-down magazines.  I tweaked it to make it gluten free.

SPH Gluten Free Secret Ingredient Cookies
inspired by a recipe by Candace Zaugg
Taste of Home Magazine, February/March 2008
1 box Betty Crocker Gluten Free Chocolate Chip Cookie Mix
1/2 cup butter, melted
2 eggs
1 tablespoon vanilla extract
1 cup shredded carrots (I do mine in the food processor to make them extra fine)
1 cup gluten free granola (I used Jessica's Natural Foods Chocolate Chip)
1 3-oz. package chopped walnuts

Preheat oven to 350.  Mix the cookie dough according to package directions.  Stir in carrots, granola and walnuts.  Drop by spoonfuls onto parchment lined cookie sheet (I use a cookie scooper).  Bake for 18-20 minutes.  Allow to cool completely, then eat and enjoy!

These would also be lovely dusted with a little powdered sugar if you are so inclined.  We just LOVED them plain!

Another variation:  use grated zucchini.  And the trick with grated zucchini - let it drain in a fine mesh strainer for at least a couple hours before you bake with it.  Zucchini is almost all water.  By draining it first, the water has a chance to escape before the zucchini gets cooked.  No fine mesh strainer?  Use some cheesecloth in a regular colander.  Works just as well.

Feed a few of these to your picky eater, and tell them the secret ingredient is love.

Have a great day!


Recipe linked to Very Good Recipes

Tuesday, May 22, 2012

Dining Gluten Free for Memorial Day

It's picnic and party season.  If you're new to being gluten free, this might seem a little intimidating...

Hopefully the people you are celebrating with are friends and family who understand the situation you are in, and want to be helpful with your situation.  If you know food and your new eating habits will really be an issue, eat first and go late.  Preferably after the main meal has been served.  And remember, if you know it will just be really unpleasant, you can always say "no thanks".  Don't set yourself up to fail by surrounding yourself with negative people.  Failing here could make you sick.  Really sick.

So let's start by saying right now that you don't need to feel intimidated.  Or confused.  Or anything else but confident.  You can do this, and you'll make it through just fine!

Picnic and party season is the same as dining gluten free for Christmas, or Easter, or Super Bowl Sunday.  If you are not hosting the shindig, get the ball rolling with the host.  A polite phone call to discuss eating arrangements is your first priority.  Talk about the threat of cross-contamination, and offer to help with whatever you can reasonably do.  Bring your own hamburger and hot dog buns (Udi's brand are phenomenal!).  If the grillmaster at your event toasts the buns on the grill, ask that yours be toasted first, and in an area where no sausages were cooked (sausages often have fillings that may contain gluten ingredients).  When the burgers are being piled onto a serving platter, try to get your burger onto your own plate separately, or at least snag one that's far away from sausages and hot dogs.

And as for the sides - try to stick with foods that would be "generally regarded as safe".  Like coleslaw, or a gelatin-based salad.  Fruit plates and vegie trays are going to be your best friend!  Remember, if you bring a side to pass, be sure that everyone understands whatever system you and your host come up with to keep it from being cross-contaminated.

Try to be as polite and diplomatic as possible when passing up someone's famous dish that took them hours to make. Say lots of nice things about how delicious it looks.  Ask for the recipe, and tell them that it looks so good, you'd like to try to make it at home gluten free.  Usually the compliment of asking for the recipe will help soothe any hurt feelings.

Oh, and of course, if it's a birthday or graduation party or bridal or baby shower - SKIP THE CAKE!!!

Let me give you a real-life example of the RIGHT way to go about this:
For a birthday party we were attending, the hostess was making root beer pulled pork in her crock pot.  I know this because I called as soon as the invitation arrived.  Our contribution to the party was the root beer and the barbecue sauce.   We also brought potato chips and our own buns for our sandwiches.  The other party-goers were genuinely interested in the how's and why's of living gluten free.  Not one person noticed a difference in the quality of the pulled pork, and some said it was better than ever.  When it was time for ice cream and cake, we skipped the cake and had just plain ice cream.  None of us felt deprived or left out.  Everyone had a really great time.

Try to keep the focus on the purpose of the gathering, whether it's the celebration of a special event, or just the fellowship of friends and family.  Find ways to make eating safely work for you, and have a great time!


Not Your Mama's Deviled Eggs Recipe

Get ready to stand tradition on its ear and then some!  This will be your new dish-to-pass at any picnics or parties this summer - I PROMISE!


I am not a spicy hot foods person.  I like many things, and generally will try almost anything once.  Well, maybe I'm not that brave, but the day I saw this recipe in a hand-me-down stack of old magazines, it sounded too good not to try.

SPH Totally Untraditional Deviled Eggs Recipe
inspired by a recipe by Patricia Harmon
from Taste of Home Magazine, February/March 2009

6 eggs, hard boiled and sliced in half
(wipe your knife in between eggs to avoid getting yolk all over the other eggs)
1 ounce cream cheese (more if needed to thicken yolk mixture that is too thin)
1/3-1/2 cup mayonnaise (start with 1/3 cup, then add more if needed to thin the mixture)
1 ounce diced chilies from a can (roughly 1/4 can - more or less to your taste)
1/2 teaspoon chipotle chili powder (more or less to your taste)
1 tablespoon minced garlic (I get mine from a jar - you can use more or less to your taste)

Optional Toppings:
Salsa
Sliced ripe olives (shown)
Shredded cheese (shown - I used Mexican cheese mix, but you can use what you like or have on hand)
Sliced green onions
Sour cream

Remove cooked egg yolks from eggs, and place in blender with cream cheese, mayonnaise, chilis, chili powder, and garlic.  Blend until smooth and creamy.  Yep, that's the trick for a no-lump filling.  If your filling is too thin, add more cream cheese - too thick, add more mayo.  Simple.  Pour contents into a zip top bag.  Ask a kid or husband to hold it open for you, or place in a glass or jar.  Fold the edges over the edge of the jar.  This will keep the zipper part from getting goopy when you pour stuff into it from the blender.  Seal the bag, and snip off one of the bottom corners of the bag.  Not too much - just enough to let the filling come out easily.  Squeeze filling into eggs, then top as desired.  Use any leftover filling as a dip for celery, cucumbers, carrots and jicama.

I will never eat regular deviled eggs again.  Seriously!  As a not-liker of spicy foods, this actually has what I'd call good heat.  It doesn't fry your mouth or tongue, but you'll definitely feel warm at the back of your tongue, where it's much less painful.  And it's a pleasant warm, not "I need a fire extinguisher!".  These are definitely a more modern, grown-up take on a traditional favorite.

And as for the toppings...

Take them in small separate containers, and let folks make their own deviled egg creations.  Kind of like a taco bar, but yours will be a spicy deviled egg bar.    How fun and different would that be?!

Just remember that these eggs are made with mayonnaise.  Mayonnaise and warm weather do not always play nicely with each other, so be sure when you bring them somewhere you have them adequately cooled, and kept cool throughout the day.  Think ice, and think lots and lots of it, unless you will be in an air-conditioned location.  These eggs are amazing, and you'll want to be remembered for their flavor, not for food poisoning.

Try a new twist on an old favorite, and ENJOY!!!


Monday, May 21, 2012

Eating Gluten Free When You're in a Hurry

It's Monday, and let's face it, we're all going to have a crazy busy week this week, right?

I'm sure my house is no different than yours.  I have two kids.  They are in activities.  Sometimes, they need to go opposite directions at the same time.  Sometimes, when they need to do this, I am the only driver in the house - at least for now, but that's another story.  And it always seems they need to be somewhere shortly after dinner time.  So how do we manage?

The same way everyone else does - you either reheat leftovers or your grab a box from the freezer.

And what if you don't have any leftovers?

There are quite a few brands of gluten free convenience meals available.  A favorite in our house is Udi's pizza.  We usually get the pepperoni, but cheese and Margherita pizzas are also available.

Here's my blockbuster method for making EXCELLENT frozen gluten free pizza:  Start by defrosting it.  Yep, you read it correctly!  You probably know (or will know when the kidlets get home from school today) that tomorrow night (or whatever night this week) is going to be your nutso night.  Take the pizza out of the freezer now (or maybe when you get home from work tonight).  Put it in the fridge and let it defrost overnight tonight and all day tomorrow.  Now, to bake it!  When it's time to start dinner, preheat your oven to 425.  When you turn the oven on to preheat, put a cookie sheet in at the same time.  This is critical - you must preheat the cookie sheet!  It will act like a pizza stone, and cook the underside (and especially the middle) of the crust.  While the oven is preheating, remove the pizza from its box and plastic, ditch the cardboard circle, and set the pizza on a piece of parchment paper.  When the oven has preheated, lift the pizza using the piece of parchment paper, and place it on the cookie sheet.  Be very careful!!!  You should hear a sizzle when the pizza/paper makes contact with the cookie sheet.  Bake for about 17 minutes.

Maybe you'd like to make your own pizza?  Against the Grain makes a delicious plain pizza crust that you can use as a base for your own creations.  Be sure to bake the crust first - defrost crust, preheat your cookie sheet and oven to 425, crust/parchment on cookie sheet, and bake for about 10-12 minutes.  Then, you can have at it!  Try Annie's Naturals Sweet & Savory BBQ sauce, some leftover cooked chicken, a sliced red onion and some mozzarella cheese.  Or maybe a Hawaiian pizza is more your style?  Of course, you can always do a more traditional approach - Muir Glen pizza sauce, some Aidell's Italian Sausage, and mozzarella cheese.  The sky and your imagination are the only limits here.

And, I will let you know, that the Udi's pizzas and the Against the Grain crusts usually feed either two adults or two teenagers - so gauge your needed portions appropriately.  If you will be feeding the team after baseball practice, be prepared!


Another favorite in our house is Amy's.  The kids love her tamales and enchilada meals.  Princess also likes her gluten free vegetable lasagna.  Amy's also has several other heat-and-eat meals that are gluten free, and quite a few that are vegan as well.  Again, for fastest and best results, defrost them first.  I know it seems odd because freezer meals are meant to go from freezer to oven to table.  Just trust me.  I'm a mom.  I know these things.  Again, do the preheat the cookie sheet thing, and place the meals on the sheet when the oven is preheated.  We ALWAYS bake all Amy's meals on 400 degrees.  Some of them have different temperatures, but we get the best and most consistent results at 400.  Also, most of them take about 35-40 minutes to cook fully when thrown in the oven frozen.  By defrosting, you can save yourself about 10 minutes.  That may not seem like much, but sometimes those extra 10 minutes are all you need to make it somewhere on time.

Happy Monday, all - and hope your week isn't too crazy!


Saturday, May 19, 2012

{GIVEAWAY} WINNER!!!

Good morning, everyone!
I have great news!
We have a
WINNER
for our fabulous
Fashion to Figure
GIVEAWAY!

CONGRATULATIONS
FREEB
!!!!

Please email me today
and we will get you all set up to claim your prize!


Friday, May 18, 2012

FASHION TO FIGURE **GIVEAWAY**

Just a reminder...
Today is
the last day
to enter the
Fashion to Figure Giveaway!!!
Click the button
in the right sidebar
to read more about it
and
ENTER!!!

Thursday, May 17, 2012

Gluten Free Triple Layer Lemon Bars Recipe

Quick and simple.  Easy and delicious. Light and lemony.  Need I say more?


I think the photo says it all - here's the recipe:

SPH Gluten Free Triple Layer Lemon Bars
1 3-oz. package chopped walnuts, divided
1 box Betty Crocker Gluten Free Yellow Cake Mix
1 egg
1/2 cup butter, melted
1 6-oz. box and 1 3-oz. box Jell-o (brand) Cook & Serve Lemon Pudding, made per package directions
1 8-oz. container frozen non-dairy whipped topping, defrosted

Preheat oven to 350 degrees.  In a mixing bowl, stir together cake mix, egg and melted butter until mixture resembles crumbs.  Add about 2/3 of the package of walnuts.  Butter the bottom and sides of a 9x13 cake pan.  Press mixture into cake pan and up the sides.  Bake for about 12-15 minutes, until mixture is definitely set and edges are beginning to brown.  Remove from oven, and allow to cool completely,

While the crust is baking and cooling, mix the larger box of pudding.  Pour into a bowl and allow to cool to nearly room temperature.  No need to refrigerate - you'll do that in just a bit.  Just let it hang out on your counter while you make the other box of pudding.  So then make the smaller box of pudding.  Pour this batch of pudding into a large mixing bowl, and allow to cool for a few minutes.  Just until the steam is gone.  Then, fold in half of the container of whipped topping, until pudding is light and fluffy.

When the crust has cooled almost completely, pour the bigger batch of lemon pudding over the top and spread til even.  Next, spread pudding/whipped topping mixture over the lemon pudding.  Finally, top with remaining whipped topping.

In a zip-top bag, place remaining walnuts.  Crush with a rolling pin.  It's ok if they're not all the same size - just crush them up a bit more than they already are in the package.  Sprinkle over the whipped topping layer of the bars.

Cover with plastic wrap and refrigerate for at least 30 minutes.  Cut into bars and serve.

This light and delicious bar is the perfect make-ahead and bring-along dessert.  Because the recipe makes a huge cake pan of bars, it's great for Bible studies or small-groups or to take to a family reunion.

Not a fan of walnuts, use pecans.  Or almonds.  Or leave the nuts out entirely.  You decide.

Make some up this weekend, and enjoy!


Tuesday, May 15, 2012

Expanding the Gluten Free Pantry - Emergency Preparedness

Just read an article that really got me thinking, and I needed to share it with you...

As I was out hip-hopping around the blogosphere this weekend, I found an article about how to easily and inexpensively save up 52 weeks worth of food.  With the economy the way it is, and natural disasters, and all - we should all have a well stocked pantry, just in case.  In fact, FEMA's emergency preparedness supply list recommends having a three-day supply (at least) of non-perishable food.  And that's at least a three-day supply.  For each person.  Including 1 gallon of water per person per day.  And that's just for drinking.

This may sound really over the top, but remember what happened in New Orleans after Hurricane Katrina?  Or New England after Hurricane Irene?  Desperate conditions existed for those folks for a lot longer than 3 days in many places.

Would your family be ready?

Emergency preparedness is no laughing matter, but it's especially important for those of us who live on a special diet.  Being ready with some shelf-stable basics will help!

About two weeks ago, I shared with you how to stock a gluten free pantry.  These are basic items I keep on hand just for every day.  Within that list, you'll notice that a LOT of the items are shelf-stable items that anyone could and should keep on hand.

The easy way to start building up an emergency food supply is to just buy one more of whatever you happened to be buying.  For example, if you normally buy a bag of rice, buy 2.  One way that we've found to not only save money, but to keep a good store on hand, is to buy in bulk.  Some products are significantly cheaper if you can take advantage of case discounts (like at Whole Foods or warehouse stores), or through Amazon.com.  Depending on the item, a case is usually good for our family of 4 for 2-3 months.  Lately, with a growing teenage boy, some items are disappearing significantly faster, but that's another story for another day.  Also, do what the extreme couponers do:  wait for items to go on sale, then use coupons!  Hmmm, where have I heard this before...

So what do I buy in bulk and where?

Here's my simple list:

Whole Foods:  Chicken broth; beef broth; cream of chicken soup; all canned tomato products; bagged grains and beans; snack items such as Glutino brand crackers and cookies, Smoreables graham crackers, etc.; Oregon Chai (brand) chai tea concentrate; fruit and vegetable juice blend drinks (when they are on sale); frozen fruits and vegetables; butter (can be frozen); orange juice (the kind in a milk-type carton); condiments (BBQ sauce, ketchup, mustard); rice noodles; canned beans.

Amazon.com:  Pamela's Baking and Pancake Mix; Betty Crocker baking mixes;  Gluten Free Pantry baking mixes.  They also have lots of Bob's Red Mill and King Arthur products if you are interested in those.

Walmart:  Nonfat dry milk powder; non-dairy powdered coffee creamer; Hershey's cocoa powder and baking chips; some condiments (chili sauce); sugar; Chex-brand cereals; Gluten Free Rice Krispies (TM)

My local Meijer:  canned fruits and vegetables; dried beans; anything they have that's usually in my pantry that's on sale for cheaper than I can get it anywhere else.  This is where knowing the price of everything really comes in handy.  For example, this week, they have several gluten free baking mixes on sale.  You bet I grabbed whatever I could get!  They also had several types of Glutino cookies and snacks on sale.  Also, I buy my coffee from Meijer.  I look for the organic coffee that's on sale, and I can get it cheaper there than anywhere else.  I store it in my freezer.

Check the clearance bins and racks, too.  I found some single-pot size coffee packages for $1 one time, among many other values.  You'd be amazed what ends up there, so it's worth the look!

And as for storage?  We have several shelves in our mudroom that hold all the cans and bags.  Unless you are really good at building things, I HIGHLY SUGGEST getting the metal wire shelves.  You can get them at WalMart and elsewhere for very reasonable prices (be sure to check around to get the best price).  They also hold a LOT of weight per shelf.

Other basics to keep on hand - cooking oil, and anything else you think you can't live without food-wise.

Try to keep your items as organized as possible by expiration date.  Most canned goods are still safe to eat beyond the expiration date, but that's an easy way to ensure you are rotating your stock.  Also, buy and store what you'll eat.  There is nothing worse than spending money and throwing the items in the trash due to spoilage.

A few other things to keep in mind:

  • In your freezer, keep a bag of ice.  I know it limits your storage space, but if the power goes out in an emergency, you'll have that much more "cold time".  We keep a bag of ice in our upstairs freezer above the refrigerator and in our deep freeze.  If you have one of those big-enough-to-hide-a-dead-body freezers, get two or three bags of ice.  And, we plan to also rotate frozen items out of our freezer into our refrigerator to help keep the fridge items cold as well as SAFELY defrosting what we are going to eat should we lose electricity.
  • You will need a way to cook it all.  If the power goes out, you may not be able to cook on your stove.  Having a camp stove, or some other means of cooking, will be essential.  So will a handheld can opener.
  • Food safety will be especially important.  Keep some plastic gloves on hand, and some bleach to help sterilize water for drinking and cleaning.  Also dish soap.
  • Speaking of washing dishes, a good supply of disposable plates, forks, spoons, and knives will be good to have on hand.  We have a drawer in our kitchen where leftover items from takeout get stored.  Look for sales around graduation time if you need to stock up.
  • In your emergency kit, include a copy of Triumph Dining's gluten free dining and grocery shopping guides.  If you have to evacuate, you may eventually be shopping and eating in unfamiliar places.  These are great to have on hand anyway, but they should definitely travel with you.
Be sure to check out these other great articles on emergency preparedness at Six Sisters' Stuff.  LOTS of really great ideas!

And, my favorite, and perhaps most family-friendly guide to emergency preparedness:  the merit badge book for Emergency Preparedness from The Boy Scouts of America.  See if you can get a copy from your local library if you don't have a scout.  Or, you can buy it for $4.49 + shipping.

Think about it. Learn what you can.  Make plans - even a simple plan to start is better than no plan at all.  Talk about it with your family.  Then start preparing.

Have a great Tuesday, everyone!


Sunday, May 13, 2012

Gluten Free Broccoli with Lemon Sauce Recipe

Sometimes, recipes are automatically gluten free.  Can you spot the ones that are?


Sorry photo is blurry - it's because of the steam!

So you picked up one of your favorite food magazines in the store, and as you turn the pages and start drooling, that little voice starts nagging in your head about the whole gluten free thing.  Discouraged, you put the magazine back down and leave the store.

Well, friend, I'm here to tell you to fret no more.  There are many recipes that are in national food magazines that are already naturally gluten free.  How can you tell?  KNOW YOUR INGREDIENTS!  There are many sauces and glazes that are cornstarch-based.  Guess what?  Cornstarch is gluten free.  Check out the fillings for fruit pie recipes.  I'll betcha that they are thickened with cornstarch or tapioca.  Tapioca - also gluten free.  Puddings are usually thickened with eggs.  Eggs - gluten free.

Today's recipe is an oldie but a goodie from Taste of Home, probably the most popular food magazine in America because of its easy recipes with down-home flavors.  This one would be excellent with grilled chicken or fish!

SPH Gluten Free Broccoli with Lemon Sauce Recipe
adapted from "Broccoli with Lemon Sauce", Taste of Home Magazine, October/November 2008
3 pounds frozen broccoli florettes, defrosted
1 cup chicken broth (I use Pacific Organic Free Range Chicken Broth - you could also use vegetable stock)
2 tablespoons butter
1 1/2 tablespoons cornstarch
1/4 cup cold water
2 egg yolks, beaten
1/3 cup fresh lemon juice (about 1 lemon's worth-ish - eyeball it; you can always add more if you want more lemony flavor)

Put broccoli in a large saucepan or soup pot with about 1" of salted water in the bottom of the pan.  And yes, salt the water - you'll thank me later.  Cover, and heat over medium heat, about 8-10 minutes, or til heated through.  Meanwhile, in a small saucepan, heat the stock and butter until butter melts.  While stock is heating, whisk cornstarch into 1/4 cup water until smooth.  Add to stock after butter melts, and bring to a boil for about 2 minutes, or until thickened and bubbly.  Remove from heat.  Start adding stock to beaten egg yolks a little at a time to temper them.  And by a little, I mean like a teaspoon at a time at first, then upping the amount gradually, until you have about half egg yolks/half stock in your little bowl.  You do this so you don't end up with scrambled eggs.  The mixture will start to feel pretty warm in your hand.  Then, you know it's safe to start drizzling and whisking in the egg yolk mixture to the rest of the stock.  Bring slowly back up to a boil, and whisk for another 2 minutes.  Remove from heat, and slowly drizzle and whisk in lemon juice.  Strain sauce through a strainer into another container - I used the measuring cup from my chicken stock.  Drain broccoli, and put it in a serving dish.  Drizzle sauce over the top.  Serve hot, and should make about 10 servings.

I love this dish!  It is simple.  It is delicious.  It is quick and easy.  Like you can make it in 15 minutes quick and easy.

However...

You could also add some minced garlic to the sauce.  Or top it all with some slivered almonds.  Serve the sauce over some grilled or steamed asparagus.  Or fresh steamed green beans.  Or cauliflower.  I'm also thinking this would make a great sauce over some fried chicken.  Lots of versatility here, too!

Once you know what you are looking for, and get familiar with ingredients that are naturally gluten free, spotting gems like these will become easier and easier.  Make some for dinner this week, and enjoy!


Happy Mother's Day!

My favorite Mother's Day story...

Pulled from Inspirational Stories 


When God Created Mothers
by Erma Bombeck

When the Good Lord was creating mothers, He was into His sixth day of "overtime" when the angel appeared and said. "You're doing a lot of fiddling around on this one."
And God said, "Have you read the specs on this order?" She has to be completely washable, but not plastic. Have 180 moveable parts...  all replaceable. Run on black coffee and leftovers. Have a lap that disappears when she stands up. A kiss that can cure anything from a broken leg to a disappointed love affair. And six pairs of hands."
The angel shook her head slowly and said. "Six pairs of hands... no way."
"It's not the hands that are causing me problems," God remarked, "it's the three pairs of eyes that mothers have to have."
"That's on the standard model?" asked the angel. God nodded.
"One pair that sees through closed doors when she asks, 'What are you kids doing in there?' when she already knows. Another here in the back of her head that sees what she shouldn't but what she has to know, and of course the ones here in front that can look at a child when he goofs up and say. 'I understand and I love you' without so much as uttering a word."
"God," said the angel touching his sleeve gently, "Get some rest tomorrow..."
"I can't," said God, "I'm so close to creating something so close to myself. Already I have one who heals herself when she is sick... can feed a family of six on one pound of hamburger... and can get a nine-year-old to stand under a shower."
The angel circled the model of a mother very slowly. "It's too soft," she sighed.
"But tough!" said God excitedly. "You can't imagine what this mother can do or endure."
"Can it think?"
"Not only can it think, but it can reason and compromise," said the Creator.
Finally, the angel bent over and ran her finger across the cheek.
"There's a leak," she pronounced. "I told You that You were trying to put too much into this model."
"It's not a leak," said the Lord, "It's a tear."
"What's it for?"
"It's for joy, sadness, disappointment, pain, loneliness, and pride."
"You are a genius, " said the angel.
Somberly, God said, "I didn't put it there."

And as for that tear?  I always told my children that sometimes you love someone so much it flows right out your eyes.  Getting to be my kids' mom is the best Mother's Day present I could ever hope or dream of.  Without them, I would not have been on the adventures we've shared, learned some of the amazing things I've learned, feared the fears, or loved so deeply.  Being their mom has defined who I am, and for that I am so grateful.

Have a blessed, heart-full Mother's Day!


Friday, May 11, 2012

Adoption Day

Today is a special day in our house - Adoption Day!


(photo taken by Princess)


Three years ago today, in the late afternoon, we drove to a friend's house.  This friend runs a wonderful dog rescue, and it was time to pick up our new addition.

About five weeks prior, she had called us with the wonderful news that not only had she found one potential dog for us, but two.  Hubby has animal allergies, so the dog we added to our family had to be what we call a "hair breed" and not a "fur breed".  Limited dander was a MUST!  We were also interested in a small breed - in the 15-20 pound range.  We preferred a female, but the right neutered male would be acceptable.  And, we wanted a dog instead of a puppy.  We had looked on Petfinder.com for nearly three years with no success, and my friend found us not one, but two, dogs.  In a week.

So she sent us the photos.  We had our choice of an extremely adorable little Silky Terrier or an extremely adorable Bichon Frise-mix.  All four of us had our eyes IMMEDIATELY drawn to the little blonde beauty on the screen, each of us choosing names we thought would be appropriate for her.  Each name just somehow not quite right.  And then, Hubby said her name.  And somehow at that moment, we knew she belonged to us because it was the perfect name.  At first, we knew it was perfect because of her color, but now we know it's the perfect fit for her personality.

I won't disclose it here - she deserves her privacy as much as my children and husband.  But let's just say, it is THE MOST PERFECT NAME FOR A DOG EVER!  Really.

That fateful afternoon, our little beasty made the fateful trek from a different rescue in an area where they have a high-kill shelter.  Her savior, the operator of that rescue, would be driving her to our friend's house, and we would pick up 4LPA there.  She was waiting in a small pen in my friend's garage.  And she stood up on her little back legs and danced when she saw us.

My first reaction:  To whom do I write the check, and for how much?  Where do I sign?  She's coming home with me.  Honey, go get the leash!

And she's been my faithful companion ever since.  Always by my side.  A real Mama's girl.

Our lives have never been the same.  We are so blessed to have the most perfect dog in the universe.  She came housebroken, and after a little work, remembered some basic commands.  She has even learned a whole bunch of new tricks, thanks to the patience of Princess (and constant stream of treats).  Her favorite foods are cheese, yogurt, peanut butter, and whatever you happen to be eating at the moment.  She loves frozen mangoes and frozen strawberries and frozen mixed vegetables (but she'll spit out the green beans).  She is spoiled rotten because she deserves it.  She has more sweaters in her wardrobe than I do.  She is so wonderful with children, and even tugs on the leash when we are at the park to go by the sandbox - that's where she greets her "fan club", the pint-size future dog-owners of America who pet her with chubby little sandy sweaty hands and admire her little stubby tail.  They are frequently kissed by a little pink tongue as a reward for their kind behavior, and squeal with delight because "it tickles".  She greets everyone she sees like they are her long lost friend.  Everyone should live "Love Thy Neighbor" like my dog - the world would be a much better place!

If you and your family are considering adding a pet to your family, go to a shelter or a rescue organization.  When you adopt a shelter pet, you save two lives - the one you take home with you, and the one that can now be taken off the streets and given safe haven.  Our perfect dog was waiting for us there - yours could be, too.

Happy Adoption Day, 4LPA!  We love you more than all the cheese in the world can say, and we're so glad we are yours!


Wednesday, May 9, 2012

Gluten Free White Chocolate Butter Bars Recipe

These are so rich and delicious!  And they put the mmmmmm in creamy!


Found this recipe for White Chocolate Butter Bars a while back on Cookies and Cups.  Shelly has the most AMAZING recipes!  The squares look so pretty on a plate, and have such a simple flavor profile, anyone will LOVE them!

SPH Gluten Free White Chocolate Butter Bars
1/2 cup melted butter
1 box Betty Crocker Gluten Free Yellow Cake Mix
1 egg
1 12-oz. package white chocolate chips
8 oz. package cream cheese, room temperature
2 cups powdered sugar, plus more for dusting
2 teaspoon vanilla
2 eggs

Preheat oven to 350.  Butter the bottom and sides of a 9 x 13.  In a large mixing bowl, combine butter and cake mix until mixture looks like crumbs.  Beat in the egg.  It will now be like sticky crumbs.  Press evenly into bottom of baking pan.  Sprinkle the white chocolate chips over cake mixture, and press in gently.  In separate mixing bowl, beat together cream cheese, powdered sugar, vanilla and eggs.  Pour evenly over chips and be sure it reaches the edge of the pan.  Bake for about 25-30 minutes, or til center is set and tester comes out clean.  Remove from oven and allow to cool completely.  Dust with desired amount of powdered sugar.  Cut carefully into squares, and store in the fridge for up to 3 days, if any survive that long.

So I'm thinking I'm going to have to try this with chocolate cake mix and milk chocolate chips.  Maybe even make it a triple-chocolate-threat by putting some cocoa powder in the cream cheese layer?  Some other ideas are floating around, too, but I'll have to get back to you on those...

These would be a great addition to the dessert table at a ladies' luncheon or Bible study, a treat for a neighbor or friend who did something really special for you, or just because it's Thursday.

Give them a try, and ENJOY!


Super Easy Gluten Free Coconut Truffles Recipe

Good morning everyone!  We have a super simple, use-up-the-leftovers treat today!


So I found this wonderful recipe for Coconut Bounty Bites from Steph at Silver Boxes.  They sounded so delicious, I couldn't wait to try them.

Except...

That full bag of coconut I thought I had in my baking cabinet?  Practically gone.  Same for the powdered sugar.

So what's a girl to do?

Improvise with what you've got!

I had a partial can of white frosting in the fridge.  Guess what frosting is made from?  That's right - shortening and powdered sugar.  I had some coconut, but not a lot.  So I used the approximate proportions from Steph's recipe to improvise the little yummies you see above.  And here's how it goes...

SPH Gluten Free Coconut Truffle Recipe
1 cup shredded coconut (use UNSWEETENED - and yes, this time, it does matter)
1 cup white frosting
Mix these two together in a small bowl.  I mashed them together with a fork because my frosting was cold.  Use a cookie scooper or two spoons to scoop out portions and roll into balls.  Then I rolled them in cocoa powder and put a chocolate chip in the top.  Chill before serving.

So let's play with this a little bit, based on what you may or may not have on hand...

Roll them in powdered sugar instead of cocoa powder.  Or roll them in more shredded coconut.  Dip them completely in melted chocolate and top with an almond (sound familiar?).  Use chocolate frosting instead of white.  Need more truffles?  Double or triple your recipe.  Mine made 8 truffles.  Scale the recipe back and make just a few little bites as a secret treat for yourself.

No matter how you make them, MAKE THEM!  Enjoy!


 Recipe linked to Very Good Recipes

Monday, May 7, 2012

Gluten Free Bajan Inspired Rice Casserole Recipe

A taste of Barbados today - and it's not what you're probably expecting!


Princess' 4H club recently participated in our county extension's International Night.  For their country, the club chose Barbados.  The kids learned all kinds of interesting facts about their chosen country, and had to prepare a sample of the country's native cuisine.  Well, it turns out that a common dish in Barbados is macaroni and cheese pie.  It is macaroni and cheese made with Bajan (pronounced BAY-jun like Cajun) spices.  One of the club members' moms made a big crockpot to share of this, and I have to tell you, it smelled oooooh. soooooo. gooooood!  She shared the recipe for Bajan Macaroni Pie with everyone, and I decided to play with it, based on gluten issues, and some of the comments I heard from the kids regarding flavor.

SPH Bajan Inspired Rice Casserole Recipe
2 cups rice
2 quarts chicken stock (I use Pacific Naturals Free Range Chicken Broth), divided
olive oil for pan
1 pound ground turkey
salt and pepper
1 large green pepper, seeded and diced
1 onion, diced
1-2 tablespoons minced garlic (I use the kind from a jar - add more or less to your taste)
2 tablespoons paprika (I used 1 1/2 T. sweet, and 1/2 T. hot)
1 teaspoon ground black pepper
1/2 teaspoon thyme
1/8 teaspoon ground cloves
2 teaspoons dried parsley
couple shakes cayenne pepper (more or less to taste)
2 tablespoons gluten free all purpose flour (I use Glutino brand)
2 tablespoons Dijon mustard (I use 365 Organic brand)
16 ounces grated cheddar cheese, divided

Preheat oven to 350 degrees.

Pour rice into a medium pan.  Add 1 quart of chicken stock.  Cover and bring to a boil over high heat, then lower heat and simmer for 15 minutes.

While rice is cooking, heat oil in a large skillet over medium high heat.  Add ground turkey, season meat lightly with salt and pepper, and cook until nearly all browned.  Add onion and peppers.  Cook until onion is translucent.  Add garlic and spices.  Cook until garlic is fragrant, just a minute or two.  Add flour, and cook for just another minute or two - to take the raw taste off the flour.  Add mustard and remaining quart of chicken stock.  Stir til starting to thicken a bit, then stir in all but one cup of cheese.

Stir meat/cheese mixture into cooked rice, then pour entire batch into a 9x13 baking pan.  Spread evenly, and top with remaining cheese.  Bake for about 15-20 minutes, or til cheese on top is bubbly and starting to brown.  Serve warm.

You can serve this as a main dish, like I did, or eliminate the turkey and use it as a side.  In Barbados, the pie is served with flying fish.

One of the best parts about this dish as that it is spicy, but not the spicy that burns your mouth.  It really warms you up from the inside out.  It's a perfect quick and filling supper for these cool spring evenings, especially after a chilly afternoon watching a kid play a sport or pulling weeds in the garden.

Have your own International Night, and try something delicious from Barbados!  Enjoy!


Photobucket

Sunday, May 6, 2012

Gluten Free Lemon Chiffon Cake Recipe

Light and lemony - a perfect dessert for Mother's Day!


Isn't it pretty with its little lemon peel rosette?  If I'd had fresh raspberries or strawberries in the house, I would have added them around the border of the plate.  This is a lovely dessert any time of the year, but especially nice in the spring.  It reminds me of lemonade, but in a cake.  With Mother's Day coming up, it would be a lovely addition to a special dinner for Mom, and it's really easy to make with a cake mix!

So let's get right down to it!

SPH Gluten Free Lemon Chiffon Cake Recipe
1 box Betty Crocker Gluten Free Yellow Cake Mix
2/3 cup buttermilk
1/2 cup canola oil or melted butter
3 eggs
grated zest of 1 lemon (get organic if possible)
2 T. lemon extract
1 cup egg whites (I use the kind that come in a carton from the store - easier, and doesn't deplete my supply of regular eggs)
1/2 t. cream of tartar


Glaze
1/2 c. Betty Crocker Rich & Creamy vanilla frosting
juice of 1 lemon (use the lemon you zested for the cake)


Preheat oven to 350 degrees.  Grease bottom and sides of three 8" round cake pans.  Pour contents of cake mix into mixer bowl.  In a small bowl, combine buttermilk, oil/butter, 3 eggs, lemon zest and lemon extract.  Beat until lightly combined.  Beat liquid ingredients into cake mix, at medium speed, for only 2-3 minutes.  Be sure to stop and clean the sides of the bowl with a rubber spatula FREQUENTLY, and beat only until everything is well combined and smooth.  DO NOT OVERBEAT, or your cake will be rubbery.  Definitely not a desired outcome.  In separate large bowl, beat egg whites with cream of tartar until stiff peaks.  Gently fold in egg whites, just until mostly combined (if you have a few little bits of white showing, that's ok).  Don't stir them in - they will deflate, and that definitely will take away from that light and airy texture we've all come to expect from a chiffon cake.  Pour the batter as equally as possible into all three cake pans.  Place the pans on racks that are as centered as possible in your oven.  I place two cake pans on the top rack, and one on the bottom.  I also arrange them in sort of a vertical triangle to allow maximum air circulation in the oven for even baking.  Bake for about 45 minutes, or til tester inserted in center comes out clean.  Allow cakes to cool completely before removing from pan.

Meanwhile, make the glaze.  In a small bowl, combine the frosting and lemon juice.  Whisk until very smooth.  Drizzle over cooled cakes.

You can layer them to make a tall cake (be sure to make enough glaze to finish all three layers), or do individual layers, which is what I did in the photo above.  You can also do these as cupcakes.  If you want them really fancy, do the lemon peel rosette.  Just use a vegie peeler, and remove the yellow part only of a lemon rind.  Roll it up, starting at one end, then let it open on its own to form the flower.  Use more frosting if you want a thicker glaze, or add the lemon juice to the whole can for frosting instead of glaze. You can also make orange or lime chiffon - just use a different citrus fruit.

Try it - you'll like it!


Photobucket

Two Gentle Reminders


  1. Did you register for the wonderful Fashion to Figure Giveaway?
  2. Some great recipes this week - stay tuned!


Photobucket

Friday, May 4, 2012

Gluten Free Agua de Horchata Recipe

Happy Cinco de Mayo!  Here's a  delicious recipe for an authentic Mexican  drink - like rice pudding in a glass...
So a while back I totally had a taste for Agua de Horchata.  It's a Mexican rice drink that really does taste like rice pudding in a glass.  Well, that sent me scurrying all over the net, reading recipe after recipe, until I came across this one.  And the second best part, with flavor being first, is that it is totally GLUTEN FREE!!!

Here's what I came up with:

SPH Agua de Horchata
2 cups long grain white rice (the kind you actually have to cook longer than 5 minutes)
3 cups boiling water
1 vanilla bean, split and scraped
1 t. vanilla extract (more or less to taste - I use a whole tablespoon)
1/2 t. cinnamon (also more or less to taste)
1/3 cup sugar (again the more or less to taste thing)
4 cups milk or water (your choice - I only had half and half in the house, so that's what I used)

Put the rice in a quart size jar.  Add vanilla bean and seeds.  Cover with boiling water, filling jar all the way to the tippy top.  You may have a few tablespoons of water left in your measuring cup, but that's ok.  Put on a lid and a ring.

Allow to sit overnight.  After a nice long soak, remove (and discard) vanilla bean from jar and add the rice, soaking water, vanilla extract and cinnamon to a blender.  Puree until smooth.


Drain through a cheesecloth lined sieve into a medium-sized mixing bowl.  You will have to moosh the rice around in the cloth with a large spoon to really get every last bit of goodness.  In fact, when you think you've really gotten it all, wrap the cheesecloth up into a bundle around the rice, and SQUEEZE IT.  Squeeze it hard, like you're mad at someone.  Like they ate all your chocolate mad.  Pour the "milk" from the bowl back into the blender, and add sugar and milk/water, and blend again until well combined.  Serve chilled, even over ice if desired.

Agua de Horchata is so refreshing on a hot summer's day.  It has such simple flavors, but wow!  If you are feeling extravagant, spring for Mexican vanilla and Mexican cinnamon.  You can order the vanilla online through eBay for a really decent price.  Set aside some of the beans, and use some to make homemade vanilla extract.

Also, if you opt for the dairy free version, it would make a great base for a smoothie.  Make it even healthier by swapping in honey or agave for the sugar.  After draining the rice milk in the sieve and putting it back in the blender, throw in some frozen berries or other fruit.  Oh, so good!

Enjoy!


Thursday, May 3, 2012

***FASHION TO FIGURE GIVEAWAY***

Good morning, everyone - today we have a great GIVEAWAY!!!

***THIS IS A COMPENSATED POST***
***ALL OPINIONS EXPRESSED ARE COMPLETELY MY OWN***


As women, aren't we all sick and tired of clothing that's designed to fit the mannequin in the window or some stick figure model who wears a size 0 (on a bad day if she's gorged on half a grape)?  We are three-dimensional and have CURVES!

Well, Fashion to Figure has awesome, current fashions for women who are size 12-26.  With everything from modest to MEE-YOW!, you're sure to find what you are looking for!  Just in time for summer - great clothing that actually FITS!

Here is one of my favorites - the Summer Bloom Striped Maxi Dress:

Perfect for a picnic or even church!  Add a sweater or jacket to wear to fireworks on the 4th of July or a casual Friday at work.  I love how the flowers add such a feminine and dramatic feminine touch, drawing your eye up and down, doing that magic slimming thing!

Need some accessories to go with your lovely new fashions?  Check out the handbags and jewelry or how about a cute belt?!

And all at reasonable prices - including a flat shipping rate of $5.95, with free shipping for orders over $70!

So here's the fun part - THE GIVEAWAY!!!!

One lucky reader will win their choice of items, priced $30 or less.  Sorry, but this will be limited to US readers only.  Here's how to enter - leave a comment for each item that you do.  The more comments, the more chances to win!


  1. *MANDATORY*  Visit fashiontofigure.com, and leave a comment here telling us what your favorite item is.
  2. *MANDATORY* FRIEND Suburban Prairie Homemaker - use GFC or Linky Followers - your choice.  Already a follower?  Just leave a comment that says so. And thank you!
  3. FOLLOW Suburban Prairie Homemaker on Facebook.
  4. POST about the giveaway on Facebook.
  5. FOLLOW Suburban Prairie Homemaker on Twitter.
  6. TWEET about the giveaway.
  7. FOLLOW Suburban Prairie Homemaker on Pinterest.

Fine print type stuff:
Entries will start today, and end on May 18th at 11:59 PM CDT (aka Chicago time).  Winner will be posted on Saturday, May 19th, and will have 48 hours to claim their prize.

So go clothes shopping, and let us know what caught YOUR eye!  Have fun, and have a great weekend!

Photobucket

Wednesday, May 2, 2012

Pardon Our Dust!!!

So I spent most of the day yesterday updating the look of the old blog homestead...


Quick story time:
  The lilies of the valley (white bell shaped flowers) remind me of my mom.  My grandmother grew them on the side of her house, and on the morning of my parents' wedding, there was my mom, picking them frantically to get them to the florist to be included in her bouquet. She had a morning wedding, by the way, so you can imagine how fast she was trying to work and still get herself ready for the big day!

These are heirloom lilies - my great-grandmother gave some extras to my grandmother when Grandma and Grandpa moved into their house.  Then, when my parents bought our old house, they took a clump with them.  When my mom passed, and my dad decided to sell that same house, a few clumps of the lilies moved to a special spot right outside my back door. They are actually blooming right now, and have the most amazing fragrance!

This turquoise-type blue is
one of my 2 favorite colors
(the other is denim).
And yes, my two favorite colors are
shades of blue.
My third favorite color is dirt.
But I digress...

Yes, I designed and created the background myself.  I used digital scrapbooking materials from CottageArts.net, and followed the directions I found here to make your own scrapbook background and here to make your own background in PowerPoint.
After a LOT of tweaking,
I think you'll agree,
it's turned out pretty well!

I'm still working on adjusting the sizes of buttons and gadgets, and I'm planning on adding my own social media icons.  I'm also working on drop down menus for some new tabs at the top, and  let's just say there are a few other surprises I have up my sleeve.  

Stay tuned for more of the new and improved Suburban Prairie Homemaker, and
a ***GIVEAWAY*** tomorrow!

Photobucket