So maybe this is your first time going to a big party after figuring out you need to be gluten free, and you're not sure what to eat when you get there...
First, take a deep breath. It will be ok. This is easier than you think, and it will get easier over time.
Talk to your host/hostess when you receive the invitation. Explain your situation. And no, you are not a freak - this situation is more and more common every day. Offer to help in any way you can so they won't feel put upon or put out.
If you are asked to bring a dish to pass, you can bring gluten free breadsticks and SPH Pizza Dip. Or offer to bring a vegie or fruit tray and your own dip(s). I'm sure the dieters in the group would be glad to have a healthier option as well.
Do your homework before you go - find out what commercially-available brands (and that's food as well as drink) are safe or not. If you're really not sure, don't eat it. If you're worried that your dish is all you'll be able to eat, have a safe snack before you go.
If you should accidentally get "glutened", you'll probably know pretty quickly. If you feel ill, try to excuse yourself graciously and gracefully. If you need to call in sick to work on Monday, do it. Take care of you so you can be healthy. Have simple meals for the next few days, and stick with food that's really easy to digest, like a vegie soup made with GF chicken broth. Yogurt smoothies. Green juices. You get the picture.
Hang in there - like I said, this does get easier over time. By the next big bash, this will have become a habit!
Tuesday, January 31, 2012
Tea for Tuesday - Crochet Tea Cozy Tutorial
Today we're learning how to decrease for crochet, and start a really cute flower basket-type tea cozy...

The pattern we will be using is from Cute & Easy Crochet by Nicki Tench, and it starts on p. 92. If you don't already own this book, you should pick it up. I got mine at JoAnn's with a 40% off coupon, and I used my teacher discount. I'm sure you can find it online as well. There are lots and lots of really simple patterns in it, they are are all meant to be quick and easy, and yes, they are all quite adorable. Many of the patterns call for little bits and bobs of color, so they are a great way to use up stash yarn.
So let's get started...
You can use the yarn the pattern calls for, or something of a similar weight. I don't have wool yarn (I'm allergic), so I used two strands of regular worsted weight acrylic in a white and a pale blue. I will also be using yarn from my stash for the roses and the leaves that are stitched onto the "basket".
For the two colors of the base, make 2 balls of yarn because you will be working with two strands throughout. Choose one color to be the "basket" and the other to be the "filler" behind the roses. You can use your stash to make the flowers as in the picture in the book, you can make them all one color, you can make them shades of the same color - use your imagination!
You will also need size F(5/4mm) and J(10/6mm) hooks, safety pins, and a yarn needle.
Today, we're just going to work on the base of the tea cozy. I know you're busy, and don't have a lot of time, so we're going to break this down into some evening-size, manageable pieces. We're also going to notch up your crochet skills a bit by learning to decrease and change color. Next week, we'll learn some new stitches - don't worry, they're very easy.
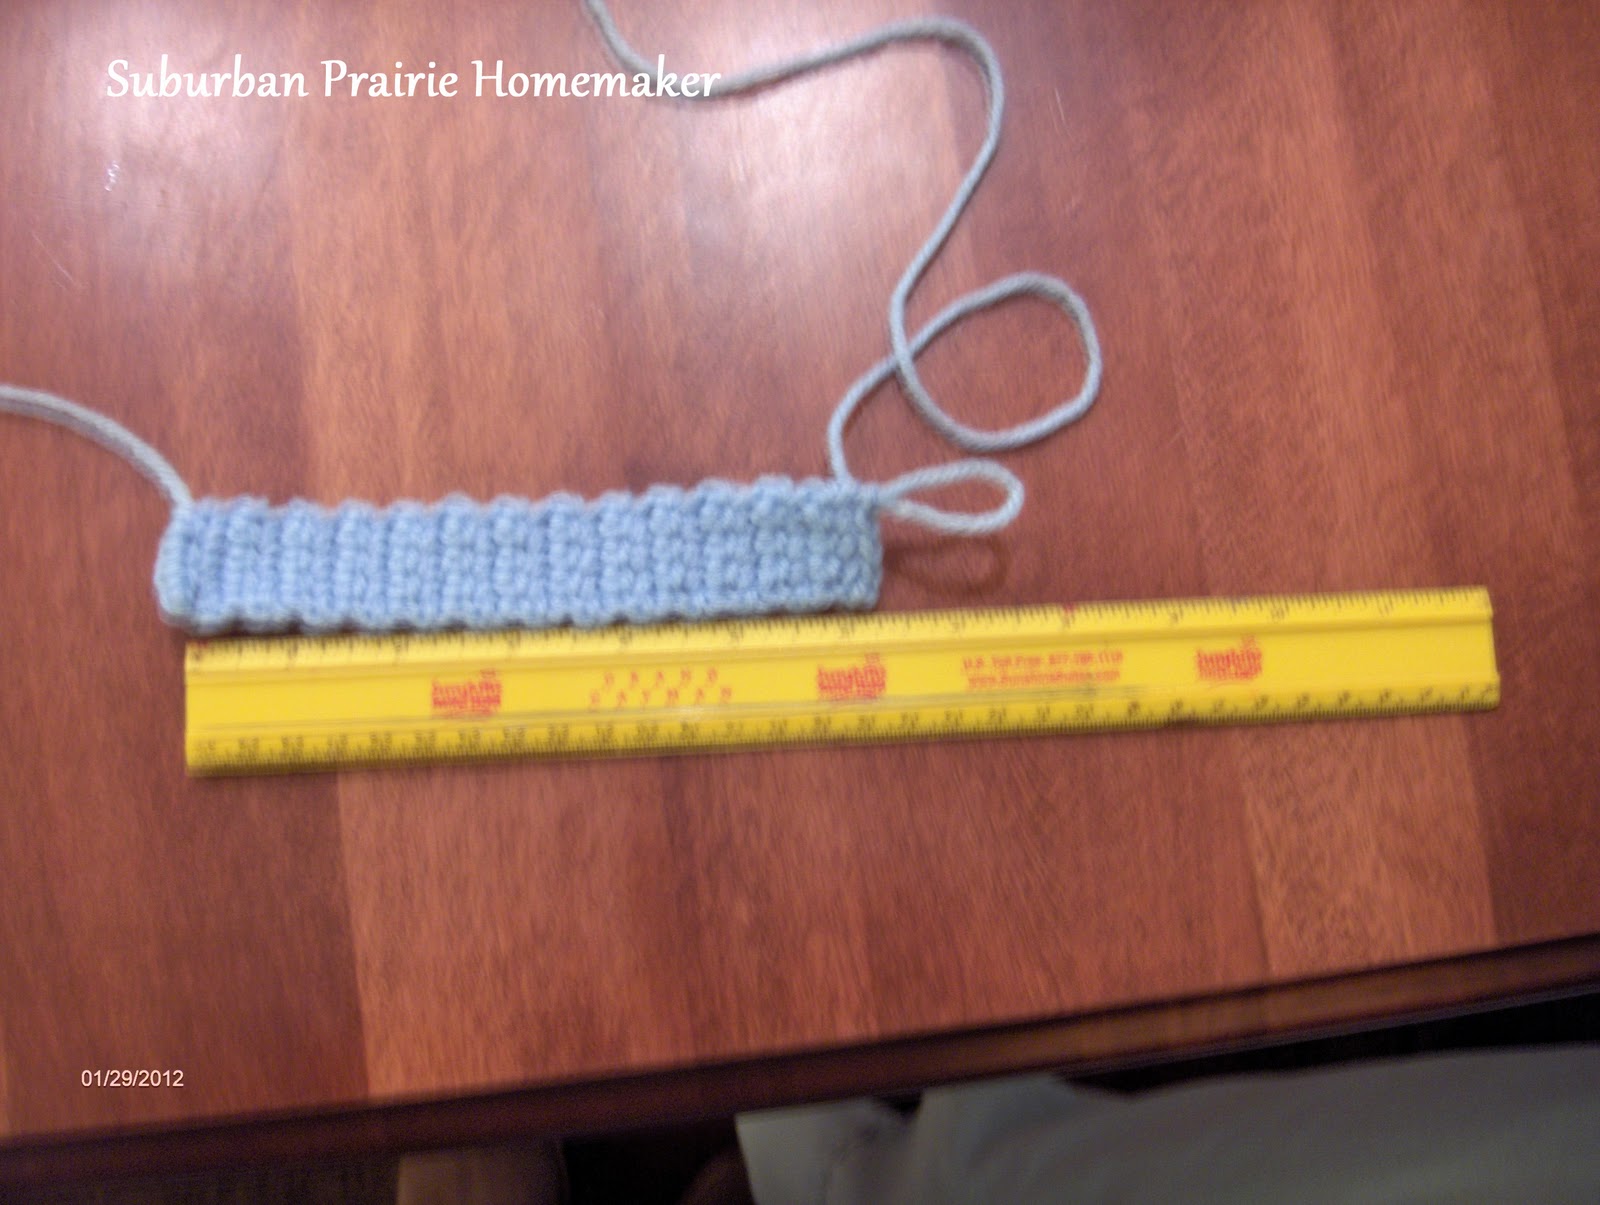
With whatever color you choose to be the base of your tea cozy (now referred to as color A) and two strands of yarn, chain 29 with the J hook. Measure to see if this will go round your tea pot. Twenty-nine was fine for my tea pot. Yours may be smaller or larger. Feel free to add chains or make fewer chains. Then, following the pattern, sc in second ch from hook, and each ch across. Ch 1, turn. Work rows back and forth until piece measures 2 1/2" (6.5 cm). For me, this was 8 rows. For you it may not be. The important thing is to keep your tension even to be sure your stitches are all nice and even. Ch1, turn.

Here is where we work the decrease. Basically, a decrease is combining two stitches into one. Yep, it's really that easy - let me show you. Insert your hook into the first stitch and pull up a loop.

Just keep that loop on your hook for a moment - we're not doing anything with it quite yet. Insert your hook into the next stitch and pull up another loop.

Now, the final step: yo, and pull through all 3 loops on your hook. See how it combines the two stitches into one?
 Continue across the row in sc, until the last 2 stitches, then work another decrease. It will look like this:
 And here is where we will work the color change. Go ahead and ch 1, like you are going to turn.
 Pull on the loop, to make a very large loop.

Snip the top of the loop with scissors.
 Remove the ends that are attached to the balls of yarn, and pull the ends on your piece tight.

To add the new color, insert your hook into the chain space. Pull up a loop of Color B.
 Ch 1 with color B, turn, and continue to work the pattern as directed in the book. Be sure to keep your ends on the wrong side (back) of your piece, and crochet over them to work them in. When you get to the top of the base, it will look like this:
 Now, make one more, so you have 2. Hold one of them up against your tea pot (I used my little kettle), and mark where your openings will be for the handle and spout with safety pins.
 The last part of today's tutorial will be the little tab at the top. You will only use one strand of yarn, in color B, and the size F hook. Very simple - make a chain of 5 stitches, sc in 2nd ch from hook and across, to make 4 stitches. Ch 1, turn, and continue back and forth until your tab is 6" long (approx. 15cm).

And that's where we'll stop for now. We'll make the flowers and get the whole thing put together next Tuesday. Also, tomorrow, I'll be starting a ***FANTASTIC GIVEAWAY***!


The pattern we will be using is from Cute & Easy Crochet by Nicki Tench, and it starts on p. 92. If you don't already own this book, you should pick it up. I got mine at JoAnn's with a 40% off coupon, and I used my teacher discount. I'm sure you can find it online as well. There are lots and lots of really simple patterns in it, they are are all meant to be quick and easy, and yes, they are all quite adorable. Many of the patterns call for little bits and bobs of color, so they are a great way to use up stash yarn.
So let's get started...
You can use the yarn the pattern calls for, or something of a similar weight. I don't have wool yarn (I'm allergic), so I used two strands of regular worsted weight acrylic in a white and a pale blue. I will also be using yarn from my stash for the roses and the leaves that are stitched onto the "basket".
For the two colors of the base, make 2 balls of yarn because you will be working with two strands throughout. Choose one color to be the "basket" and the other to be the "filler" behind the roses. You can use your stash to make the flowers as in the picture in the book, you can make them all one color, you can make them shades of the same color - use your imagination!
You will also need size F(5/4mm) and J(10/6mm) hooks, safety pins, and a yarn needle.
Today, we're just going to work on the base of the tea cozy. I know you're busy, and don't have a lot of time, so we're going to break this down into some evening-size, manageable pieces. We're also going to notch up your crochet skills a bit by learning to decrease and change color. Next week, we'll learn some new stitches - don't worry, they're very easy.
With whatever color you choose to be the base of your tea cozy (now referred to as color A) and two strands of yarn, chain 29 with the J hook. Measure to see if this will go round your tea pot. Twenty-nine was fine for my tea pot. Yours may be smaller or larger. Feel free to add chains or make fewer chains. Then, following the pattern, sc in second ch from hook, and each ch across. Ch 1, turn. Work rows back and forth until piece measures 2 1/2" (6.5 cm). For me, this was 8 rows. For you it may not be. The important thing is to keep your tension even to be sure your stitches are all nice and even. Ch1, turn.

Here is where we work the decrease. Basically, a decrease is combining two stitches into one. Yep, it's really that easy - let me show you. Insert your hook into the first stitch and pull up a loop.

Just keep that loop on your hook for a moment - we're not doing anything with it quite yet. Insert your hook into the next stitch and pull up another loop.

Now, the final step: yo, and pull through all 3 loops on your hook. See how it combines the two stitches into one?


Snip the top of the loop with scissors.


To add the new color, insert your hook into the chain space. Pull up a loop of Color B.


And that's where we'll stop for now. We'll make the flowers and get the whole thing put together next Tuesday. Also, tomorrow, I'll be starting a ***FANTASTIC GIVEAWAY***!

Sunday, January 29, 2012
Gluten Free Maple Bacon Cupcake Recipe
You've heard of breakfast for dinner - this is breakfast for dessert!
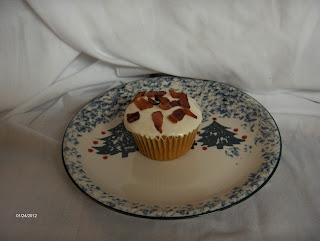
So I found this recipe at Pressed Down, Shaken Together on a blog hop, and it just sounded so intriguing. Maple. Bacon. Cupcakes?! I decided I had to give it a go, and here it is, gluten free.
SPH Gluten Free Maple Bacon Cupcakes
1 box Betty Crocker Gluten Free Yellow Cake mix (you could use regular cake mix, too)
1 3-oz. box Jell-o Vanilla Instant Pudding
3 eggs
1/2 cup oil or melted butter
1/2 cup maple syrup
1 container Betty Crocker Rich & Creamy Vanilla Frosting
2 T. maple syrup
8 slices of bacon, snipped, crisped and drained
Preheat oven to 350 degrees. Line muffin tins with cupcake papers.
In mixer bowl, combine cake mix and instant pudding. In a small bowl, beat eggs. Add oil and maple syrup. Add to cake mix in mixer, and beat until smooth. Fill muffin cups 2/3 full with cake batter and bake about 20-23 minutes. Allow to cool.
Meanwhile, whip together maple syrup and frosting. Spread over cooled cupcakes. It's a little runny, so be mindful of that. Sprinkle with crisped bacon bits.
After feeding this recipe to "the critics", it was decided that the cupcakes were better without the bacon. Maybe it was the bacon I used? We all agreed that the maple cupcakes were fantastic, so these would definitely be good "alone".
Try them for yourself, and see what you decide. Enjoy!
Saturday, January 28, 2012
Gluten Free Pork Chop Dinner Menu and Recipes
A great menu for a nice, simple Sunday dinner, a frantic Monday, or even special enough for company...

So for dinner tonight, we have pan-seared pork chops, broccoli and rice with a nice pan gravy for you. Yes, you can make a nice gravy after you go gluten free! Here's how...
Let's start with the pork chops, or you won't have any meat juices to turn into gravy.
1 pork chop per person
Salt, pepper and paprika (McCormick brand is safe)
Heat a large skillet over medium-high heat. Drizzle skillet with olive oil. Add pork chops, and sprinkle with salt, pepper and paprika. Allow to brown for a few minutes, then cover, and cook for about 5 minutes more. Remove lid, and turn chops. Cover again, and cook until done. Remove from pan to a platter, cover with foil, and allow to rest.
While chops are cooking, make the rice. Our family of four LOVES rice! So, this is the size batch I make for us.
2 cups rice
4 cups stock/broth (I used Pacific brand Organic Free Range Chicken for this meal)
Put rice and stock in a medium saucepan. Bring to a boil over high heat, reduce heat to low, and simmer for 15 minutes. Remove from heat, and allow to stand for 5 minutes. Fluff with a fork and serve.
Steam broccoli while rice is cooking.
Also, make your gravy. To the juices in the meat pan, add a few tablespoons of gluten free all purpose flour (I use Gluten Free Pantry brand) or cornstarch. Whisk to thicken, then add chicken stock (I used about a cup and a half) to make the gravy. It's important here to use a whisk because it helps take care of all the clumps. You may still have lumps in your gravy, but hopefully, they will only be the bits that are left in the bottom of the pan.
This is definitely a nice enough meal to serve unexpected company, without too much effort, and quick enough to feed your hungry hoard between school, soccer practice and piano lessons. Enjoy!
January Craftivism Challenge - Round-up
Well, we've spent the last 3 weeks making pillowcases, Little Dresses and Little Boy Shorts.
These are my pillowcases (all 12 of them) - they are headed to Children's Memorial Hospital in Chicago.

Now it's time to show off what you've made, and tell us where your goodies are headed! Sorry, no photo thumbnails, but you can list your blog, or a link to Flickr or other photosharing website. Be sure to go visit others who've worked hard for these challenges, and leave them some blog love!
Here we go!
Thanks so much for your participation!
Thursday, January 26, 2012
Study Day
Mommy Study Time - DO NOT DISTURB (unless you are bringing me chocolate)
Taking a break today and will be back tomorrow - see you again soon.
Feel free to look around while you're here - check out some of the recipes and tutorials!
Taking a break today and will be back tomorrow - see you again soon.
Feel free to look around while you're here - check out some of the recipes and tutorials!
Great Classes at Ozark Folk Center
If you live in Arkansas, or are willing/able to travel, the Ozark Folk Center is offering some amazing classes in Feburary. You can check out their schedule HERE. This is a great way to get your craft on and learn some new awesome skills!
Wednesday, January 25, 2012


Free eBook Offer
Remember the other day when I told you about FaveCrafts? One of their wonderful sites is AllFreeChristmasCrafts. I know, I only put my Christmas trees away last weekend, but here's a portion of the email I received from them today:
Check it out!
We are so excited to share with you the brand new eBook from Krylon®, How To Create 14 Sparkly Craft Projects Using Krylon Glitter Blast™. This eBook contains 14 craft ideas featuring spray paint that glitters, shimmers, and shines. Add some sparkle to your home décor and holiday decorations with the projects featured in this eBook. Download and print this collection of shimmery crafts and keep a copy on hand for the next time you want to make a project that really shines.One of the projects was sparkly eggs, and we all know Easter is right around the corner. There are other projects in this ebook that may interest you, and did I mention - IT'S FREE!
Check it out!
One Yard Wednesday - Ruffled Apron
A cute little apron - perfect for hosting a Super Bowl party!

This cute little number is based on the "Kitschy Kitchen Apron" pattern in One-Yard Wonders by Rebecca Yaker and Patricia Hoskins, on page 56. The original was designed by Mother's Apron Strings, as noted in the book. One-Yard Wonders is a great title to have in your craft library - great little projects, complete patterns and diagrams. Each project has room to be personalized in some way to suit your tastes.
For this project, Rebecca and Patricia used one piece of a bordered fabric. This would be a great way to repurpose a bordered tablecloth that may have too many stains in certain areas to make it practical to use anymore. I'm using up some of my stash. Make it from your stash, from fat quarters and jelly roll strips, in your favorite team's colors, or Christmas colors, or any color(s) that you choose. Make it from one piece of fabric or many. Make one or a dozen - these would make lovely mother/sister-in-law and prayer partner/secret sister gifts.
For our new sewists, today's two new skills are gathering stitches and attaching a set-on waistband.
So let's stop chatting and start sewing!
Here's what you need:
3/4 yard fabric A, cotton fabric, about 45" wide
1/2 yard fabric B, cotton fabric, about 45" wide
Rotary cutter and mat (or ruler and scissors) and other basic sewing supplies
Knitting needle or long, narrow pointy object for turning apron strings
If you choose to do this from one piece of fabric, it's best to follow the diagram in the book. These girls really do know how to stretch a yard of fabric and get the most out of it! If you are doing it from more than one piece, you may want to make a sketch of how your pieces are going to fit on your fabric. Here is the diagram I made for myself, based on the measurements given in the book.
Fabric A


Topstitch this hem on the right side (front) around all three sides. I used a decorative stitch. You can use a straight stitch or a zig zag or a decorative stitch - your apron, your choice. I also used a matching thread. You can match, coordinate, or contrast as desired.
If you are adding pockets to the front, now is the time to do it. Measure where you'd like them to be, and stitch them on. Not sure how to do a pocket? Read here.
Press one short end of each apron string piece in 1/2".
 Fold these pieces in half LENGTHWISE with right sides together. Start sewing on the non-folded end, turn the corner and sew the long edge. Clip the corner and trim the extra fabric on the sewn short end to 1/4" away from the seam.

Using a knitting needle, turn the strings so that right sides are facing. If you've never done this before, here is how to do it. Press well, and topstitch all the way around. Again, whatever stitch and thread you choose.
Now, it's on to the ruffle. Start by making a 1/4" rolled hem on one long side and both short sides, press and topstitch.
 So let me share with you a secret I learned years and years ago, sewing a LOT of gathered skirts with set-on waistbands. You will notice in the photo above a lonely red pin in the center. Find the center of your ruffle piece by folding the short ends together, and marking the center with a pin. Next, fold each short end to the center, and mark these "quarters" with a pin, and do the same thing for the apron front.

Back to your ruffle piece. If you have a ruffle attachment, use that and stitch between the pins. If you don't (or if you're like me and have one but have no clue how to use it), set the stitch length on your machine to its highest number of stitches per inch. Pull out a looooong tail (mine was a good 6-8") of thread behind the needle and bobbin, then stitch at 1/4" between the topstitching on one end and the first pin. STOP! Repeat between each pin. Only stitch between the pins. When you are all the way across, pull out another looooong tail, then cut the thread from the machine. Clip threads between the pins, leaving really long tails for each side. These tails are what you will pull to make the gathers that make the ruffle ruffly. You need to have enough thread so you can hang on to it.
Match the center of your ruffle to the center of the apron front. Pin raw edges together at centers and quarters, matching the pins.

Pull thread gently in each section to gather. You may have to try different thread tails to find which one works best. Mine was the ending top thread. I've done projects where it was the bobbin thread. I think it probably depends on your machine. Your goal here is to try to get roughly equal gathers between each set of pins. Once you've done that, pin the top edge into place. Use as many pins as you think you need. Change the stitch length on your machine back to the number appropriate for your fabric. Stitch the now-ruffly ruffle to the apron base, using a 1/4" seam.
For the waistband, press one long edge under 1/2". You had to remove the pins from your apron base/ruffle while sewing, so find the center and quarters again, and mark. Match the unpressed (raw) edge of the right side of the waistband to the right side of the apron/ruffle at the center and quarters. Pin as necessary to keep the ruffles from getting attached in the seam.

Now this is the only really tricky part. Stitch the waistband to the apron, 1/2" seam allowance. I go VERRRRRRY VERRRRRRY SLOW, and I keep my left hand between the ruffle and the waistband. I sew pin to pin. It seems like it takes forever! But! I learned a long time ago, that it is a huge pain in the neck to have to go back and rip out sections to re-sew when you catch the gathers in your seam. I'm trying to save you the pain. Think of me as Human Aspirin. Once you are all the way across, press the seam toward the waistband. Be sure that you press the entire lower edge

Fold waistband in half, right sides together, and stitch short ends with a 1/2" seam allowance. Clip corners, trim excess fabric, and turn right side out. Press. Match lower edges of waistband and pin. Topstitch waistband on front side of apron.

Pin one apron string to each end of the waistband, overlapping about 1" - 1 1/2". Stitch in place. I used the same decorative stitch because it is also a good reinforcing stitch. I also stitched one row to overlap the topstitching of the waistband, and the other row to overlap the topstitching of the apron tie.
 In the book, an option is offered to add cute, vintage-type buttons. If I had used them, I would have put them here. It would have made a nice accent.
And now you're done! Enjoy your new apron!

This cute little number is based on the "Kitschy Kitchen Apron" pattern in One-Yard Wonders by Rebecca Yaker and Patricia Hoskins, on page 56. The original was designed by Mother's Apron Strings, as noted in the book. One-Yard Wonders is a great title to have in your craft library - great little projects, complete patterns and diagrams. Each project has room to be personalized in some way to suit your tastes.
For this project, Rebecca and Patricia used one piece of a bordered fabric. This would be a great way to repurpose a bordered tablecloth that may have too many stains in certain areas to make it practical to use anymore. I'm using up some of my stash. Make it from your stash, from fat quarters and jelly roll strips, in your favorite team's colors, or Christmas colors, or any color(s) that you choose. Make it from one piece of fabric or many. Make one or a dozen - these would make lovely mother/sister-in-law and prayer partner/secret sister gifts.
For our new sewists, today's two new skills are gathering stitches and attaching a set-on waistband.
So let's stop chatting and start sewing!
Here's what you need:
3/4 yard fabric A, cotton fabric, about 45" wide
1/2 yard fabric B, cotton fabric, about 45" wide
Rotary cutter and mat (or ruler and scissors) and other basic sewing supplies
Knitting needle or long, narrow pointy object for turning apron strings
If you choose to do this from one piece of fabric, it's best to follow the diagram in the book. These girls really do know how to stretch a yard of fabric and get the most out of it! If you are doing it from more than one piece, you may want to make a sketch of how your pieces are going to fit on your fabric. Here is the diagram I made for myself, based on the measurements given in the book.
Fabric A

Fabric B

These are initial diagrams, and not to scale, but you can see how the pieces will fit onto the two different fabrics. So after going through the whole process, here's what and how to cut the pieces for the apron.
Fabric A
1 apron base, 27" on the bottom, 22" across the top and 20" tall (trapezoid)
1 ruffle, 6" wide by 27" long (that's the other rectangle on the diagram - I changed the numbers, compared to those in the book, based on my personal preferences)
Fabric B
Cut 3 strips, all 5" x 31"
(also changed from numbers in book based on personal preference)
You can use extra fabric for pockets, if desired. And speaking of fabric, these two are from Joann Fabrics.
Unless otherwise stated, use a 1/2" seam allowance.
Start by making a 1/4" rolled hem on your trapezoid, on both sides and the bottom. You'll remember how to do this from the Little Shorts.

You can miter the corners, like we did for the pocket on the Little Boy Shorts if desired. I did because I think it gave the hem a nicer finish.

This is what it will look like when you are done pressing.

If you are adding pockets to the front, now is the time to do it. Measure where you'd like them to be, and stitch them on. Not sure how to do a pocket? Read here.
Press one short end of each apron string piece in 1/2".


Using a knitting needle, turn the strings so that right sides are facing. If you've never done this before, here is how to do it. Press well, and topstitch all the way around. Again, whatever stitch and thread you choose.
Now, it's on to the ruffle. Start by making a 1/4" rolled hem on one long side and both short sides, press and topstitch.


Back to your ruffle piece. If you have a ruffle attachment, use that and stitch between the pins. If you don't (or if you're like me and have one but have no clue how to use it), set the stitch length on your machine to its highest number of stitches per inch. Pull out a looooong tail (mine was a good 6-8") of thread behind the needle and bobbin, then stitch at 1/4" between the topstitching on one end and the first pin. STOP! Repeat between each pin. Only stitch between the pins. When you are all the way across, pull out another looooong tail, then cut the thread from the machine. Clip threads between the pins, leaving really long tails for each side. These tails are what you will pull to make the gathers that make the ruffle ruffly. You need to have enough thread so you can hang on to it.
Match the center of your ruffle to the center of the apron front. Pin raw edges together at centers and quarters, matching the pins.

Pull thread gently in each section to gather. You may have to try different thread tails to find which one works best. Mine was the ending top thread. I've done projects where it was the bobbin thread. I think it probably depends on your machine. Your goal here is to try to get roughly equal gathers between each set of pins. Once you've done that, pin the top edge into place. Use as many pins as you think you need. Change the stitch length on your machine back to the number appropriate for your fabric. Stitch the now-ruffly ruffle to the apron base, using a 1/4" seam.
For the waistband, press one long edge under 1/2". You had to remove the pins from your apron base/ruffle while sewing, so find the center and quarters again, and mark. Match the unpressed (raw) edge of the right side of the waistband to the right side of the apron/ruffle at the center and quarters. Pin as necessary to keep the ruffles from getting attached in the seam.

Now this is the only really tricky part. Stitch the waistband to the apron, 1/2" seam allowance. I go VERRRRRRY VERRRRRRY SLOW, and I keep my left hand between the ruffle and the waistband. I sew pin to pin. It seems like it takes forever! But! I learned a long time ago, that it is a huge pain in the neck to have to go back and rip out sections to re-sew when you catch the gathers in your seam. I'm trying to save you the pain. Think of me as Human Aspirin. Once you are all the way across, press the seam toward the waistband. Be sure that you press the entire lower edge

Fold waistband in half, right sides together, and stitch short ends with a 1/2" seam allowance. Clip corners, trim excess fabric, and turn right side out. Press. Match lower edges of waistband and pin. Topstitch waistband on front side of apron.

Pin one apron string to each end of the waistband, overlapping about 1" - 1 1/2". Stitch in place. I used the same decorative stitch because it is also a good reinforcing stitch. I also stitched one row to overlap the topstitching of the waistband, and the other row to overlap the topstitching of the apron tie.

And now you're done! Enjoy your new apron!
Monday, January 23, 2012
Tea for Tuesday - Knit Heart Mug Mat and Tutorial
A great project to boost your new knitting skills, make as a gift for someone special, or keep for your favorite cup of java.
So how cute is this little mug mat?!
 We'll practice the knit stitch (k), learn to purl (p), follow a "real" pattern, and how to weave in your beginning tail. Before we begin, though, if you are left-handed, READ THIS:
We are going to use this pattern from FaveCrafts.com. If you need a pattern for a project, FaveCrafts is the place to go to get one free. They have everything from sewing to knitting to crocheting and more. Go check them out sometime when you have a chance.
For this project, you will need:
1 ball of cotton worsted weight yarn (like Sugar-n-Cream), your choice of colors (I used a hot pink)
Size 6 needles (I used 7's)
Size D crochet hook
yarn needle
piece of scrap cardboard
ruler
scissors
Following the pattern, cast on 19 stitches.


Flip tail yarn away from you, towards the back of the work. Knit 1 more stitch.
 Flip the tail back toward you. Continue moving the tail back and forth between stitches until you are about half way across the row. Finish knitting the row, then knit 2 more rows.

So this is where our next new stitch comes in. Start by knitting 9 stitches.

The next stitch is a purl (p). Begin by bringing your working yarn forward to the front of your piece.
 Insert the right needle into the loop on the left needle from right to left, on the front side of the needle.
 Loop working yarn UNDER the right needle.

Pull through the loop on the needle. Slide old loop off the left needle. It's just like a knit stitch, but in reverse. By working k's and p's, the yarn creates "bumps" on one side and a smooth side (what we typically recognize as a knitted texture) on the other. Switching back and forth allows the knitter to control where the bumps are, which in this pattern, creates the little heart.
By the way, when I first learned to purl, I CONSTANTLY would lose my stitch off my needle. If this happens to you, DON'T PANIC! Just slide your left needle CAREFULLY back into the little loop and try again. Keep trying until you get it - remember, practice patience and persistence.
Now you will knit the other 9 stitches across the row. I know just making 1 purl stitch isn't going to teach you how to do it very well, so that's why this pattern is really great. Continue following the pattern, working k's and p's as directed. After 6 rows, you'll start to see the bottom of the heart.
 After 12 rows, it's starting to really shape up!
 Since this pattern does involve some accurate counting, be sure to mark your pattern as needed to keep track of your progress.
 Before you know it, you'll be all the way to the top! Bind off and fasten off. Use your yarn needle or crochet hook to weave the loose end in on the back side. If you need to, use the hook to pull the beginning tail to the back side, too.
 Now if you want, you can stop here. The mug mat in the original pattern photo has fringe, and if you'd like to add fringe to yours, here's how to do it.
Cut a rectangle from scrap cardboard (think cereal box - I used a leftover butter box) that's approximately 5" long. It doesn't have to be exact - it's not like it's a heat shield tile on the space shuttle.

Wrap the yarn around the rectangle LENGTHWISE 19 times, ending when you get back to the top of the rectangle on the back side.
 Remove the cardboard.
 Snip the top loops with scissors.
 Snip the bottom loops.

To add this fringe to your mug mat, insert your crochet hook from BACK TO FRONT in the corner of the base row.
 Loop one of the fringies over the hook.

Pull through, then loop the tails over the hook.

Pull those through the loop on your hook. Pull tight.
 It should look like this.
 Work across both the base row and the top row.
 When you get all the way across, both rows, use a ruler to trim your fringe.
 And then you are all done. Now, you can knit anything - all knitting is knits, purls, and yarn overs/unders - even cables. Aren't you just so talented and clever! Make one of these or a dozen. Make them in all reds, pinks and whites for St. Valentine's Day. Make them with larger needles, in pastels, and stitch them together to make a cute baby afghan. Make a bunch in a friend's favorite color, and stitch them together to make her a throw for her birthday or a scarf for Christmas. Quite a lot of versatility for a little heart!
Enjoy your newest knitting stitch!
So how cute is this little mug mat?!

For this project, you will need:
1 ball of cotton worsted weight yarn (like Sugar-n-Cream), your choice of colors (I used a hot pink)
Size 6 needles (I used 7's)
Size D crochet hook
yarn needle
piece of scrap cardboard
ruler
scissors
Following the pattern, cast on 19 stitches.

The first row of the pattern is just a plain knit stitch (k), but here's where you start to weave in that leftover tail of yarn. Start by knitting 1 stitch.


So this is where our next new stitch comes in. Start by knitting 9 stitches.

The next stitch is a purl (p). Begin by bringing your working yarn forward to the front of your piece.


Pull through the loop on the needle. Slide old loop off the left needle. It's just like a knit stitch, but in reverse. By working k's and p's, the yarn creates "bumps" on one side and a smooth side (what we typically recognize as a knitted texture) on the other. Switching back and forth allows the knitter to control where the bumps are, which in this pattern, creates the little heart.
By the way, when I first learned to purl, I CONSTANTLY would lose my stitch off my needle. If this happens to you, DON'T PANIC! Just slide your left needle CAREFULLY back into the little loop and try again. Keep trying until you get it - remember, practice patience and persistence.
Now you will knit the other 9 stitches across the row. I know just making 1 purl stitch isn't going to teach you how to do it very well, so that's why this pattern is really great. Continue following the pattern, working k's and p's as directed. After 6 rows, you'll start to see the bottom of the heart.


Cut a rectangle from scrap cardboard (think cereal box - I used a leftover butter box) that's approximately 5" long. It doesn't have to be exact - it's not like it's a heat shield tile on the space shuttle.

Wrap the yarn around the rectangle LENGTHWISE 19 times, ending when you get back to the top of the rectangle on the back side.


To add this fringe to your mug mat, insert your crochet hook from BACK TO FRONT in the corner of the base row.


Pull through, then loop the tails over the hook.

Pull those through the loop on your hook. Pull tight.


Enjoy your newest knitting stitch!
Subscribe to:
Posts (Atom)