
Showing posts with label crafting. Show all posts
Showing posts with label crafting. Show all posts
Wednesday, July 24, 2013
Wednesday, March 21, 2012
One Yard Wednesday - Denim Pocket Purse
Materials for today's OYW - 1 pair of old blue jeans, and a little imagination.

Isn't it just so stinkin' cute! Don't you want one for yourself?! Let's make one!!!
You will need one whole pair of blue jeans, holes and stains are acceptable - you'll be cutting around them and you can also cover them up. I used a men's pair, size 34x32. You can use any size from kids on up to Sumo wrestler. You will also need glue - either fabric glue or a good strong craft glue (I use Aleene's Tacky Glue). Don't forget a quilt ruler, cutting mat, good sharp scissors and a few pins. Then, for the pretty parts, you'll want some scrap fabrics, trims, buttons and ribbons. I used some scrap eyelet I had, some scrap fabrics in my stash, some ribbon, and a button. To sew, you will need thread to match the denim you are using, plus matching/coordinating/contrasting/accenting thread for stitching on any accents you may be adding. You will need the zipper foot for your sewing machine. Read your user's manual to find out which foot is the zipper foot and how to properly change the foot on your sewing machine. This will make sewing around all those bulky denim seams much easier, and you'll see why in just a bit.
Ok, ready?
Start by dissecting your jeans. Don't worry - it's much easier and way less gross than Biology class. Cut the jeans just above the crotch to remove the legs from the body portion. Remove the bottom hem from the legs. Then, cut the two back pocket sections out from the back of the body portion. Here's what you'll have left.

For the handle you will also need to cut the inseam section from one leg. This is the seam that has the double-stitching. Cut it with roughly an inch-ish of fabric on each side, then trim it to have 1/2" of fabric from each side of the stitching. Like this.
 I absolutely love the detail this adds to the handle. Remember, it's those little details that change a project from homemade to handcrafted. This is one of those little details.
Now, you'll want to trim up your pockets. Trim around each pocket, leaving 1/2" of fabric. If you have pockets that aren't perfectly straight across the top, measure 1/2" from the highest corner, and make your line straight across from that point.

Press the top raw edge under toward the former inside.
 To assemble the body of the bag, place the inseam handle piece on one of the pocket piece right sides facing, and matching the raw edge on the right side and bottom.
 Stitch this seam from the top of the pocket down to the bottom edge, with your presser foot right up against where the double-stitched seams meet. This is why we use a zipper foot - it was designed for a similar purpose. Right tool for the right job. This also helps hold that pressed raw edge in place.
Press the new seam toward the double-stitched seam on the handle piece. We will glue these in place in just a little while, and by pressing now, it's convincing this heavy fabric to do our bidding later.
 Add the second pocket, right side down, on top of the handle piece. Stitch from the top of the pocket down, putting the zipper foot right up next to that pocket seam.
 To join the handle to the opposite side of the bag, twist it CAREFULLY (practice as many times as you need to be sure to have it end up without a big kink in the middle - mine took 3 tries), and repeat the matching and sewing.
 You now have a really cool denim tube with a handle. Your purse needs a bottom. Fold the tube so it is inside out, and match the 3 bottom points of your pockets. Pin at the center and one side point, then stitch (again, right next to the double-stitched seam). Repeat for the other side.

Trim the seams to about 1/4". This takes a lot of the bulk out of the bottom of the bag.

Carefully snip across the bottom point to make it square. Do NOT cut through the stitching, just really close to it.
 Turn your bag right side out.
 Starting to look like something, huh?! Notice that you have three pockets in your bag, and that if you pull the point up on the inside, this bag will sit flat, almost like a bucket. Because I used a pair of men's jeans, these pockets are nice and roomy. If you wanted to, you could add some type of closure (like a snap) to the center pocket at this point. I chose to leave mine open.
 Get ready to get messy. Glue the first side of the handle toward the center, starting at the top on one side and going to the top on the other. Repeat on the other side, and under the pressed-under edges of the inside pocket.
 Now it's time to add the decorative elements. Feel free to add as many as you'd like, or substitute according to your own tastes and desires. It's your project, and there are no denim purse police! I started by gluing eyelet around the top outer edge. I made sure to use the outer edge of the outer pockets so I didn't either hide the opening, or worse, glue it shut. That would be bad. Very bad.
 It still needed something, and there was that hole in the bottom of one of the outside pockets. So I made my VERY FIRST fabric yo-yo, and used an ivory button for the center. It's hard to tell (because of the shadow), but that button actually matches the eyelet perfectly. I got really lucky. Too bad I can't do that with lottery numbers.
 Ok, very cute. Country chic. But still needs something...
Glued ribbon over the raw edge of the inner pocket. Makes it look finished and polished. Plus adds another pop of color on a very neutral canvas.
 Hmmmm... What else... Oh, the back! We can't forget the back now, can we?! This is some giant rick rack I had in my stash. Usually, it goes on Little Dresses. I hand stitched it to the main part of the pocket, then glued the ends down where the pocket is double-stitched to the main body of the purse. This also helps keep the rick rack from fraying. I used large stitches, just tight enough to hold the trim on. I also used matching thread. You could use contrasting thread if you'd like.
 Still not "finished"... Well, there are some tiny holes on the other side, and that flower does look awfully plain all by itself... It needs some leaves! I cut some simple leaf shapes from some green scraps in my stash. I like how the squares on this fabric echo the dots on the yellow ribbon and on the fabric yo-yo. My leaves match - yours don't have to. You don't even have to do leaves if you don't want to.

I folded the edges of each leaf under, even flattening the points at the top/bottom. They get re-pointy as you work your way around. I used a double thread of an accenting shade of bright green, and just did a simple small running stitch all the way around. I started at one point, and when I got back to the beginning, I made a line of running stitches down the center to the other point. This is where I began to stitch the leaf to the pocket. I made sure first and foremost to NOT SEW THE POCKET SHUT. It got a little tricky in places, but I figured out how to make tiny (but secure) stitches around the edge of the double stitching on the bottom edge of the pocket. Also, when I sewed the other edge of the leaf to the open section of the pocket, I tried to make stitches that overlapped my original stitches. This not only made the leaves secure on the pocket, but it brought the stitching out as its own accent. Remember to audition your elements before attaching them. And also, sometimes enough is enough. Let the simplicity of this bag shine through - you are accenting its natural beauty.
Here it is again - one last look.
So then I got to thinking (you KNOW that always spells trouble). What if you traced the pocket pattern onto scrap fabric, and made a scrappy pocket purse. Or you bleached the denim first. Or dyed it with fabric dye. Or both. Or added designs made with fabric paint. You could easily do the flower in the center of both the front and back pocket. Or do more flowers, in various sizes and colors. What if you made a mommy-daughter pair from adult-size jeans and kid-size jeans. You could do lots and lots of layers of eyelet, or jelly roll strips that had been gathered into ruffles. Maybe you have some really neat trim you'd like to glue to the handle to give is some pizzazz.
Whatever you decide, it's a great little bag. Have fun!


Isn't it just so stinkin' cute! Don't you want one for yourself?! Let's make one!!!
You will need one whole pair of blue jeans, holes and stains are acceptable - you'll be cutting around them and you can also cover them up. I used a men's pair, size 34x32. You can use any size from kids on up to Sumo wrestler. You will also need glue - either fabric glue or a good strong craft glue (I use Aleene's Tacky Glue). Don't forget a quilt ruler, cutting mat, good sharp scissors and a few pins. Then, for the pretty parts, you'll want some scrap fabrics, trims, buttons and ribbons. I used some scrap eyelet I had, some scrap fabrics in my stash, some ribbon, and a button. To sew, you will need thread to match the denim you are using, plus matching/coordinating/contrasting/accenting thread for stitching on any accents you may be adding. You will need the zipper foot for your sewing machine. Read your user's manual to find out which foot is the zipper foot and how to properly change the foot on your sewing machine. This will make sewing around all those bulky denim seams much easier, and you'll see why in just a bit.
Ok, ready?
Start by dissecting your jeans. Don't worry - it's much easier and way less gross than Biology class. Cut the jeans just above the crotch to remove the legs from the body portion. Remove the bottom hem from the legs. Then, cut the two back pocket sections out from the back of the body portion. Here's what you'll have left.

For the handle you will also need to cut the inseam section from one leg. This is the seam that has the double-stitching. Cut it with roughly an inch-ish of fabric on each side, then trim it to have 1/2" of fabric from each side of the stitching. Like this.

Now, you'll want to trim up your pockets. Trim around each pocket, leaving 1/2" of fabric. If you have pockets that aren't perfectly straight across the top, measure 1/2" from the highest corner, and make your line straight across from that point.

Press the top raw edge under toward the former inside.


Press the new seam toward the double-stitched seam on the handle piece. We will glue these in place in just a little while, and by pressing now, it's convincing this heavy fabric to do our bidding later.


Trim the seams to about 1/4". This takes a lot of the bulk out of the bottom of the bag.

Carefully snip across the bottom point to make it square. Do NOT cut through the stitching, just really close to it.


Glued ribbon over the raw edge of the inner pocket. Makes it look finished and polished. Plus adds another pop of color on a very neutral canvas.


I folded the edges of each leaf under, even flattening the points at the top/bottom. They get re-pointy as you work your way around. I used a double thread of an accenting shade of bright green, and just did a simple small running stitch all the way around. I started at one point, and when I got back to the beginning, I made a line of running stitches down the center to the other point. This is where I began to stitch the leaf to the pocket. I made sure first and foremost to NOT SEW THE POCKET SHUT. It got a little tricky in places, but I figured out how to make tiny (but secure) stitches around the edge of the double stitching on the bottom edge of the pocket. Also, when I sewed the other edge of the leaf to the open section of the pocket, I tried to make stitches that overlapped my original stitches. This not only made the leaves secure on the pocket, but it brought the stitching out as its own accent. Remember to audition your elements before attaching them. And also, sometimes enough is enough. Let the simplicity of this bag shine through - you are accenting its natural beauty.
Here it is again - one last look.
So then I got to thinking (you KNOW that always spells trouble). What if you traced the pocket pattern onto scrap fabric, and made a scrappy pocket purse. Or you bleached the denim first. Or dyed it with fabric dye. Or both. Or added designs made with fabric paint. You could easily do the flower in the center of both the front and back pocket. Or do more flowers, in various sizes and colors. What if you made a mommy-daughter pair from adult-size jeans and kid-size jeans. You could do lots and lots of layers of eyelet, or jelly roll strips that had been gathered into ruffles. Maybe you have some really neat trim you'd like to glue to the handle to give is some pizzazz.
Whatever you decide, it's a great little bag. Have fun!
Thursday, February 23, 2012
One Yard Wednesday - Green Fabric Votives
It's time to start pulling out all things green...
Got green fabrics leftover from (insert any crafty adventure here)?
On one of my bloghopping adventures I came across these adorable votive jars at Fellow Fellow.
Remember back at Christmas time - we had talked about ways to be thriftier in 2012. One of those ways was to save your glass jars. Like spaghetti sauce, salsa, etc., jars.
Well, today, we're going to jazz one up!
Pull out your green scraps and the glass object of your choice. The amount of fabric you will need will depend on the size of your object. I'm thinking if you have the right size item to cover, you could get by on a just linear quarter yard. I had this scrap fabric leftover and it was roughly a foot by width of fabric. I used less than a quarter of it to cover a former minced garlic jar. If you wanted to cover something significantly larger or smaller, your fabric needs will change accordingly.
In addition, you will also need craft glue (I use Aleene's Original Tacky Glue), wooden craft sticks (I used two),a container for mixing the glue and some water. A lid for this container is also helpful, but not necessary. Also, if you prefer, you can use ModPodge, but the craft glue/water combo is less expensive. Be sure to have a pair of junky scissors on hand as well - the kind you don't mine getting gloopy with glue.
First, be sure that your object is completely clean. I did mine with a good hand wash followed by Windex.
Now, some votive candle safety: These are best used with battery powered tea lights. However, if you ABSOLUTELY have to have the real thing, be sure that your container has lots of room around the candle. You want to be sure to keep that flame as far away from the fabric as possible. Also, hide some rice, sand, small gravel, coffee or other beans, etc. in the bottom of the jar. These will help dissipate the heat and keep your jar from shattering.
Just another quick note - your item is now NOT SAFE for dishwater of any kind. If you decide to use this technique a plate or platter (and you can, by the way), you can put wax paper under your goodies if using with food, then give the top a quick wipe with a soapy dishcloth to be sure it's clean when you are done. BUT DO NOT PUT IT IN THE SINK FULL OF SOAPY WATER NOR IN THE DISHWASHER! No way! Don't do it! Really!
And yet another: This is messy. You will get glue on you. And possibly your work surface. Newspaper would be helpful. Also, don't try to take photos of your work while your hands are goopy with glue. Just good advice from a friend {smile}.
So let's make a mess!
Start by mixing your glue mixture. In your container of choice, mix glue with water. I used a mixture that's about 50/50. You can use more or less glue based on your preferences. I stirred mine with a bamboo skewer but you can use your craft stick or whatever works for you.
Now measure your container against your fabric. Lay the fabric out flat on a cutting mat, and measure side
 plus bottom

plus side.
 I added about 1/2" to this measurement, just to be sure to make up for the curve of the bottom of the jar as well as the narrowing at the neck of the jar.
Cut your fabric into 1/2" strips.
 I don't remember exactly how many I did, but I think I did at least 12-16.

Take these strips for a swim in your glue mixture. Stir with your choice of item.
 Stir until the strips are well saturated with glue mixture. See how mine went from a sage-y green to practically white? When the glue gets embedded into the fabric it will not just hold the strips in place, but act like a stiffener. This will help keep the fabric strips upright against the walls of a vertical container.
 Now the fun REALLY begins! Remove the strips, one at a time, and slowly squeeze the excess glue out. Then, start layering the strips inside your jar. Use a craft stick to smoothe them into place and remove any air bubbles that may be behind them. Overlap them slightly each time you put a new one in.

Work your way around the circle, until all the open space is covered. Then, trim any overhanging ends with the junky scissors. Allow to dry. This will take much longer on a rainy, damp day. Ask me how I know. As I write, mine is still drying...
This is what your jar will look like when it's about half-way dry.

Don't worry - the glue will dry clear. You can tell by the "wet line". Also, your fabric will shrink up a bit. It will still look pretty, though.
Once the top is pretty dry, you can trim the top edge again. Also, you can save your extra glue mixture for other projects. I use mine when making crocheted snowflakes to stiffen them. It works great for decoupage projects.
Speaking of...
You could decoupage your jars on the outside with fabric or fancy tissue paper. Or a glass platter (on the back). Use the same glue mixture to apply your strips, then add another coat when everything is dry to protect your work.
Have fun with this technique, and enjoy your new votive holder!
Got green fabrics leftover from (insert any crafty adventure here)?
On one of my bloghopping adventures I came across these adorable votive jars at Fellow Fellow.
Remember back at Christmas time - we had talked about ways to be thriftier in 2012. One of those ways was to save your glass jars. Like spaghetti sauce, salsa, etc., jars.
Well, today, we're going to jazz one up!
Pull out your green scraps and the glass object of your choice. The amount of fabric you will need will depend on the size of your object. I'm thinking if you have the right size item to cover, you could get by on a just linear quarter yard. I had this scrap fabric leftover and it was roughly a foot by width of fabric. I used less than a quarter of it to cover a former minced garlic jar. If you wanted to cover something significantly larger or smaller, your fabric needs will change accordingly.
In addition, you will also need craft glue (I use Aleene's Original Tacky Glue), wooden craft sticks (I used two),a container for mixing the glue and some water. A lid for this container is also helpful, but not necessary. Also, if you prefer, you can use ModPodge, but the craft glue/water combo is less expensive. Be sure to have a pair of junky scissors on hand as well - the kind you don't mine getting gloopy with glue.
First, be sure that your object is completely clean. I did mine with a good hand wash followed by Windex.
Now, some votive candle safety: These are best used with battery powered tea lights. However, if you ABSOLUTELY have to have the real thing, be sure that your container has lots of room around the candle. You want to be sure to keep that flame as far away from the fabric as possible. Also, hide some rice, sand, small gravel, coffee or other beans, etc. in the bottom of the jar. These will help dissipate the heat and keep your jar from shattering.
Just another quick note - your item is now NOT SAFE for dishwater of any kind. If you decide to use this technique a plate or platter (and you can, by the way), you can put wax paper under your goodies if using with food, then give the top a quick wipe with a soapy dishcloth to be sure it's clean when you are done. BUT DO NOT PUT IT IN THE SINK FULL OF SOAPY WATER NOR IN THE DISHWASHER! No way! Don't do it! Really!
And yet another: This is messy. You will get glue on you. And possibly your work surface. Newspaper would be helpful. Also, don't try to take photos of your work while your hands are goopy with glue. Just good advice from a friend {smile}.
So let's make a mess!
Start by mixing your glue mixture. In your container of choice, mix glue with water. I used a mixture that's about 50/50. You can use more or less glue based on your preferences. I stirred mine with a bamboo skewer but you can use your craft stick or whatever works for you.
Now measure your container against your fabric. Lay the fabric out flat on a cutting mat, and measure side


plus side.

Cut your fabric into 1/2" strips.


Take these strips for a swim in your glue mixture. Stir with your choice of item.


Work your way around the circle, until all the open space is covered. Then, trim any overhanging ends with the junky scissors. Allow to dry. This will take much longer on a rainy, damp day. Ask me how I know. As I write, mine is still drying...
This is what your jar will look like when it's about half-way dry.

Don't worry - the glue will dry clear. You can tell by the "wet line". Also, your fabric will shrink up a bit. It will still look pretty, though.
Once the top is pretty dry, you can trim the top edge again. Also, you can save your extra glue mixture for other projects. I use mine when making crocheted snowflakes to stiffen them. It works great for decoupage projects.
Speaking of...
You could decoupage your jars on the outside with fabric or fancy tissue paper. Or a glass platter (on the back). Use the same glue mixture to apply your strips, then add another coat when everything is dry to protect your work.
Have fun with this technique, and enjoy your new votive holder!
Saturday, February 18, 2012
February Craftivism Challenge - Knit HeartScarf Pattern
Let's practice our knitting skills some more, and learn something new...
You will need about 3 balls of Lion Brand Hometown Yarn (or similar super bulky yarn) in red. Just make sure your bulky yarn is red for the HeartScarf project. Lion Brand has Tampa Spice or Cincinatti Red in the Hometown. Red Heart has Red Heart Chunky in Berry Breeze (which appears to be reds and hot pinks on the screen). I am using a red super bulky which was donated to me by a friend, and the amount is approximately 8 ounces. You can also hold together 2 strands of worsted weight yarn in red.
You will also need chunky size needles. Mine are 17's. I think you could use anything size 13 or above.
So let's start with the basics. Start by casting on 12.
So the pattern goes like this:
Row 1 (and all odd rows): Knit across
Row 2 (and all even rows): K2, p8, k2. The k2's on each row keep your scarf from curling in on itself.
This pattern (knit one row, purl one row) is called stockinette stitch. This produces the texture we usually associate with a knit item. The Special Olympics Scarf we made in November and the dishcloth we made in December are all knit. This is called garter stitch. If you ever see these terms in a pattern in the future, you'll know what the designer has intended. Let me show you a couple samples so you can see what I mean.
This is the back of my scarf (in progress). It has all the loops/bumps. This is what garter stitch looks like on both sides.

This is the front of my scarf (in progress). It has the smooth columns of v's. This is what stockinette stitch looks like.

Did you catch my crazy trick? I have made projects in stockinette stitch in the past. While making them, I would {NEVER} be interruped and then, of course, would {NEVER} forget whether I was knitting or purling. NEVER - HA! So, I find a way to mark one of my needles to represent the purl. In this case, I happen to have 2 sets of size 17's in 2 different colors. I use the purple for the purl. You can put a piece of painters' tape or masking tape on the head of your needle, mark a plastic needle with a Sharpie, whatever works for you.
Continue knitting and purling until desired length (60"), knit one row and bind off.
Now, one of the neat things about stockinette stitch is that you can use the v's to do cross-stitch on. You can stitch on stripes, or shapes (like a heart), or a monogram. That's if you want to. I chose not to do that this time. By the way, if you want the LOOK of argyle (you know, all those really cool diamonds with the intersecting lines), but don't want to try to knit it - think cross-stitch!
If you'd like a fancier border, you can crochet around the edges (like we did for our cup cozy).
Add fringe if you want to. You could use a thinner/lighter weight red for the fringe.
If you need a practical present in a hurry, these are GREAT! Make a bunch in different colors for all your friends and relations. Or, make a bunch, then stitch them together to make a nice throw. Use the basic stockinette pattern with a longer chain to make a baby afghan. Use smaller needles and lighter yarn or use multiple strands of yarn and Speed Stix (size 50's).
Next weekend, I'll have a linky up again, so we can link to each others' projects. Come back and link up!
Have fun knitting!
Wednesday, January 11, 2012
Tea for Tuesday (Well, Thursday) - and a Tutorial Two-fer
Wow, that's a tongue twister! Two great tutorials today - grab a crochet hook and some yarn and let's go!
Last Thursday, while visiting my favorite forum, Mary Jane's Farm, one of the farmgirls posted this wonderful Cup Cozy Tutorial link. And since January is National Hobby Month, and it's also a time that folks decide to try new things, I thought this would be a great opportunity to do a crochet tutorial.
I love teaching people how to do what I love to do. Is that too much love in one sentence? You'll remember reading that the lady who taught me to crochet made us all promise that we would teach others so the art would live on. Here's your chance to join me in a hobby that is relatively inexpensive, is actually easier to learn than you think, and is a lot of fun!
**A SPECIAL NOTE TO THOSE WHO ARE LEFT HANDED**
I am not. I am terminally right-handed. The method I will be demonstrating in this and any future crocheting tutorials is a "right-hand-friendly" method. Unfortunately, I do not know how to teach you to knit and crochet left-handed. If my mom were alive, she would know, and I'd gladly take photos of her doing what she did so you could see. Sadly, she went to Heaven and took her knowledge with her. There are lots and LOTS of videos on YouTube that may be helpful for you.
Before we begin, we need to say "thank you, Princess" - she did quite a bit of the photography for me.
So let's start with what you need for the project, and we will go from there...
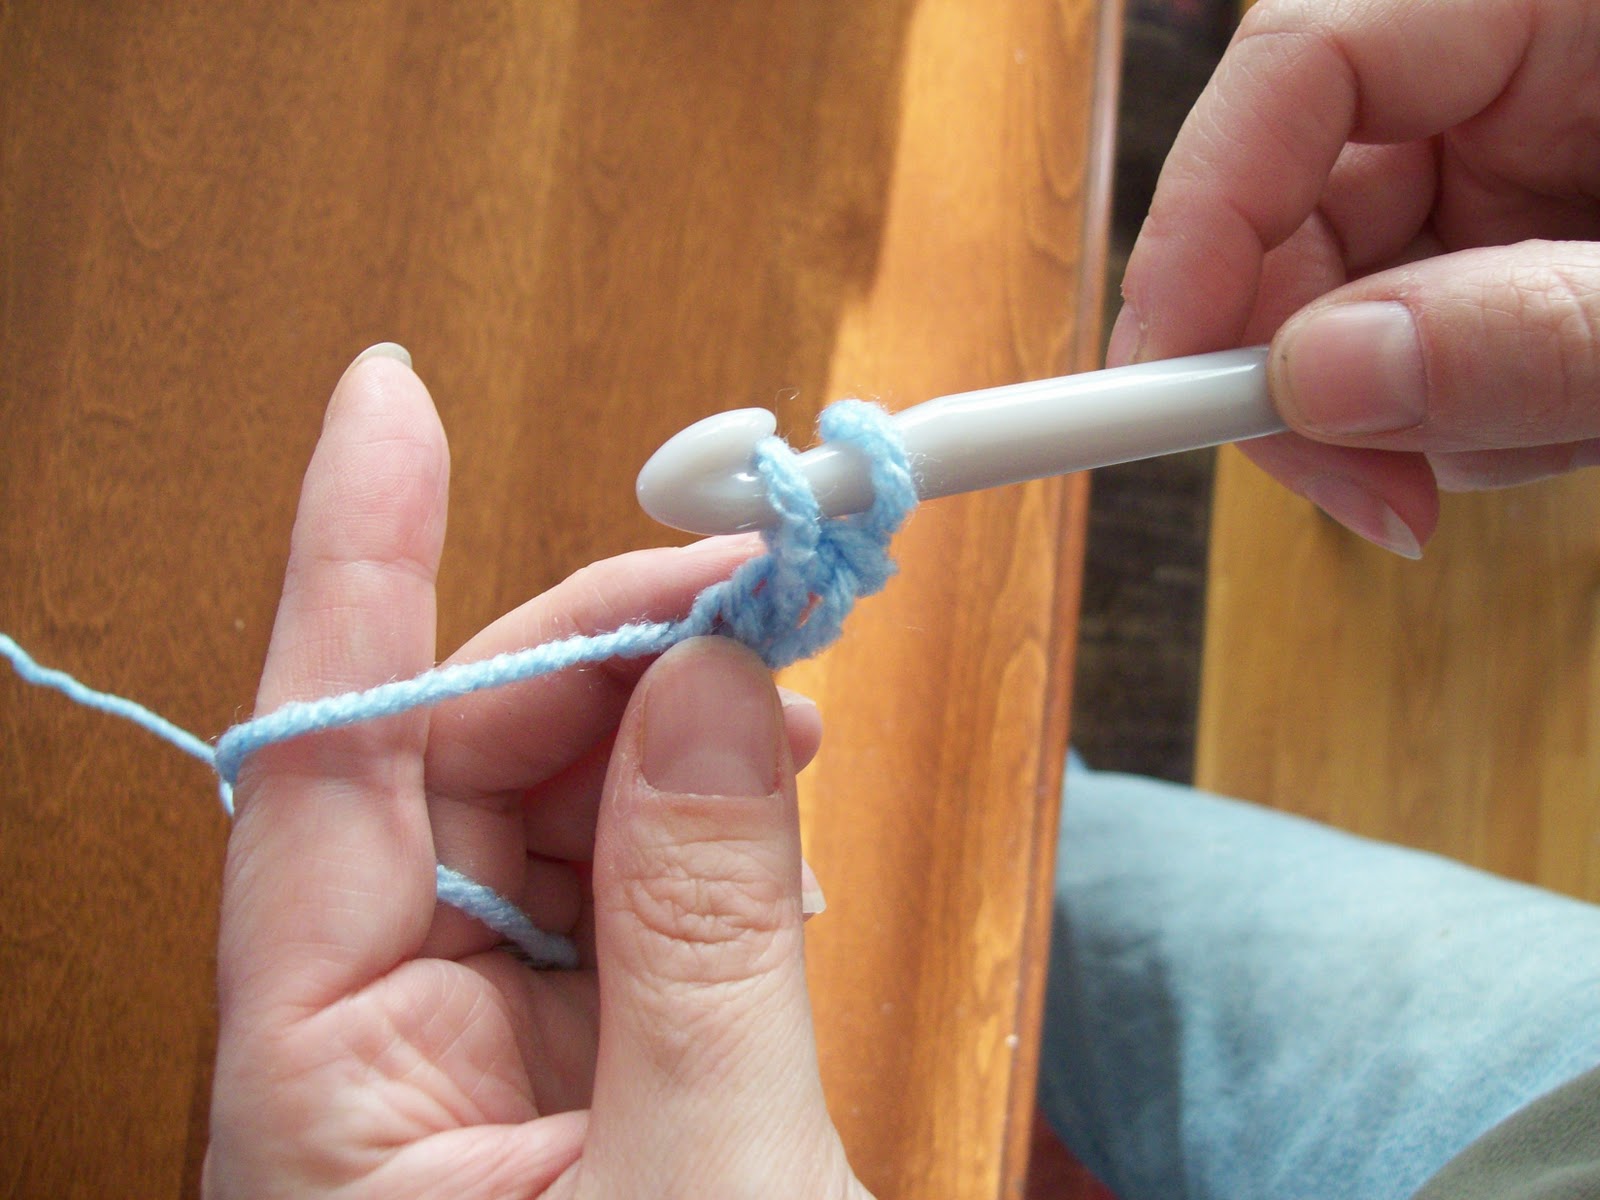
To begin, you will make a slip knot and insert your hook into the loop.

If you participated in the Nine Days of Knitting Tutorial, you already know how to make a slip knot. If not, check the link, and there are lots of photos that show you how step-by-step. After inserting your hook, pull the little tail so the loop is snug around your hook, but not so tight that you can't slip and slide the yarn or pull the hook part of the hook back through. This is important because soon, you will be pulling yarn through this loop. What you have in your hands should look pretty similar to the picture.
When we learned to knit, we held the yarn in our right hands to keep the tension in the working yarn so our stitches would be nice and even. In crochet, we hold the hook in our right hand and the yarn with our left. I drape my yarn over my left pinky, under my two center fingers, and back up over my left index finger.

When I first started, I just carried it over my index finger. Princess carries her yarn between her left index and center fingers. I've seen others who completely loop their yarn around their pinkies, then do the over/under thing. Whatever works best for you - there are no crochet police!
To make your first chain stitch (ch), drape the yarn over (yo) the hook,

and using the hook, pull the yarn through your loop.

Don't feel discouraged if it takes you a few tries to get the hang of it. Today is a day to be confident and practice patience.

Try to get your chain stitches all even. Repeat this process until you have 21 stitches.
 Congratulations - you are crocheting! To be sure you have 21 stitches, count the v's. Here's an example:

See how the chains make the little v's? This chain was made with a smaller hook, so the chains look much smaller.
Ok, so you want a project that actually looks like more than a worm. Here's what's next - single crochet (sc).
Take another close look at your chain. You will notice that it also looks like a bunch of little pretzels all strung together.

You are going to insert your hook into the bottom of the pretzel of the second ch from your hook.

Like this:
 The first chain (the one right next to your hook) acts as a turning chain, which you'll see more about in a minute.

Then, you will yo, and pull the loop through. Again, it may take a few tries, but you'll get it.


Now you should have two loops on your hook.


Repeat all the way across your chain.

 When you get to the end, chain 1. Turn. This turning chain helps keep the edges of your piece straight.
You now know everything you need to make any crochet stitch ever. And I mean like EVER! Every crochet pattern starts with a loop or slip knot, then some type of chain, and every stitch after that is all yo's and pull throughs. Wow, aren't you so clever! Do you feel empowered? YOU SHOULD!
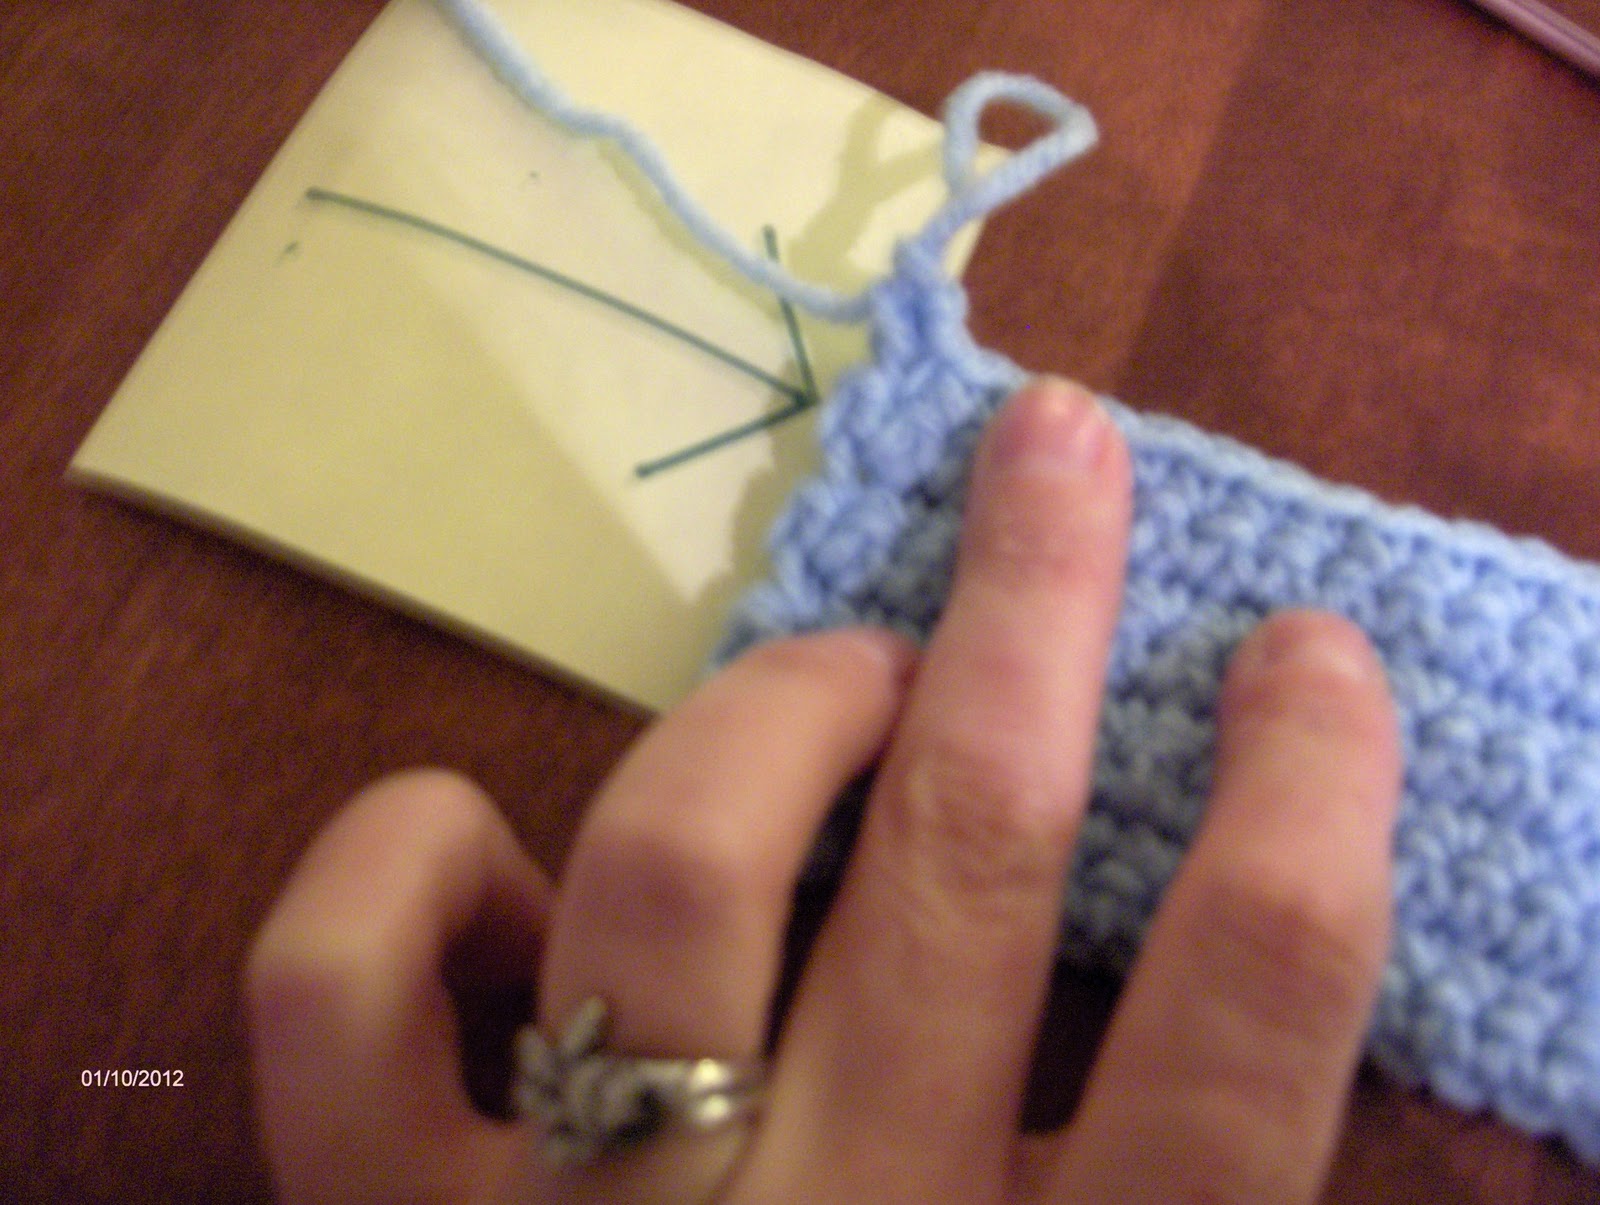
Let's go back the other way now. Look at your piece closely again. You will notice that there are little bars that go across, and little upside down V's.

The stitches look like upside down bunnies - the cross bars being their little bunny heads, and the V's being their long floppy bunny ears. Insert your hook between the little bunny heads of the first and second stitches.


Sc. You remember, yo, pull up a loop, yo and pull through two on the hook. All the way across again, ch 1 and turn.

Just like anything else, crochet is not only an art, but it's a skill. It takes practice. And regular practice at that. If I'm crocheting or knitting in public, people are amazed at how fast I stitch. It's only because I have years and years of practice. I've crocheted since I was 10, so that's been 34 years. I've knitted for 5. You will get faster, and better. Just be patient with yourself, and hang in there. Be confident - you learned to walk and run, to read, to drive and any number of other things you do every day now without thinking. This, too, will be one of those things eventually!
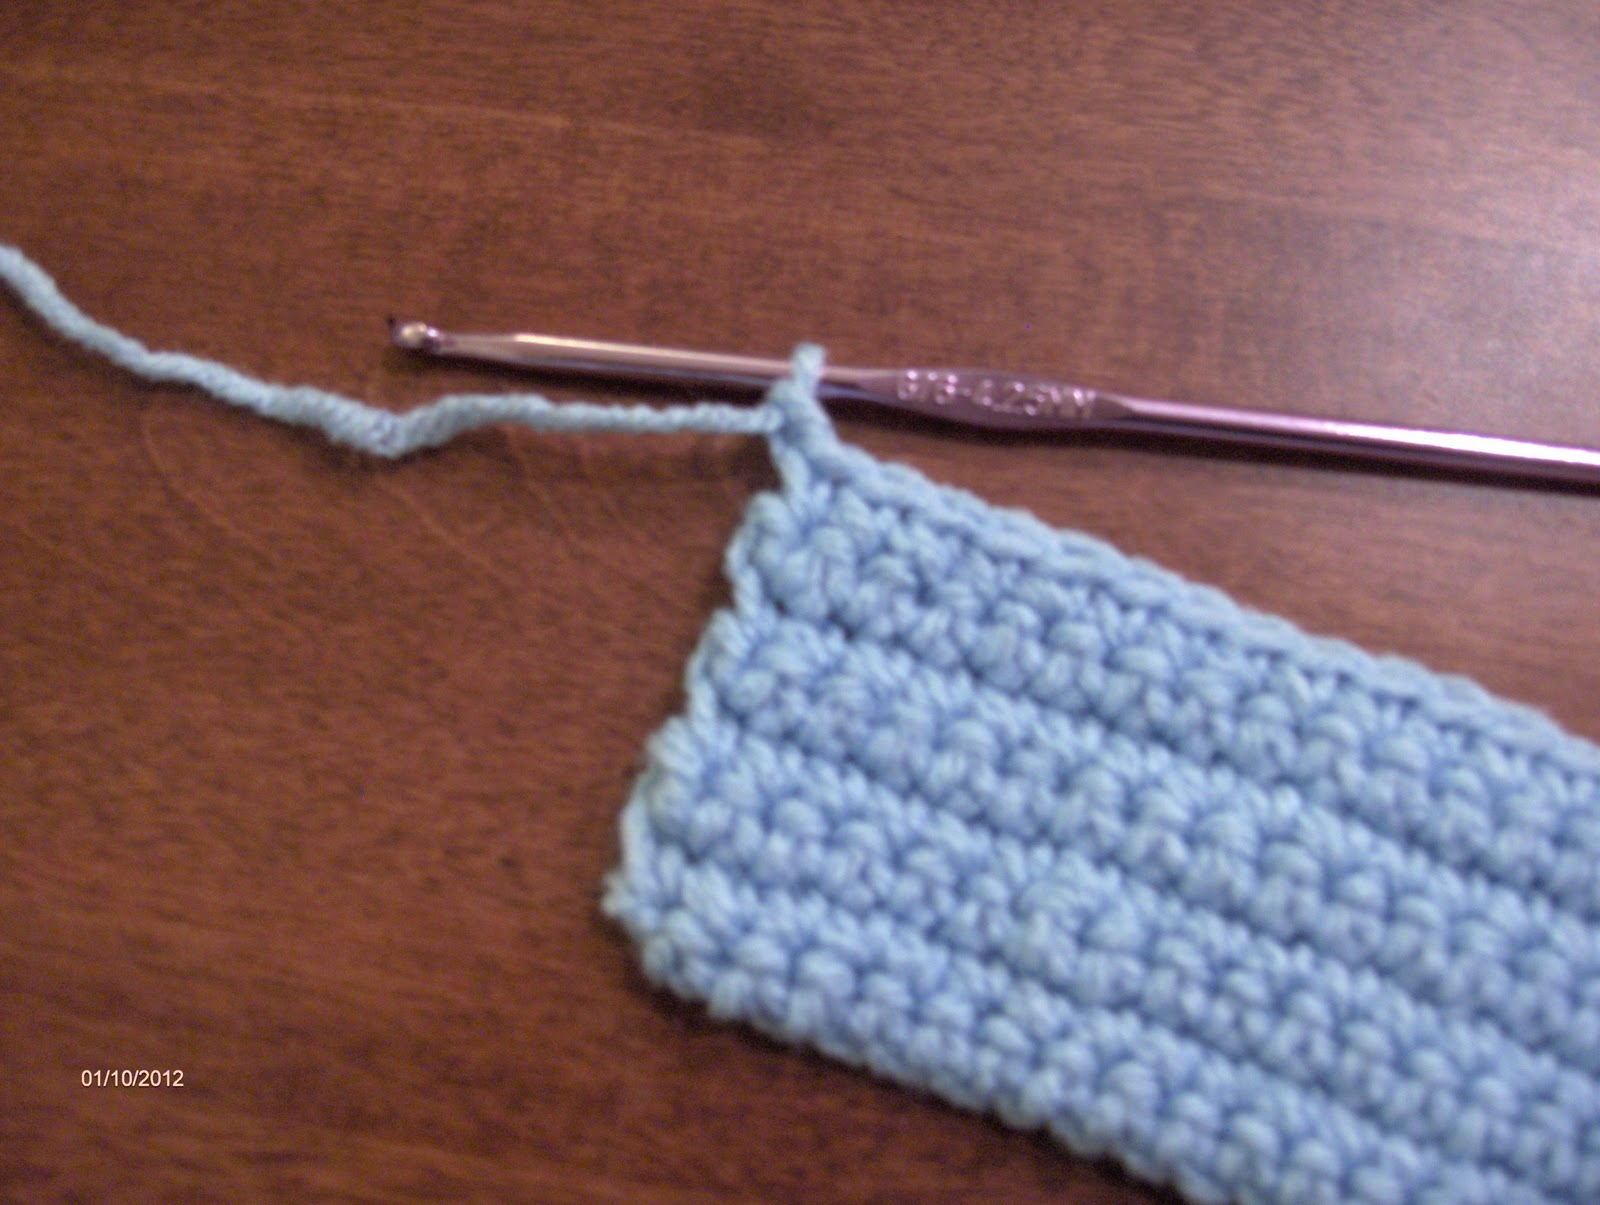
Let's practice some more! And just a quick note - I'm changing hooks, so what you see in the pictures will roughly be the actual size of what you are working on.
Keep working each row in sc until you have 20 rows.

At the end of Row 20, ch 2 but do not turn.

Remove your hook. It's ok, you're all done now. Pull the loop for that second chain so it's pretty big - like a couple of inches.

Clip your yarn with scissors in the center of the loop.

Pull the end of yarn from the skein out of the loop, and the end of yarn attached to your piece tight. Like really tight.You've now made a very secure knot. If you want, you can make another simple overhand knot as well. Using a yarn needle, weave the ends into the back of the stitches (the bunny head side).

You have now made a great little mug mat! Feel free to add some fringe if you'd like, or stitchery, or whatever your heart desires. Just keep in mind that bumpy things make bad places for cups with liquid, so beads would be best suited for the outside edge.
To continue with the Cup Cozy Tutorial, follow the directions and photos given. They are very thorough. In fact, this is probably one of THE BEST crochet tutorials I've ever seen. I"ll show you what I did for each of the steps. I paraphrased the titles of each step. Also, I used a G (6 /4.25 mm) hook, which is smaller than a J.
So here we go:
"Chain big enough to go around cup"


"Sc to desired width" - mine was about 45 stitches
 "ch 1, turn"
 "work down left side"

Insert your hook into the spaces created by the stitches and rows. Just do your best to find holes all the way down the side.
 "At the bottom, make a chain"
Here is what it looked like when I got to the bottom. I did 5 chains.
 "Attach to the other side" - look for a space within a stitch or hole between the rows
 To finish attaching, use a slip stitch (sl st). YO, pull up a loop, and pull that loop through the loop on your hook. I told you - all yo's and pull up a loop!
"Ch1 and sc back across"
 When you get across, instead of doing a ch 1 to turn, sl st to the row of sc going down the side of the cozy.
To do the chain at the top to loop over your button, join your yarn here in the hole between the top 2 rows.

To do that, insert your hook and pull up a loop.

Pull the little tail through your loop to make a basic knot. Pull up another loop and begin your chain. My chain was 15 stitches.
Choose a really cute button, sew it on, and you're all done!

You can doodad up your cozy with stitching, beads, multiple colors of yarn - just like the mug mat. Play with it, and have some fun with your new skill!
Last Thursday, while visiting my favorite forum, Mary Jane's Farm, one of the farmgirls posted this wonderful Cup Cozy Tutorial link. And since January is National Hobby Month, and it's also a time that folks decide to try new things, I thought this would be a great opportunity to do a crochet tutorial.
I love teaching people how to do what I love to do. Is that too much love in one sentence? You'll remember reading that the lady who taught me to crochet made us all promise that we would teach others so the art would live on. Here's your chance to join me in a hobby that is relatively inexpensive, is actually easier to learn than you think, and is a lot of fun!
**A SPECIAL NOTE TO THOSE WHO ARE LEFT HANDED**
I am not. I am terminally right-handed. The method I will be demonstrating in this and any future crocheting tutorials is a "right-hand-friendly" method. Unfortunately, I do not know how to teach you to knit and crochet left-handed. If my mom were alive, she would know, and I'd gladly take photos of her doing what she did so you could see. Sadly, she went to Heaven and took her knowledge with her. There are lots and LOTS of videos on YouTube that may be helpful for you.
Before we begin, we need to say "thank you, Princess" - she did quite a bit of the photography for me.
So let's start with what you need for the project, and we will go from there...
- Worsted weight acrylic yarn (I highly recommend Red Heart brand - buy either Classic or a Super Saver if you want more yarn for more projects, but you can use whatever brand you like)
- A size "J" crochet hook (if there is no letter on your hook, it may say size 10 or 6mm)
- Yarn needle
To begin, you will make a slip knot and insert your hook into the loop.

If you participated in the Nine Days of Knitting Tutorial, you already know how to make a slip knot. If not, check the link, and there are lots of photos that show you how step-by-step. After inserting your hook, pull the little tail so the loop is snug around your hook, but not so tight that you can't slip and slide the yarn or pull the hook part of the hook back through. This is important because soon, you will be pulling yarn through this loop. What you have in your hands should look pretty similar to the picture.
When we learned to knit, we held the yarn in our right hands to keep the tension in the working yarn so our stitches would be nice and even. In crochet, we hold the hook in our right hand and the yarn with our left. I drape my yarn over my left pinky, under my two center fingers, and back up over my left index finger.

When I first started, I just carried it over my index finger. Princess carries her yarn between her left index and center fingers. I've seen others who completely loop their yarn around their pinkies, then do the over/under thing. Whatever works best for you - there are no crochet police!
To make your first chain stitch (ch), drape the yarn over (yo) the hook,

and using the hook, pull the yarn through your loop.

Don't feel discouraged if it takes you a few tries to get the hang of it. Today is a day to be confident and practice patience.

Try to get your chain stitches all even. Repeat this process until you have 21 stitches.


See how the chains make the little v's? This chain was made with a smaller hook, so the chains look much smaller.
Ok, so you want a project that actually looks like more than a worm. Here's what's next - single crochet (sc).
Take another close look at your chain. You will notice that it also looks like a bunch of little pretzels all strung together.

You are going to insert your hook into the bottom of the pretzel of the second ch from your hook.

Like this:


Then, you will yo, and pull the loop through. Again, it may take a few tries, but you'll get it.

Now you should have two loops on your hook.

Next, you will yo again, and pull that loop through the two loops on your hook. You have just made a single crochet!

Repeat all the way across your chain.


You now know everything you need to make any crochet stitch ever. And I mean like EVER! Every crochet pattern starts with a loop or slip knot, then some type of chain, and every stitch after that is all yo's and pull throughs. Wow, aren't you so clever! Do you feel empowered? YOU SHOULD!
Let's go back the other way now. Look at your piece closely again. You will notice that there are little bars that go across, and little upside down V's.

(bars are top arrow, upside down v's are bottom arrow)
The stitches look like upside down bunnies - the cross bars being their little bunny heads, and the V's being their long floppy bunny ears. Insert your hook between the little bunny heads of the first and second stitches.


Sc. You remember, yo, pull up a loop, yo and pull through two on the hook. All the way across again, ch 1 and turn.

Just like anything else, crochet is not only an art, but it's a skill. It takes practice. And regular practice at that. If I'm crocheting or knitting in public, people are amazed at how fast I stitch. It's only because I have years and years of practice. I've crocheted since I was 10, so that's been 34 years. I've knitted for 5. You will get faster, and better. Just be patient with yourself, and hang in there. Be confident - you learned to walk and run, to read, to drive and any number of other things you do every day now without thinking. This, too, will be one of those things eventually!
Let's practice some more! And just a quick note - I'm changing hooks, so what you see in the pictures will roughly be the actual size of what you are working on.
Keep working each row in sc until you have 20 rows.

At the end of Row 20, ch 2 but do not turn.

Remove your hook. It's ok, you're all done now. Pull the loop for that second chain so it's pretty big - like a couple of inches.

Clip your yarn with scissors in the center of the loop.

Pull the end of yarn from the skein out of the loop, and the end of yarn attached to your piece tight. Like really tight.You've now made a very secure knot. If you want, you can make another simple overhand knot as well. Using a yarn needle, weave the ends into the back of the stitches (the bunny head side).

You have now made a great little mug mat! Feel free to add some fringe if you'd like, or stitchery, or whatever your heart desires. Just keep in mind that bumpy things make bad places for cups with liquid, so beads would be best suited for the outside edge.
To continue with the Cup Cozy Tutorial, follow the directions and photos given. They are very thorough. In fact, this is probably one of THE BEST crochet tutorials I've ever seen. I"ll show you what I did for each of the steps. I paraphrased the titles of each step. Also, I used a G (6 /4.25 mm) hook, which is smaller than a J.
So here we go:
"Chain big enough to go around cup"

(cup of choice - aka mug as still life)


Insert your hook into the spaces created by the stitches and rows. Just do your best to find holes all the way down the side.
Here is what it looked like when I got to the bottom. I did 5 chains.


"Ch1 and sc back across"

To do the chain at the top to loop over your button, join your yarn here in the hole between the top 2 rows.

To do that, insert your hook and pull up a loop.

Pull the little tail through your loop to make a basic knot. Pull up another loop and begin your chain. My chain was 15 stitches.
Choose a really cute button, sew it on, and you're all done!

(mug as still life 2)
You can doodad up your cozy with stitching, beads, multiple colors of yarn - just like the mug mat. Play with it, and have some fun with your new skill!
Subscribe to:
Comments (Atom)