
Showing posts with label repurposing. Show all posts
Showing posts with label repurposing. Show all posts
Wednesday, July 24, 2013
Sunday, April 1, 2012
Bunny Project for Harrisburg
Just a reminder:
TOMORROW
is the last day
you can ship your bunny(ies)
to Harrisburg
via Priority Mail
in the continental US
and have them arrive in time
to be distributed
for Easter
Please ship to
First Church of God
1520 Mchaney Road
Harrisburg, IL 62946
I pinned several patterns
on my Pinterest board
if you'd like
to make some of those.
You can also make
and
or three
or a dozen.
The goal is 100 bunnies.
Can you take
some time
this afternoon
and make
just
1
?
If you make one (or a bunch),
please leave a comment saying so.
Thank you so much,
and have a blessed Sunday!
Thursday, March 29, 2012
Sock Bunny for The Bunny Project for Harrisburg
He is just so adorable and easy to make - you'll want to do at least a dozen!

We've named him Righteous. He reminds me of a skater dude, so he needs a really cool name. I know he's faceless right now. Don't worry, I'll take care of his adorable mug later today. I wanted to get the tutorial up as soon as possible because if you are joining in on the Bonus Craftivism Challenge, you need to mail your bunny (bunnies) no later than Monday, and then you'll need to mail them Priority Mail. So let's get started!
You will need one pair of size large cotton socks in at least a medium length. I used men's boot socks I found at Dollar General (2 pair/$4). I like how they looked like traditional sock monkey socks. You can use whatever socks you'd like.

You will also need a needle and thread, pins, polyester stuffing, and either a fabric marking pen (this is what I used) or a pencil, and decorations of your choice. Just remember, for The Bunny Project, if you use buttons, you must label your bun "Ages 4+".
As you put this little guy together, you'll see a lot of similarities to our glove bunny, so if you're new to sewing, this is a great "next-step" project for you.
Here is the template I used as my inspiration for my bunny. If you like to make sock monkeys or would like to learn, this is the best pattern, with the easiest instructions, I've found. Obviously, to make a bunny, we're going to do a few things differently, but you can get an idea of how this is all going to go together.

Time is short so let's get started!
Trim the cuff off one sock and save it for later. Stuff this sock up into the toe, and fill the foot portion roughly 1/3 full. Run a gathering stitch under the stuffing, starting in the center back and leaving a long starting tail. When you get all the way around, pull the starting tail and working thread to gather your sock around the stuffing. Do the criss-cross we did with the glove bunny, and tie TIGHTLY to secure. Snip threads close to your knot. This will make the little bunny head.
 Now stuff the rest of the foot portion, down to the heel. Remember your bunny should be able to sit relatively well, but it should also be soft enough to hug. It's a fine line, and my best suggestion is just to play with it until you are satisfied. Add more stuffing if you need to, take some out. You be the judge.
 Stitch across the bottom of the body (where the arrow is). I found this worked best by using my zipper foot on my machine. You can hand-stitch it if you'd like. Snip up the middle of the remaining portion of the sock. This will become the bunny's legs.
 Turn the other sock inside out. Fold it roughly in half, like this photo. Using your marker or pencil, mark one paw. Use the template above for your guide. Be sure to mark the straight side along the fold.

Pin through all the layers to mark the paw on the other side, then flip and trace the line that the pins make. Your paws may not be exactly identical, but they will be close.

For the ears, draw a straight line down from near the center of the toe. This will give your bun a little tip of color on his/her ears. You can make your ears as long or short as you'd like. Repeat the pin and redraw procedure.

After marking, stitch on the lines either on your sewing machine or by hand. Be sure when you stitch the ears that you leave the bottom open! After the ears and paws are stitched, cut them free from the sock. Turn them right side out. Here you can see one of each right side out, and one still inside out.
 Stuff the paws. Stuff the ears if desired. I chose not to. I wanted more of the floppy ear look. If you want ears that stand up and are more perky, you'll need to stuff them for stability. Now that my bunny boy is done, I think I should have put a little stuffing in the tips to help weight them down. Again, your bunny, your choice. Be creative.
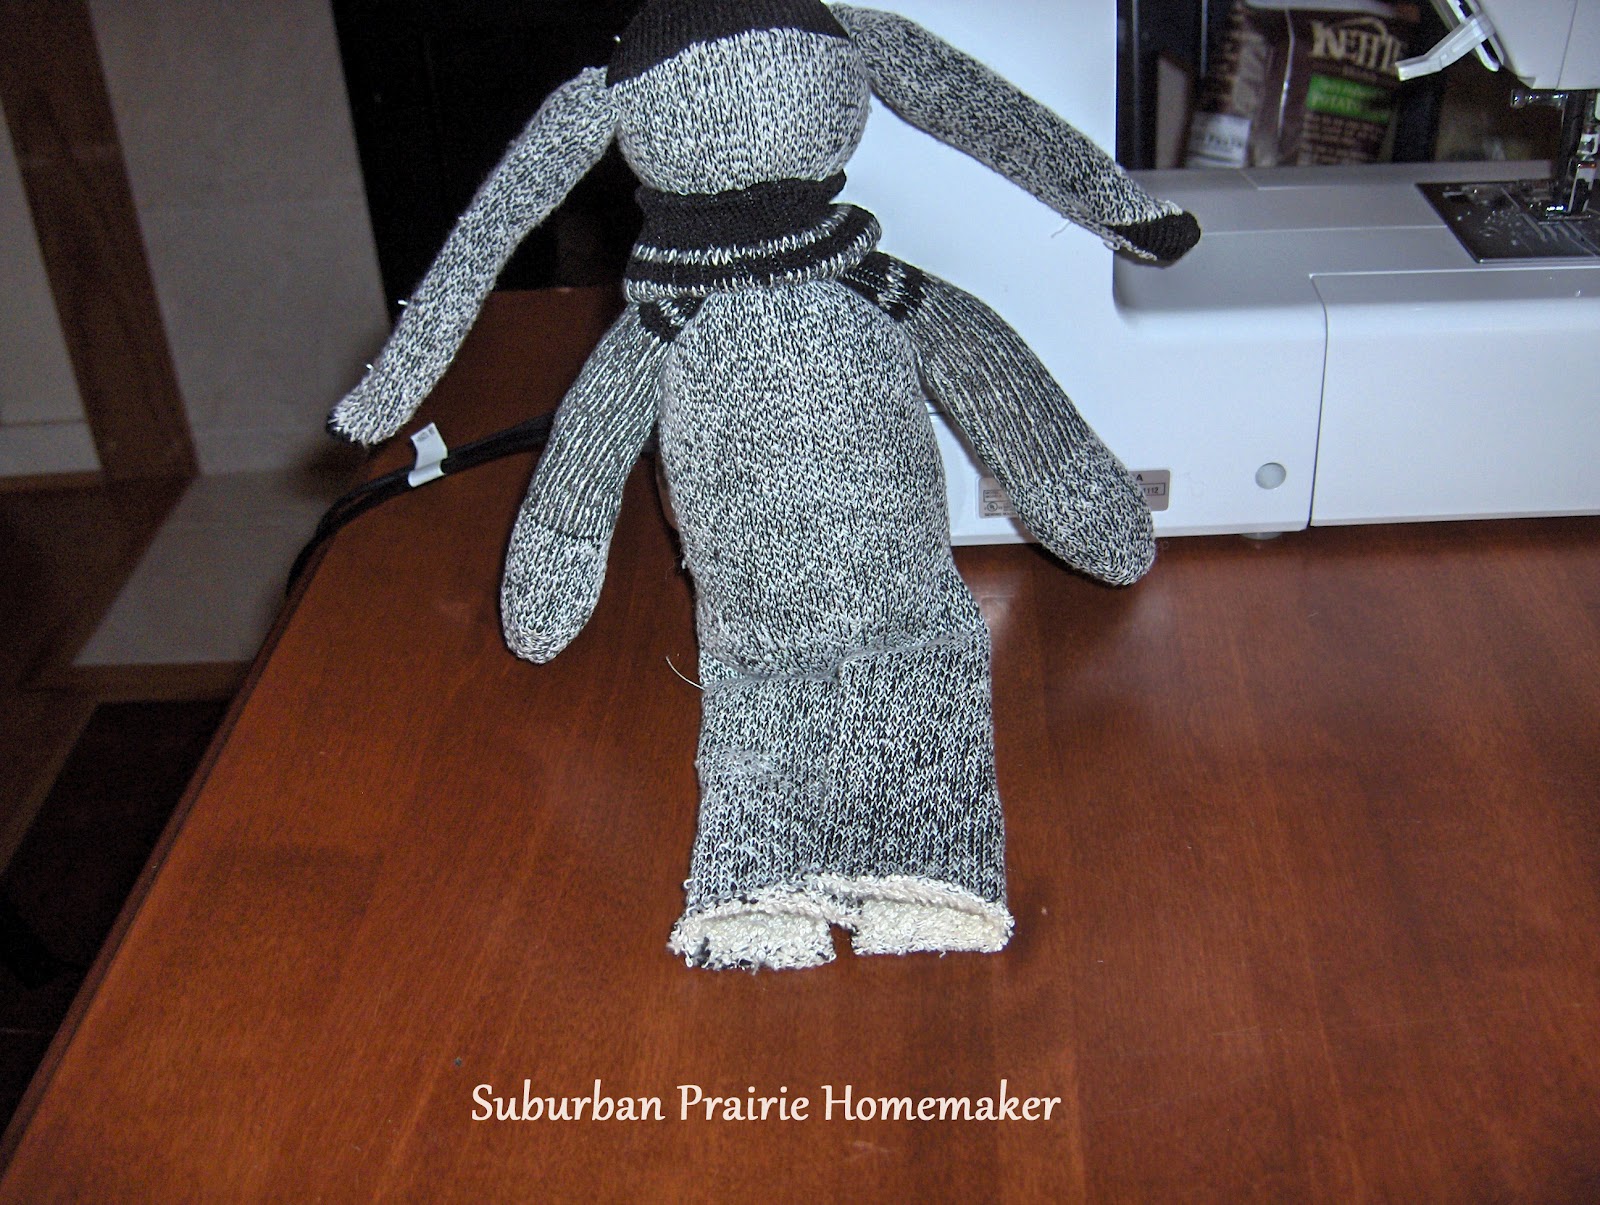
And now the fun begins! Stitch the ears and arms onto your bunny. I liked sewing the ears just below that black spot on the toe. Kind of like they are sticking out from under a little hat. I also sewed the arms on a bit high so they'd be covered by that leftover cuff. Speaking of which - roll the raw edge under.

Slide the cuff over the bunny's head. It will look like a little turtleneck.
 To finish up the legs, start at the bottom of one leg. Roll in just a little bit of each open side on the long edge, and whipstitch all the way around to the other "foot". Stuff each leg. Fold in the bottom edge of each foot a little bit, then run a gathering stitch around. Pull tight to close, then whipstitch over the top to help keep the opening closed. Knot thread securely, and cut thread close to knot.
Special Addition: To make the tail: cut a circle from leftover sock material. I used the inside of a canning ring as a template.
 Fold the raw edges in a bit and stitch with a gathering stitch. Add a wee bit of stuffing in the center and pull tight to close. Stitch to the bunny's little bum. I stitched mine so the wrong side of the fabric of my sock (which is white and fluffy) was out. You can sew yours how you like.

So this is where you need to call on your own creativity. Obviously, this little guy needs a face. I am going to embroider it. You can do the button eyes like we did for the glove bunny. You can add clothing (please remember choking hazzards for little ones and label your bunny appropriately when shipping). You could do fabric ears. Just have a lot of fun with it! Make a bunch!
As of today, I have 5 at my house and a commitment for 1 more. I'm hoping to get 100 donated. I need your help to do this! If you could take an evening this weekend and make a bunny, and ship it out either Saturday or Monday via Priority Mail, I know the children in Harrisburg will appreciate your generosity!
Remember, the bunny goes in a plastic bag to keep it clean. Label "Ages 3 and Under" or "Ages 4+".

We've named him Righteous. He reminds me of a skater dude, so he needs a really cool name. I know he's faceless right now. Don't worry, I'll take care of his adorable mug later today. I wanted to get the tutorial up as soon as possible because if you are joining in on the Bonus Craftivism Challenge, you need to mail your bunny (bunnies) no later than Monday, and then you'll need to mail them Priority Mail. So let's get started!
You will need one pair of size large cotton socks in at least a medium length. I used men's boot socks I found at Dollar General (2 pair/$4). I like how they looked like traditional sock monkey socks. You can use whatever socks you'd like.

You will also need a needle and thread, pins, polyester stuffing, and either a fabric marking pen (this is what I used) or a pencil, and decorations of your choice. Just remember, for The Bunny Project, if you use buttons, you must label your bun "Ages 4+".
As you put this little guy together, you'll see a lot of similarities to our glove bunny, so if you're new to sewing, this is a great "next-step" project for you.
Here is the template I used as my inspiration for my bunny. If you like to make sock monkeys or would like to learn, this is the best pattern, with the easiest instructions, I've found. Obviously, to make a bunny, we're going to do a few things differently, but you can get an idea of how this is all going to go together.

Time is short so let's get started!
Trim the cuff off one sock and save it for later. Stuff this sock up into the toe, and fill the foot portion roughly 1/3 full. Run a gathering stitch under the stuffing, starting in the center back and leaving a long starting tail. When you get all the way around, pull the starting tail and working thread to gather your sock around the stuffing. Do the criss-cross we did with the glove bunny, and tie TIGHTLY to secure. Snip threads close to your knot. This will make the little bunny head.


Pin through all the layers to mark the paw on the other side, then flip and trace the line that the pins make. Your paws may not be exactly identical, but they will be close.

For the ears, draw a straight line down from near the center of the toe. This will give your bun a little tip of color on his/her ears. You can make your ears as long or short as you'd like. Repeat the pin and redraw procedure.

After marking, stitch on the lines either on your sewing machine or by hand. Be sure when you stitch the ears that you leave the bottom open! After the ears and paws are stitched, cut them free from the sock. Turn them right side out. Here you can see one of each right side out, and one still inside out.

And now the fun begins! Stitch the ears and arms onto your bunny. I liked sewing the ears just below that black spot on the toe. Kind of like they are sticking out from under a little hat. I also sewed the arms on a bit high so they'd be covered by that leftover cuff. Speaking of which - roll the raw edge under.

Slide the cuff over the bunny's head. It will look like a little turtleneck.
Special Addition: To make the tail: cut a circle from leftover sock material. I used the inside of a canning ring as a template.


So this is where you need to call on your own creativity. Obviously, this little guy needs a face. I am going to embroider it. You can do the button eyes like we did for the glove bunny. You can add clothing (please remember choking hazzards for little ones and label your bunny appropriately when shipping). You could do fabric ears. Just have a lot of fun with it! Make a bunch!
As of today, I have 5 at my house and a commitment for 1 more. I'm hoping to get 100 donated. I need your help to do this! If you could take an evening this weekend and make a bunny, and ship it out either Saturday or Monday via Priority Mail, I know the children in Harrisburg will appreciate your generosity!
Remember, the bunny goes in a plastic bag to keep it clean. Label "Ages 3 and Under" or "Ages 4+".
Ship to:
First Church of God
1520 Mchaney Road
Harrisburg, IL 62946
THANK YOU!!!
Sunday, March 25, 2012
Orphaned Glove Bunny Love
Winter is over, and if you have kids, I can promise you that you have a TON of "lonely gloves". Here's a great project to make with them...
Who would've guessed that we would have 8+ days above 80 degrees in northern Illinois in March. Seriously. And with the warmer weather, everyone has been packing up their winter gear, and in this process, maybe you've found a few gloves that are missing their mate. This post by Tamika at No Time for Tea Parties is a great tutorial of how to make a glove bunny from these "lonely gloves".
These are just so cute, I decided to give it a try myself, and I added a few touches of my own. Here's what we are making today.
 Isn't she sweet? Tamika's glove bunny makes a perfect "blank canvas" for your inner doll maker. The whole process is also easy enough to follow that children can get in these too - think of this as a great project for your Brownie or Junior Girl Scout troop to do. This little cutie is all done with hand sewing, so if you're not comfortable sewing with a machine, you should seriously consider giving this a go.
Here's what you will need: Stretchy knit gloves. You can use orphans or pick up some at a dollar-type store pretty cheap. The top two pairs in the photo below we had as leftovers from a 3-pack. The bottom 8 pairs (those are all 2-packs), were on sale at our local Dollar General for $2 instead of their usual $3. That makes these gloves $1/pair. And since one pair of gloves makes 2 bunnies, that puts our little friends at 50 cents each. I think I can fit that into my craft budget! I thought the bright striped gloves would make for some really fun bunnies!
 You will also need a sewing needle and a spool of thread that matches your glove, some stuffing (polyester fiberfill or your filling of choice), and an embroidery needle and embroidery floss to give our hare a face. Other decorations will be described below. These are entirely optional, but they are a great way to use up items in your stash.
Here is the pair of gloves I decided to use first.

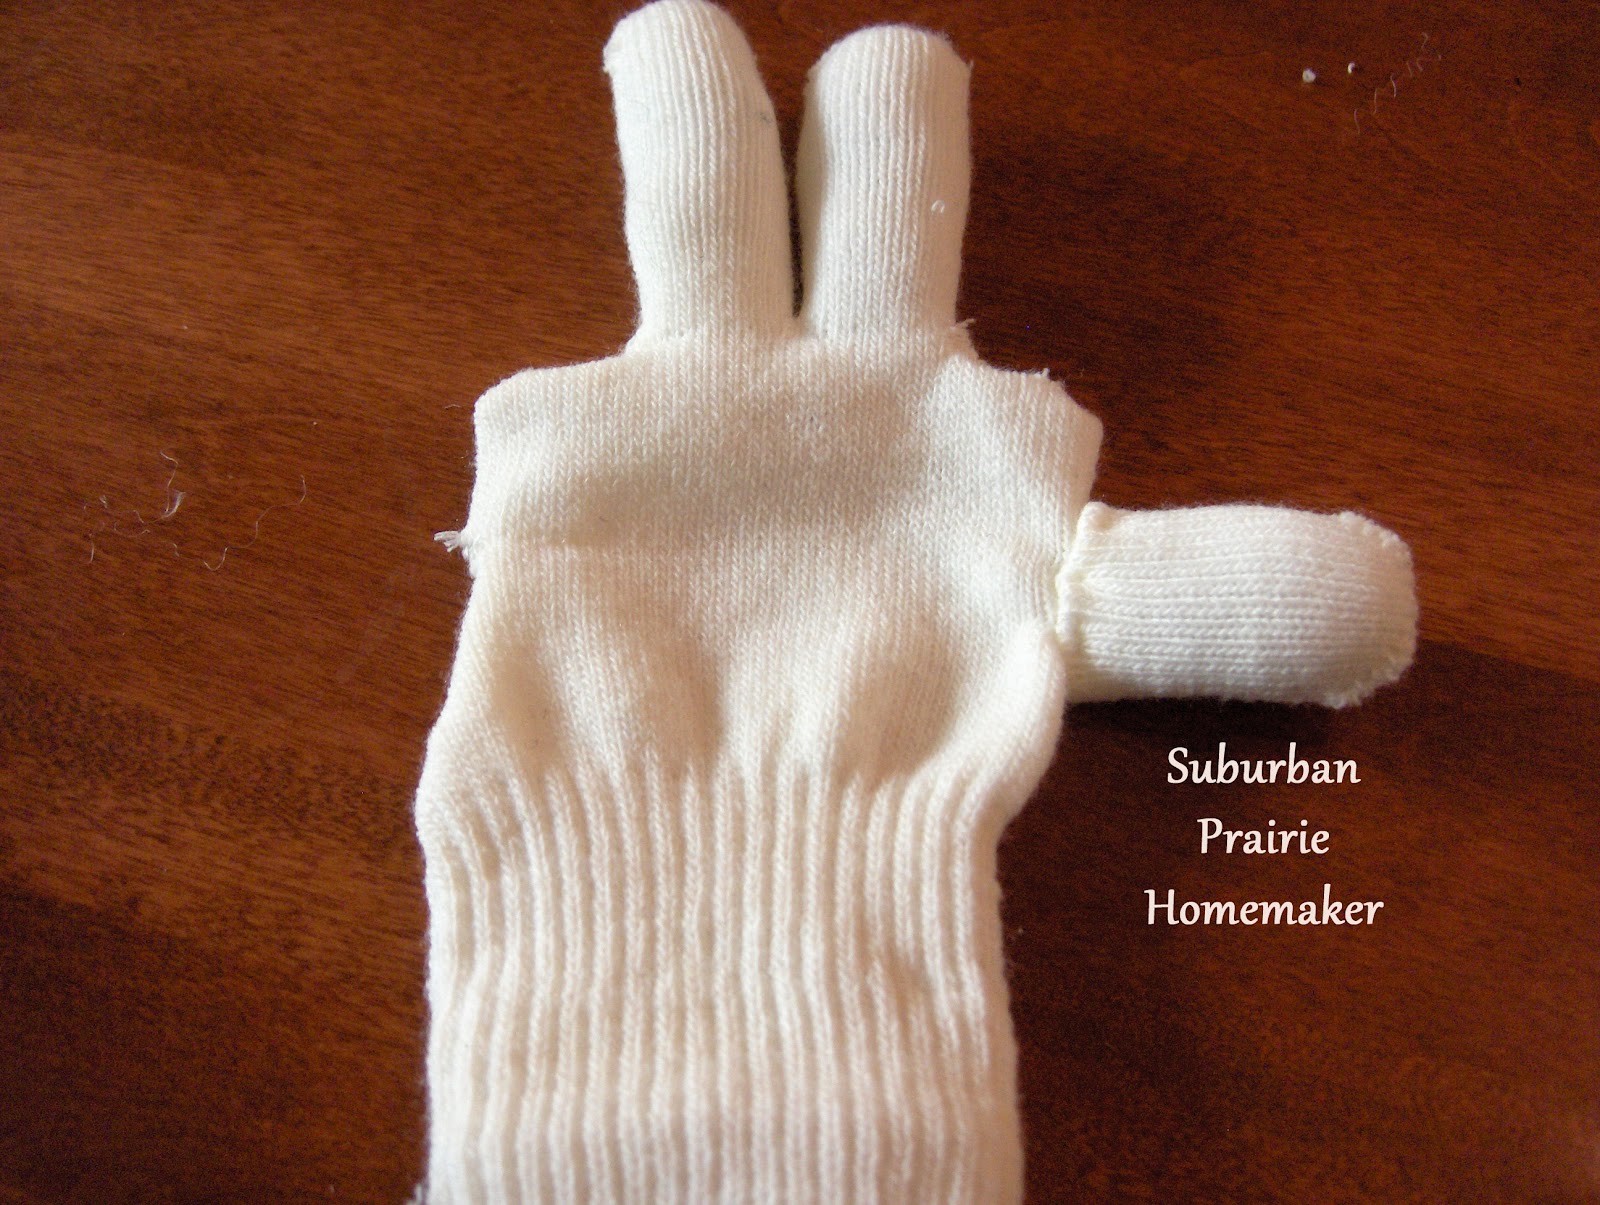
Following Tamika's directions, I trimmed off the thumb (straight line right along the hand portion of the glove), index finger, and pinky. I also trimmed the thumb piece straight, and made it the same length as the index finger. You'll see why in just a bit. Now, turn the glove inside out.
Carefully snip open the cuff.
 Like this.

Stitch the finger and thumb holes closed. I originally used an overcast stitch, but I will use a small running stitch when I make the next one. It will leave a more finished edge on the outside (and remember how finished edges take a project from homemade to handcrafted?). Turn your glove back around, right side out.
 Stuff the bunnies ears. If desired, you can run a gathering stitch across the bottom to give them more definition. Next, stuff the finger and thumb pieces.
 Tuck the edges in toward the stuffing. Sew the arms onto the body about half-way down. Here's arm #1.
 And arm #2.
 Snip the cuff in half to make two legs.
 Stuff the very top part of the body. Make a long running stitch under this stuffing. This will make the bunny's neck. Leave a long tail. Holding this tail, pull the stitches tight.
 To secure, cross the threads in the back, wrap around and cross in the front, then wrap them around to the back again. Tie tightly, and snip threads close to the knot.
 Look at the cute little head!
So I have to apologize here - for this next section, you are going to have to just trust me on the directions. Not one single photo I took came out clear. Not one. Because I'm getting really good at Practice Mondays and Carry-Over Mondays. Everyone has to be good at something, right? My camera is a big-picture kind of being. It can't wrap it's little digital mind around all the small details.
Don't worry, it's not complicated at all. Just take your time, and go step by step. If you feel totally confused, feel free to email me (address on contact page). I'll do my best to help.
Our bunny is feeling hungry - her little tummy is empty. Stuff the belly portion ABOVE where the cuff/legs meet the future torso. Repeat the running stitch across the top of the legs, which will also sew up her "personal areas". If desired, you can run another set of stitching to give the legs more individual definition. I chose not to do this.
You will alse need to stitch up her inseam. The knit fabric of the glove should curl in towards the center of each leg. Use this to your advantage, and stitch this seam shut with the raw edges in. Overcast stitch here is fine. Stuff each leg with fiberfill. Roll the bottom of her bunny feet in towards the stuffing, and using a gathering stitch, sew them shut. You now have a perfectly usable bunny doll, made by upcycling a glove! Welcome to the world of dollmaking!
So it was at this point that I wanted to give my new friend some of the personality I knew she had inside. I started by giving her a tail. Take the pinky piece you saved and cut it about halfway between where the curve of the fingertip meets the straight side and the bottom cut edge. That was a mouthful, and hopefully you get the picture. The photo below shows a practice piece that I cut too short, but I think you can get a good idea. I actually cut it where the curvy portion meets the straight side, so when you make yours, cut about half-way between where you can see that I cut and that bottom raw edge. Make sense now?
 Add a bit of stuffing, fold in the raw edges and using a gathering stitch, sew it closed. Then sew it to your bunny's bum. I like how the tail helps stabilize her body for sitting.

Tamika used french knots to make her bunnies eyes. If you are making your bunny for a child under the age of 3, I suggest doing the same thing to prevent choking. I chose to do small buttons because my bunny will go to an older child, and also because I can't make french knots. You can also do whatever embroidery you'd like, or use felt/fabric. Whatever works best for you, using what you have on hand.

This is the "design on the fly" portion of our program today...
I also decided to give her some ribbons on her ears.

She needed a dress, so I snagged a piece of pretty floral that would match her eyes (and why I chose that color for the ribbon). I cut out a rectangle after doing a rough measure to make sure that the scrap would cover Miss Bunny all the way around.
 After cutting the rectangle, I pressed all the raw edges under 1/4". Then I folded the two short ends into the center of the rectangle and pressed. I cut along these new creases. Now, I had a front, which was the bigger piece, and two back pieces. This enables you to have side seams that you can stitch up to Bunny's armpits, as well as make a center back seam that accommodates her fluffy cotton tail. Match a back piece to a front piece (raw edges together, right sides facing) and measure where the armhole will begin. Mark that place with a pin. Start stitching from the hem up to the armhole. Hide your knot in the hem like this:
 Then just do a simple running stitch all the way up to the pin. Repeat for the other armhole on the other side.
 In the back, match the pressed edges and mark for the tail hole with pins, just like before. This picture shows the right side facing out. You need the wrong side facing out. I only used the right side of the fabric so you could see the pins better. Running stitch from hem to bottom of tail hole, and from top down to tail hole.
 Turn your garment right side out and help Miss Bunny into her fancy new dress. Match up the top of the back to the top of the front. If you need to, fold the top of the back down a bit more. Finger crease it.
 Hold the shoulders together with pins. I just matched the edges with no overlap.

Start in the center back, and do a gathering stitch all the way around the neck, pulling as needed to get it to fit. Knot your thread and trim the ends.
 And here she is in her finished dress!
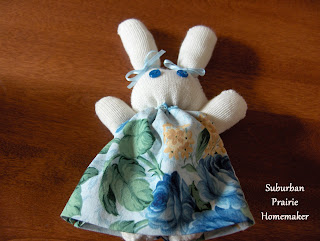 For the record, I went back and did a few extra stitches at the top and bottom of the tail hole, just to be sure it wasn't gappy or "immodest". This is where I also added the ribbon bow at the neckline. What you won't see here is the detail I added to the hem. I did some simple cross-stitching on the bottom of the hem. Nothing fancy - they weren't even all the same size. It was just a folk-art-type element that I thought would jazz up the dress a little bit more. I was right. You could also add some lace or other trims or stitching. Or not - your choice.
So what's a new dress without new shoes to go with it?!
I clipped the thumbs off a spare pair of black gloves.
 Trim the raw edges so they are straight and even. Fold the raw edges under, slide them on her little feet, and stitch them to the legs.
 Modesty is important, so our little miss needs some underthings. Start with a scrap of eyelet.
 I started in the center back, just under her tail, and stitched it to the body through the bound edge. When I got back to where I started, I overlapped the edges, and trimmed the curves to match. Then I stitched the crotch with about 5 or 6 quick stitches, to make it look like real lace bloomers.
 Like I said, I was designing on the fly. When you make your bunny, if you choose to do the bloomers, do them BEFORE you do the dress. Same for the shoes.
Final touch: embroidered her little nose and mouth.
 Embrace your inner dollmaker and have some fun with these. Make funky colors, make different clothes, add some hair. Add pink (or other color) to the ears. Give her a heart on her belly (like a Raggedy Ann (TM) doll).
Have a great rest of the weekend, everyone! See you tomorrow!
And PS - be sure you click through on one of the links above to thank Tamika for such a wonderul inspiration piece!
Who would've guessed that we would have 8+ days above 80 degrees in northern Illinois in March. Seriously. And with the warmer weather, everyone has been packing up their winter gear, and in this process, maybe you've found a few gloves that are missing their mate. This post by Tamika at No Time for Tea Parties is a great tutorial of how to make a glove bunny from these "lonely gloves".
These are just so cute, I decided to give it a try myself, and I added a few touches of my own. Here's what we are making today.

Here's what you will need: Stretchy knit gloves. You can use orphans or pick up some at a dollar-type store pretty cheap. The top two pairs in the photo below we had as leftovers from a 3-pack. The bottom 8 pairs (those are all 2-packs), were on sale at our local Dollar General for $2 instead of their usual $3. That makes these gloves $1/pair. And since one pair of gloves makes 2 bunnies, that puts our little friends at 50 cents each. I think I can fit that into my craft budget! I thought the bright striped gloves would make for some really fun bunnies!

Here is the pair of gloves I decided to use first.

Following Tamika's directions, I trimmed off the thumb (straight line right along the hand portion of the glove), index finger, and pinky. I also trimmed the thumb piece straight, and made it the same length as the index finger. You'll see why in just a bit. Now, turn the glove inside out.
Carefully snip open the cuff.


Stitch the finger and thumb holes closed. I originally used an overcast stitch, but I will use a small running stitch when I make the next one. It will leave a more finished edge on the outside (and remember how finished edges take a project from homemade to handcrafted?). Turn your glove back around, right side out.


So I have to apologize here - for this next section, you are going to have to just trust me on the directions. Not one single photo I took came out clear. Not one. Because I'm getting really good at Practice Mondays and Carry-Over Mondays. Everyone has to be good at something, right? My camera is a big-picture kind of being. It can't wrap it's little digital mind around all the small details.
Don't worry, it's not complicated at all. Just take your time, and go step by step. If you feel totally confused, feel free to email me (address on contact page). I'll do my best to help.
Our bunny is feeling hungry - her little tummy is empty. Stuff the belly portion ABOVE where the cuff/legs meet the future torso. Repeat the running stitch across the top of the legs, which will also sew up her "personal areas". If desired, you can run another set of stitching to give the legs more individual definition. I chose not to do this.
You will alse need to stitch up her inseam. The knit fabric of the glove should curl in towards the center of each leg. Use this to your advantage, and stitch this seam shut with the raw edges in. Overcast stitch here is fine. Stuff each leg with fiberfill. Roll the bottom of her bunny feet in towards the stuffing, and using a gathering stitch, sew them shut. You now have a perfectly usable bunny doll, made by upcycling a glove! Welcome to the world of dollmaking!
So it was at this point that I wanted to give my new friend some of the personality I knew she had inside. I started by giving her a tail. Take the pinky piece you saved and cut it about halfway between where the curve of the fingertip meets the straight side and the bottom cut edge. That was a mouthful, and hopefully you get the picture. The photo below shows a practice piece that I cut too short, but I think you can get a good idea. I actually cut it where the curvy portion meets the straight side, so when you make yours, cut about half-way between where you can see that I cut and that bottom raw edge. Make sense now?


Tamika used french knots to make her bunnies eyes. If you are making your bunny for a child under the age of 3, I suggest doing the same thing to prevent choking. I chose to do small buttons because my bunny will go to an older child, and also because I can't make french knots. You can also do whatever embroidery you'd like, or use felt/fabric. Whatever works best for you, using what you have on hand.

This is the "design on the fly" portion of our program today...
I also decided to give her some ribbons on her ears.

She needed a dress, so I snagged a piece of pretty floral that would match her eyes (and why I chose that color for the ribbon). I cut out a rectangle after doing a rough measure to make sure that the scrap would cover Miss Bunny all the way around.


Start in the center back, and do a gathering stitch all the way around the neck, pulling as needed to get it to fit. Knot your thread and trim the ends.


So what's a new dress without new shoes to go with it?!
I clipped the thumbs off a spare pair of black gloves.


Final touch: embroidered her little nose and mouth.

Have a great rest of the weekend, everyone! See you tomorrow!
And PS - be sure you click through on one of the links above to thank Tamika for such a wonderul inspiration piece!
Thursday, March 22, 2012
Anthro Inspired Upcycled Denim Skirt Preview
This is what I entered in Creative Bloggers Got Talent, and I thought you'd like to see it...
When I saw this one, I KNEW I had to make one!
I don't have a tutorial for this (yet), but I'll share with you some photos...
Here is the inspiration piece:

And here is the front of mine...
 And the back...
 And here is the fancy technical description of what you've been seeing:
This is a ladies' fitted skirt with set-on waistband, darts, set-in zipper and button closure. Patchwork is created from upcycled denim jeans and some home dec fabric, set on a base/lining of muslin. It is accented with self-designed and crocheted flowers (made from cotton yarn) and decorative stitching.
I had so much fun putting this little number together, I'm going to do another one - this time I'm thinking denim and quilt fabric. Maybe one with just quilt fabric. Maybe both - you know me. I'm also thinking about doing some of the crocheted trim. I promise I really will make a tutorial for this! I just wanted to share it with you, and whet your appetite.
Happy Friday, and have a great weekend!
When I saw this one, I KNEW I had to make one!
I don't have a tutorial for this (yet), but I'll share with you some photos...
Here is the inspiration piece:
And here is the front of mine...


This is a ladies' fitted skirt with set-on waistband, darts, set-in zipper and button closure. Patchwork is created from upcycled denim jeans and some home dec fabric, set on a base/lining of muslin. It is accented with self-designed and crocheted flowers (made from cotton yarn) and decorative stitching.
I had so much fun putting this little number together, I'm going to do another one - this time I'm thinking denim and quilt fabric. Maybe one with just quilt fabric. Maybe both - you know me. I'm also thinking about doing some of the crocheted trim. I promise I really will make a tutorial for this! I just wanted to share it with you, and whet your appetite.
Happy Friday, and have a great weekend!
Subscribe to:
Comments (Atom)